Alternate titles: How to dual-boot Linux Mint 13 and Windows 8 Pro; dual-booting Windows 8 and Linux Mint 13 MATE/Cinnamon side-by-side.
This article is this website’s latest on Linux Mint, a Linux distribution based on Ubuntu Desktop. Previous articles are available on the distribution’s category page at http://linuxbsdos.com/category/mint.
After writing dual-boot Windows 8 and Ubuntu 12.10 on UEFI hardware, the natural thing to do, is to follow up with one for Linux Mint 13, the current stable edition of the popular desktop distribution. So, using the computer I assembled using an ASRock motherboard, and the same hard drive, I made my first attempt to set up a dual-boot system between Windows 8 Pro and Linux Mint 13 on a computer with UEFI firmware, and on a single hard disk drive (HDD).
I tried two different methods: First, using the installer’s automated installation modes, then followed by doing it manually. Both methods worked on first try, no errors whatsoever. What follows is a step-by-step guide on how I did it.
Note: Before attempting this, be sure to set the SATA mode to AHCI on your motherboard’s UEFI Setup Utility. The motherboard on the computer used for this tutorial is a UEFI firmware-only system, not a dual-UEFI/BIOS unit. Also a 32-bit installation image of Linux Mint MATE/Cinnamon was used, though the Windows 8 installation is a 64-bit system. If nothing else, this just demonstrates that you can use a 32- or 64-bit installation image of Linux Mint with either a 32- or 64-bit Windows 8 Pro, and not have any problems.
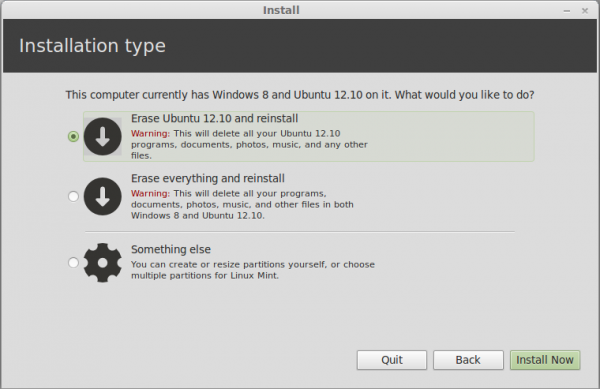
A. Method 1 – Automatic Disk Partitioning: This is the easiest and fastest method, but it comes at a price – more on that later. Here’s the situation with the computer I used. As you can see from the text in the image below, the single hard drive has an existing dual-boot system running Windows 8 Pro and Ubuntu 12.10. I had no intention of keeping the Ubuntu installation, so the installer’s automated options were just fine with me.
The drawback that comes with this method, is that GRUB, Mint’s boot loader, will be installed in the Master Boot Record (MBR), or in the first sector of the HDD. That action overwrites Windows 8’s boot files in the MBR, given GRUB sole control of the boot process. That works fine, until you decide to upgrade or reinstall Windows 8. Even installing some anti-virus programs have been known to mess with the contents of the MBR. That’s the price you pay for using the installer’s automated or automatic disk partitioning methods.
So while this method works, it is not the recommended approach. I just tried it just to see if it will work. And it did, on first try. All I did at the step shown in this image, is stick with the default selection, then clicked Install Now. That was it. After installation and reboot, the entries in GRUB’s menu allowed me to boot into either Mint or Windows 8 Pro.

B. Method 2 – Manual Disk Partitioning: This method will involve a little bit more effort on your part, but it is the recommended one. It will install GRUB, in the boot partition of Mint, never touching anything in the MBR. The next steps show how it was done. Like the first method, this one also worked on first try.
1. Disk Partitioning Methods: Because disk partitioning will be done manually, the option to select here is Something else. Selecting that and clicking Next should take you to the installer’s Advanced Partitioning Tool.

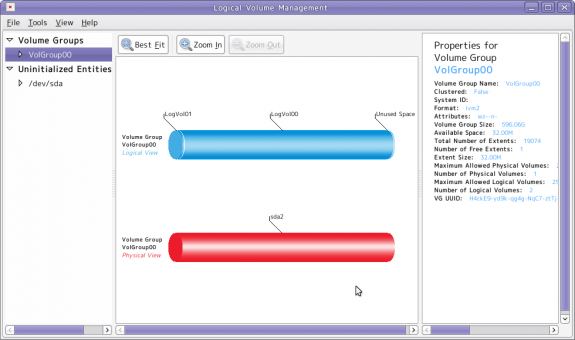
2. Advanced Partitioning Tool: This is the installer’s Advanced Partitioning Tool‘s window. The machine used for this tutorial had a second HDD (/dev/sdb) attached to it. But it will not be touched at any time. All the action will be taking place on /dev/sda. Under sda, you can see two Windows 8 partitions, and the free space. The free space is what will be used to create partitions for Linux Mint. Select it, then click the “+” button. Note that because there are two existing primary partitions on the system, you can only create two more primary partitions. You can read more about that here. For this tutorial, four partitions will be created for Linux Mint. They will be mounted at /boot, /, /home, and Swap, and created in that order. /boot is where GRUB will be installed, / is where all the programs will go, /home is where your home folder will be created under, and Swap is unformatted disk space that the system may use as virtual memory.

3. Create Boot Partition: The first partition will be mounted at /boot. By default, the installer will want to create it as a logical partition. For this tutorial, I chose to create it as a primary partition, just because I have enough primary partitions left to do it. If you only have one primary partition to use for Mint, then you have no choice but to use the default. So, I selected “Primary,” instead of “Logical.” I allocated 300 MB of disk space to it. I also chose Ext4 as the file system. That is the default. OK.


hello sir , i have successfully installed linux mint 14 on my laptop alongwith windows 8(already installed and working). i referred to your article given above and installed GRUB on separate space,i.e not replacing window’s MBR. after succefull installation it restarted and boot into windows 8. there, as given in article, i used program EASYBCD and added an entry for GRUB in windows boot menu. i selected grub2 as a type of grub. what other things i did there are, i selected linux mint as my default os, and also gave it first preference by using ‘up’ key, and shifting mint upper in position than windows 8(actually i don’t know what it really does, and also suspect this step for all problems that later appeared).now when i started the system, i first got option to select my os, but both choices were: linux mint 14(cinnamon) and whatever i select, i get following error:
GRUB4DOS 0.4.5b 2011-11-27, Mem:625k/2929M/0M,End:35560D
[Minimal BASH-like line editing is supported for the first word, TAB lists possible command completions. Anywhere else TAB lists the possible completions of a device/filename]
grub> _
and then underscore keeps blinking. i don’t know where the problem has occured but i suspect either the grub has replaced MBR or the system couldn’t find any one of GRUB or MBR. please help me . have found a lot of posts on above type of error but all of them have different causes. waiting for your reply. and thanks in advance.
Also check this out:
http://neosmart.net/forums/showthread.php?t=11135
Thoughts.
AS said, while your motherboard is UEFI capable, you are not using it and this tutorial has absolutely nothing to do with anything UEFI. The fact there is no primary partition limit and no logicals on GPT, should have been a major clue.
This (like your other tutorials) is really just dual booting on UEFI hardware, not UEFI dual booting. You’re booting the machine in BIOS emulation mode which your mobo likely defaults to (it must have the other option), so you don’t have GPT, you don’t use the UEFI boot manager, and you’re not showing how the automated and manual install process works. I know Ubiquity, Anaconda, Yast and debian-installer can set up a proper UEFI boot, and the Arch install scripts allow for various UEFI only setups, including the ability to boot the kernel directly, without a bootloader. You should look into exploring those options, it’s gonna be more of a advanced type of tutorial, but much more interesting.
You are absolutely correct. I’ll take that into consideration for the next one.
Great article, my problem with it is…after reading as much as I can find about this, I turned off secure boot in the BIOS. Turned off fast boot and that seems to be everyone’s answer. With the “boot mode” in the BIOS set at uefi, the boot able disc is never found. Everyone tries changing the boot mode to cms. I did this and can boot from the disc. The problem arrives after installing in this boot mode, you cannot get back into win 8. How did you boot from a live disc, with the BIOS set in uefi?