One tool that has seen very little or no change over the past several releases in Ubuntu Desktop is the installation program. So it is somewhat surprising that some users are having a hard time dual-booting Windows 7 and Ubuntu 12.04 using a tutorial written for Ubuntu 11.04.
Stemming from comments in that article, and email from readers, I decided to revisit that tutorial using Ubuntu 12.04. So the purpose of this article is to show how to dual-boot Windows 7 and Ubuntu 12.04 on a computer with one hard drive. And it will be on a computer with an existing installation of Windows 7. If there is a need to, you may reinstall your copy of Windows 7.
If you want to attempt this on a computer with two hard drives, see how to Dual-boot Ubuntu 12.04 and Windows 7 on a computer with 2 hard drives.
To get started, download an installation image of Ubuntu 12.04 from here. Depending on your platform, you may download the 32- or 64-bit image. Screenshosts used in this tutorial were taken from test installations using a 32-bit installation image in both a virtual environment using VirtualBox, and on real hardware. In either case, I did not encounter any errors that others have reported, so I am certain that if you follow this guide, you should have a computer with both Windows 7 and Ubuntu 12.04 installed in a dual-boot configuration.
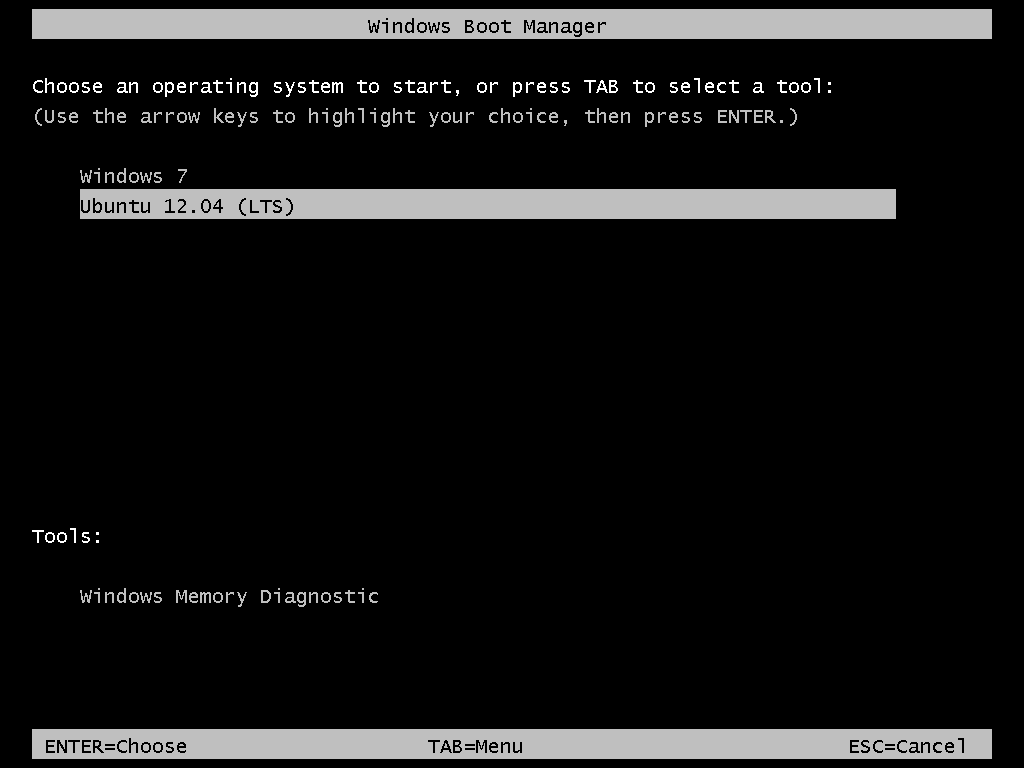
So that anytime you reboot the computer, you should see Windows 7’s boot menu with two entries listed – Windows 7 and Ubuntu 12.04 (LTS). Then you may choose to boot into Windows 7 or Ubuntu 12.04.

Now that you know what the overall goal is, how do you get from here to there? First, understand that if you have a computer running Windows 7, that Windows 7’s boot manager is responsible for making sure that the system boots. Installing Ubuntu on the same hard drive throws another boot manager into the mix. So the most important decision you are going to make about this, is which boot manager (Windows 7’s boot manager or Ubuntu’s) do you want to be responsible for primary boot operations?
When dual-booting Windows 7 and a Linux distribution on a computer with one hard drive, the best option is to have Windows 7’s boot manager be the primary boot manager. Why? Because whenever you reinstall or update Windows 7, its installer will overwrite anything it finds in the portion of the hard drive where critical boot-related programs are installed. That portion of the hard drive is known as the Master Boot Record (MBR). Also, certain anti-virus programs have been known to mess with the contents of the MBR, so installing GRUB in another location will ease the maintenance headache associated with your system. This point determines where GRUB will be installed.
If you are not familiar with disk partitioning (in Linux) and dual-booting, it is highly recommended that you read guide to disks and disk partitions in Linux and tips for dual-booting Windows and Linux.
By default, a new installation of Ubuntu 12.04 is installed on two partitions – a main partition, and Swap. The main partition is usually a primary partition and the Swap, a logical partition. And if Ubuntu is the only operating system on the hard drive, you will see both partitions labeled /dev/sda1 and /dev/sda5. Because you are going to install it on a computer with another operating system on it, the partitioning scheme will have to change.
The recommended partition scheme that will work better with the system you are about to install will have at least three partitions. They are the:
- Boot partition – This is where GRUB will be installed, instead of in the MBR. Installing GRUB in the boot partition is where users have encountered errors, so pay particular attention to what you do with this partition
- Root partition – This is where all the programs will be installed
- Home partition – This is optional, but it helps to have your files and folders on a separate partition
- Swap space
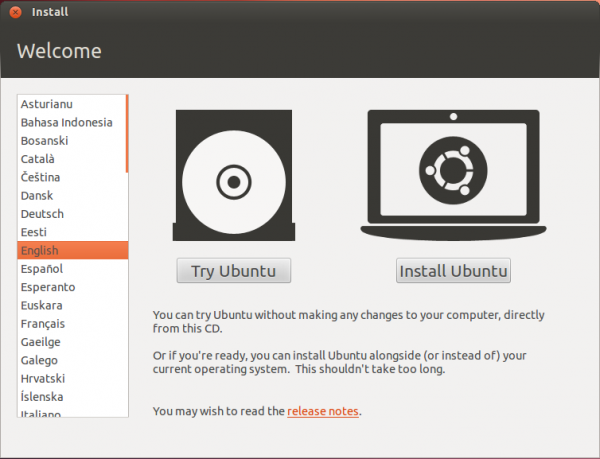
I think what you need to do should be pretty clear now. Time to begin the process! If you have not done so already, burn the installation image (of Ubuntu 12.04) you downloaded to a CD or transfer it to a USB stick, and boot the computer from it. When booted from the CD, you will be given the option to boot into a Live Desktop or start the installation without visiting the Live Desktop. It does not matter which option you choose, but booting into the Live Desktop and starting the installation from there seems to be a very good choice.
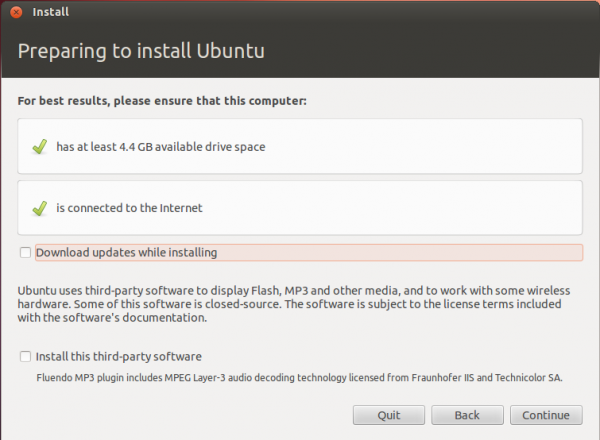
Whether the installation process is started from the Live Desktop or not, clicking through the installer gets you to the step shown in the image below. The most important information here is the minimum disk space (4.4 GB) recommended for a successful installation of Ubuntu 12.04. That piece of information will help you determine how much disk space to allocate to the root partition.
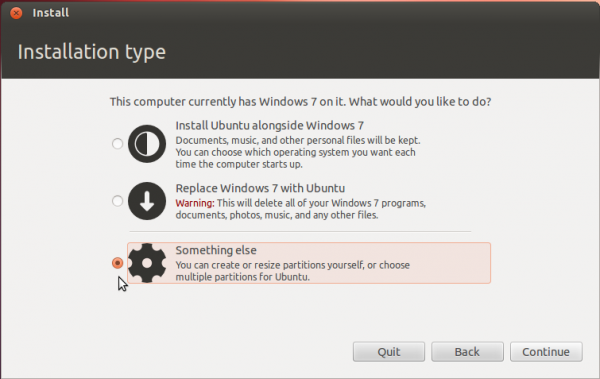
Clicking Continue from the previous step will land you here. If, as in this example, you have Windows 7 installed on the target hard drive, you should see the same three options shown here. Because you will be creating partitions manually, the option you want to select is Something else.
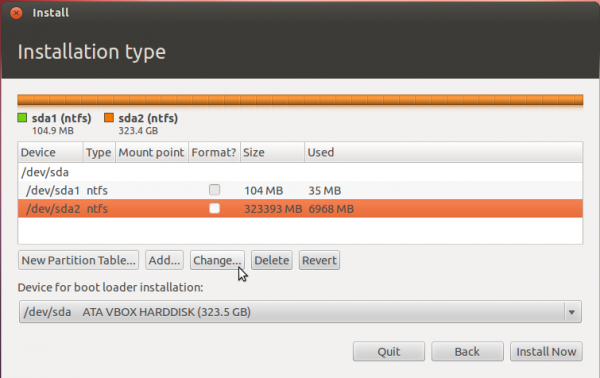
That should bring you to the Advanced disk partitioning tool. Again, if we are operating from the same point, that is, if you have a default installation of Windows 7 on the target hard drive, you should see two ntfs partitions (/dev/sda1 and /dev/sda2) listed. The main Windows 7 partitions, also popularly known as the C drive, is your sda2. To install Ubuntu, you will have to resize that partition. Note: If have free unallocated space on the hard drive, you do not have to go through this partition resizing process. To resize the partition, select it and click the Change button.
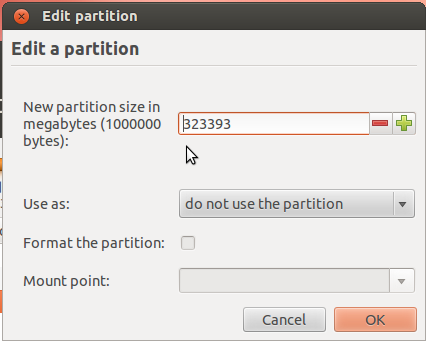
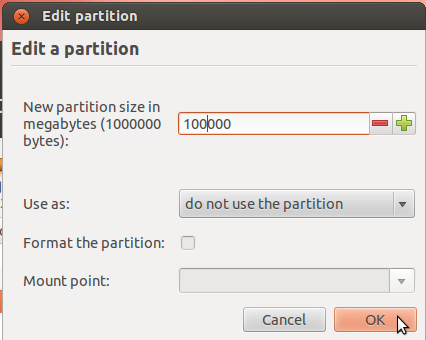
That should open this window. The only thing to do here is tell the installer how much disk space you want to keep for Windows 7. The rest will be used for Ubuntu. The system used for this tutorial has about 324 GB of disk space. I chose to keep 100 GB for Windows.
So the window now looks like this. Click OK.
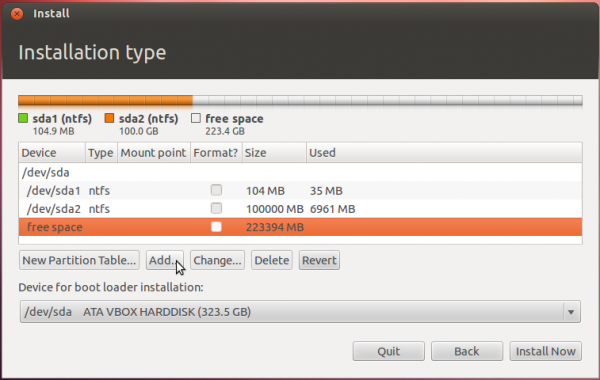
After the partition has been resized successfully, you should see the freed space marked as free space. Select it and click Add to start creating partitions for Ubuntu 12.04.


This is a magnificent tutorial! Never has setting up a dual-boot system been so easy (at least for me, anyway).
One quick question. I’ve edited my /etc/default/grub file such that GRUB_TIMEOUT is set to 0. Yet, I’m still seeing the GRUB menu after the Windows menu. Any thoughts?
Running the command update-grub should fix it.
Boom! You are officially my hero. 🙂
Seriously, thanks very much!
Got a problem here. Using EasyBCD, it keeps throwing me into something titled GRUB4DOS. What should I do from here?
If I manually select to boot to ext4 filesystem from EasyBCD, it is just showing a blinking cursor. I retried 3 times for the Ubuntu installation and I am very sure that I have chosen to install boot loader at /dev/sda5/
Here is how my drive looks. Any ideas how to fix this?
I am on Thinkpad x120e.
/dev/sda1/ windows boot partition ~100MB
/dev/sda2/ C: Windows 7 x64 installation ~70GB
/dev/sda3/ D: NTFS ~200GB
/dev/sda5/ ext4, Ubuntu, Grub, /, /boot ~16GB
/dev/sda6/ swap ~3GB
Try any of the other options in EasyBCD.
I don’t see anything in the partitioning scheme that could be causing it, but in future, always try to create D at the end of the HDD. Doing that puts the Linux boot loader closes to the first sector of the HDD.
Great guide. Worked perfectly. The couple times I had tried to install Ubuntu using the “install alongside Windows 7”. However, I wasn’t aware it would default to the Ubuntu boot manager; and it was causing problems when trying to enter Windows. Thanks again!
Hello, I am following the steps one by one described here. The partition is done successfully and I see the freed space marked as free space. The problem is, I don’t see the Add button. I have only Change and Revert. What do I do?
Thank you
Is it that you don’t see it or it is greyed out? I’m assuming it was there when you were creating the other partitions, right?
It is not there or anywhere. However I did it, by choosing Ubuntu alongside Windows. It works perfectly now, BUT I am facing another issue and I have no idea what the cause is: When running Ubuntu, the machine shuts down by itself, no warning, no nothing.
Could be a hardware issue. What PC are you using, and what grapics card is installed?
Hey, Finid, I followed this tutorial to a T back in October/September and I’ve never had any issues with it at all.
Now, given that my system is set up in the same way that’s been described in this tutorial, how can I upgrade my 12.04 to 12.10 and keep the basic structure same? (Primarily, Windows and GRUB boot loaders on different partitions)
I tried doing a direct upgrade, but I ended up borking my Ubuntu, and I had to do a reformat.
Thanks
First step is to backup your data. That means everything that you cherish in your home folder, or everything under in /home/ .
Then follow the simple steps given at https://wiki.ubuntu.com/QuantalQuetzal/ReleaseNotes/UbuntuDesktop#Upgrading. I have been able to upgrade without backing up anything, but that does not mean you should do the same.
Nice and easy-to-follow tutorial, but I have problems with Ubuntu.
I tried it with at least two copy of both 12.04 and 12.10. First neither the installation nor the Ubuntu live didn’t start. I could start installing by writing “nomodeset” after pressing F6 at the end of the command row. Then installation went without any problems. EasyBCD works fine too. But when I start my notebook, and I select Ubuntu it goes to an other (I think) bootloader. I can choose Ubuntu, Ubuntu advanced options, memory test, another memory test, and Windows7. If I choose Ubuntu everything goes black and nothing happens. If I choose Unubtu advanced optios, non-graphical interface works, but nothing more. Any idea?
Thanks a lot guys!
UPDATE
I followed this tutorial on my desktop pc and it worked fine. I found out that Ubuntu switches off the backlight. I can see there’s something on screen, but without backlight. This problem occurs only on my notebook. It’s a HP-G62 with Intel core i3 2.27 GHZ 64 bit and Intel HD graphics vga. Do you know about any solution?
Yeah, don’t buy HP/Compaq pieces of shit.
Beautiful tutorial – exactly what I needed!
I installed Ubuntu Server 12.04 LTS and added LXDE after. Now my old Intel T4200 dual core (Acer) laptop has a new lease on life. Before dual boot I could only run 32 bit Ubuntu in Virtualbox (slow) because no Vt-x…now I boot into 64 bit and it is WAAAY faster.
Thank you!!
What a great and clear tutorial!
Just two questions:
“computer should be connected to the Internet”; is wireless connection fine or should I have the (ethernet or whatever it is) cable connected?
I have Windows 7 on a Samsung 530U3C laptop, that might be affected by a scary bug.
https://bugs.launchpad.net/ubuntu-cdimage/+bug/1040557
Reading that thread it seems I should at least disable that UEFI and and maybe take some other precautions..
Do you have any tips on this?
Any form of Internet access if fine, though not having an Internet access is not a show-stopper, as you can still complete the installation without one.
Disabling UEFI might be a good idea.
That bug seems to have been fixed in the latest kernel release.
If I have my hard disk partitioned as C: and D: how will it show up in the ubuntu installer ?
I had seen something like sda1 and sda2. Off this which one is C: and which one is D:. Is there a sure shot way of finding that?
On a default installation of Windows 7, where its installer creates a system partition and a data partition, the C drive is typically sda2. If you then create another partition (D), that partition will be sda3.
From the Ubuntu installer, you can tell which is which only from their size, as the installer will see both as ntfs partitions, unless the D drive is not an ntfs partition.
Thanks. The latest I find is that ubuntu installer is not recognizing my windows partition at all. If I select the “something else” option for installation the partition table tells me:
sda1 : 107.4GB ntfs
sda2 : 142.7GB ntfs
where as from windows
C: 99.9GB and D: 132GB
I am not sure how to proceed. Do not want to risk loosing windows – which I did last time, when i went ahead and installed ubuntu on sda2 ( i had created the proper /boot , /swap, / partitions then. But after ubuntu installation, I cud never boot thru windows ! )
Well, from what you just posted, the installer recognized your Windows partitions just fine.
sda1 is the C drive while sda2 is the D drive. That you see ntfs under file systems tells you that the installer sees them as Windows partitions.
Now, you have two options. Shrink C and install Ubuntu on the free space, or shrink D and do the same.
Note: Before shrinking any partition, first verify from Windows how much space is recoverable.
I had done that previously. I had installed ubuntu on sda2 ( complete D drive was free ). However, after that system always booted in Ubuntu and did not show up windows at all.
Try it again. Let’s see if we can make it work for you.
Thank you
I have a Pacard Bell computer with 250 GB Hard Drive. It had a fresh unused windows7 installed. I used a ubunu disc to install ubintu 12.04 and it ran perfectly having roughly devided the drive into two roughly equal partitions. It worked perfectly loading either windows or ubuntu. Un fortunately both had a lot of updating to do. At the end of the latest ubuntu update it required a restart. Having closed down I started windows 7 which faild to start. when ubuntu was restarted it worked OK. The windows 7 now refuses to start nomatter which form I try. Can you help?
Where was GRUB installed and what type of error message are you getting from Windows?
The Windows Vista was preinstalled on a refurbished computer. The error is “Windows failed to start”. The options to start windows gets as far as “Microsoft Corporation” and the loading bar crossing the screen when it hangs up.If I try to load safe mode it loads a number of files up to “Loaded\Windows/system32/drivers/crcdisk.sys” and then hangs up.
The ubuntu 12.10 wasloaded from the disc in ubuntu user magazine which installed the GRUB where it normally does? I am sorry I cant be more helpful as I am an Old Beginner.
Thanks for your help , I tried using the info in UBUNTU USER issue 14 page 82. Unfortunately I used Figure 6 as my guide. It didn’t work. In exaspiration I got my Windows 7 reinstalled with the intention of reinstalling my Ubuntu. I,however, thought I would try the restoring Ubuntu instructions again. This time I used the instructions on the left hand side of the page and it worked. Back to the duaql booting system. The instructions on Fig.6 did not have the final line “sudo reboot”.
THANK YOU FOR TRYING TO HELP .
Hi, thanks for the tutorial.
I just have one question. At the moment, I have two partitions with Windows ( C: has 198GB with 157GB Free AND I have D: which has 398GB with 392 Free )
I just want to know if its possible to dual boot Ubuntu on the C drive and then have Ubuntu partitioned the same way as Windows and use D: for Ubuntu the same way I have windows set up ?
Thanks
Daniel
Question is kinda confusing. Please clarify.
Sorry,
Okay. I have one hard drive in my PC. But has been split up into two partitions ( C: and D: )
C: has Windows 7 installed and has 157GB Free
D: has all program files and has 392GB Free
I just want to know, is it okay to install Ubuntu on C: even though there is 157GB free?
Is it possible to have Ubuntu installed on C: and then to use D: for Ubuntu installs and files?
Hopefully that makes sense. Is there any other way I can contact you directly to get a quick answer ?
The short answer is yes, you can install Ubuntu on C, because that’s one of the options the installer will present to you.
The longer answer goes like this:
The confusion stems from the fact that the question is being asked as if C and D are separate hard drives, when, as you correctly stated, they are partitions on the same hard drive.
If you try to install Ubuntu on the system, the Ubuntu installer will see C and D as two partitions of /dev/sda. And since the hard drive has Windows 7 on it, there should be a System partition on it, in addition to C and D.
So the installer will see 3 partitions:
Note that where you install Ubuntu is where its files will be located, you do not need to put any file on D, unless you want to use it as a data partition for both OSs.
What you can do, is boot the system using the Ubuntu CD/DVD, then post the partitions you see from the Advanced Partitioning Tool’s window here.
That way, I can give you a better idea of how to proceed. Meanwhile, you might want to read guide to disks and disk partitions in Linux.
Ok here is the file structure
/dev/sda
/dev/sda1/
/dev/sda2/ ((C:) Windows )
/dev/sda3/ (D:)
So I will need to install it on C: and split the windows drive up so Ubuntu has space.
What I’d like to know is if I’m able to install Ubuntu on D: as it has more space on it
Yes, you can. It will work perfectly.
Ok here is the file structure
/dev/sda
/dev/sda1/
/dev/sda2/ ((C:) Windows )
/dev/sda3/ (D:)
So I will need to install it on C: and split the windows drive up so Ubuntu has space.
What I’d like to know is if I’m able to install Ubuntu on D: as it has more space on it
Excellent tutorial – worked perfectly.
One comment; I purposely made a smaller partition for windows using it’s installer, leaving freespace for the Ubuntu load. Never liked having the partioner reduce the Windows partition….
One Question; When booting into Ubuntu, it’s boot loader comes up as well… Is there a way around that? Just make it go right into Ubuntu? Oh, and of course, Win 7 is listed!
I suppose I should do a wed search but thought I’d ask….
Edit /etc/grub/default and change GRUB_TIMEOUT=10 to GRUB_TIMEOUT=0.
If you are new to Linux, this article will come in handy.
Really helpful article. Cheers for that.
I must add that it would be “/etc/default/grub” in place of “/etc/grub/default”.
this was very straightforward and helpful. I appreciate your effort. Keep up the good work!
Hey, nice clear tutorial, but I am still having problems dual-booting on a new 64-bit i7 box (which I assembled myself). I installed Win7 first, then followed your instructions carefully (except that I created primary partitions rather than logical).
Win7 works fine, but when I select the Ubuntu 12.04 option from the boot menu I get a grub prompt rather than Ubuntu.
Can you help?
That could be caused by any number of issues. Perhaps the boot partition is too far from the first sector of the HDD, or the system could not find GRUB where you told it to look.
So, what’s the size of HDD and how far is boot located inside? Somethings selecting a different option in EasyBCD will do the trick.
Actually I think I may have selected the wrong partition for the boot loader. I deleted everything and repeated the procedure from scratch and it worked. Thanks, anyway.
Yes, I’m having the same issue where choosing Ubuntu from the Windows Boot loaders takes me to a grub prompt.
I have a 500 GB drive and my /boot partition is about 410 GB into the drive.
im also facing the same issue..Any suggestions for fixing this. I kept 100 GB for windows and 200GB after that for ubuntu.