There are several menu styles to choose from in the K Desktop Environment, but my favorite is the Takeoff Launcher, which is why I consider it one of 2 cool reasons to use the K Desktop Environment.
In this article, the steps you need to take to replace Kickoff menu, the default menu style on Linux Mint 12 KDE, are presented in an easy to follow manner. Like everything that goes on the KDE panel, Takeoff Launcher has to be added as a widget. Before you get to the stage to add the widget to the panel, the package has to be compiled or built from source. Why from source? Because I could not find a binary package for it for this distribution.
If you have never built a package from source before, do not fret. Building Takeoff Launcher from source is pretty easy. Just follow the steps outlined in this article and you will complete the whole process in no time. The screen shot below gives an idea how the finished product looks like.

If it appeals to you, and you want to continue, download the source code from here. Scroll to the bottom of the page and under “For other distros ..,” click on “Takeoff v1.0.” It is a compressed tar ball. Save it to any directory in your home folder. To make things a bit easier, just save it to your home folder.
Before messing with the code, there are four dependencies that must be installed. These are listed in the README file in the compressed tar ball you just downloaded. They are: build-essential, libqt4-dev, kdelibs5-dev, and libplasma3. Besides these dependencies, cmake, a program that you will need to build the package, has to be installed too. Note: libplasma3 is installed out of the box, so you do not need to install it. To install the other three dependencies and cmake, open a shell terminal (Menu -> Favorites -> Terminal), and type: sudo apt-get install build-essential libqt4-dev kdelibs5-dev cmake.
After those have been installed, now the fun part begins. I am assuming that you still have the terminal open, and that you are in your home directory or whatever directory you saved the compressed tar ball into. All the steps you need to take to compile this package are shown in the image below. The numbers indicate the commands you need to type, and the underlined folders, aside from the downloaded file, are where you need to be before typing the next command.

Explanation and purpose of the commands (Note: You need to press the Enter or Return key on the keyboard after each command):
- 1 – ls provides a listing of the files and folders in the directory you are operating from. From the output, you should see the file you downloaded. In the image below, it is the first underlined file (takeoff-1.0.tar.gz).
- Command number 2 is used to uncompress and untar or unpack the file. Type it exactly as shown.
- Command number 3, another ls command, is just to show where the contents of the compressed tar ball where extracted into. You can see that they have been extracted into a folder named takeoff-1.0. You need to be operating from that directory to compile the package.
- Command number 4, cd, is used to change directory into takeoff-1.0.
- Command number 5, yet another ls command, is just so you could view the contents of the takeoff-1.0 folder. At this step in the README file, you are told to create a directory named build. But as you can see, that directory already exists. That is the directory you need to be operating from to build the package.
- Typing command number 6 puts you in the build directory.
- Command number 7 builds the package. Type it and then sit back. It should be completed in a few minutes. If you followed the steps as outlined here, there should be no errors.
- The final command, not shown in the image, that you need to type, is: sudo make install.
After installation, the next task is to add the launcher’s widget to the panel. To do that, right-click on an empty spot on the panel’s task manager, and select Panel Options -> Add Widgets. Typing “take” or “takeoff” in the search box should ring up the widget. Double-click on it to add it to the panel. The launcher is ready for business. At this point, you might consider removing the other menu’s icon from the panel.

The launcher will open in fullscreen mode with an empty Favorite tab by default, but all that is customizable from its settings utility.

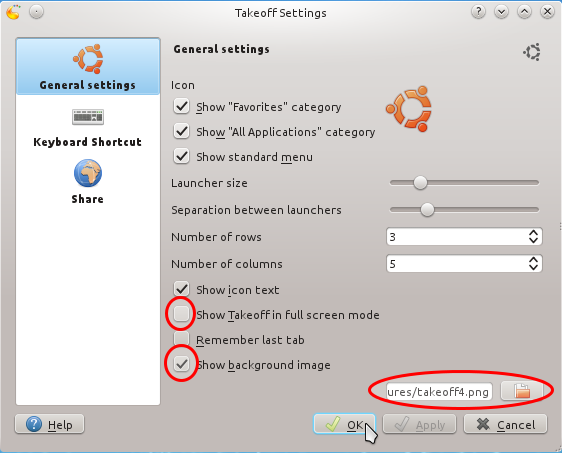
To access the launcher’s settings utility, right-click on its icon on the panel, and select “Takeoff Settings.” The options that you might want to change are indicated in red. I find that the launcher looks much nicer on the desktop when it is not in fullscreen mode. Also a background image gives it a personal touch, so if you have an image to use, check the option as shown and select an image from your computer. OK. Tip: The image I used for this is from a screen shot of a wallpaper.

This is what the Favorites tab looks like after tweaking the settings. Looks much better, right?

This is a view of the second tab, the All Applications tab. Real nice. If you do not like it, you can always go back to the default menu. One cool thing about Takeoff is you can personalize the background as much as your want.


Will it work on a 64-bit machine?
i am complete newbie to linux. I have spent the last hour right clicking (tried alt-right click too) on everything I could click on and I cannot find the panel options. Please help (Running Mint 12)
Closing all open windows will likely make it easier for you. When that’s done, right-click anywhere towards the center of the panel. you should see Panel Options > Add Widgets.
Sorry. I’m feeling really stupid right now, but where is the panel?
No need to feel stupid, we are all learning.
The panel is that long strip where the menu and other icons are on at the bottom of the desktop. The menu is at the far left while the calendar is to the far right of it. That is the panel.
Thank you for this tutorial, works on Kubuntu 11.10 x64 also, now I finally got the Takeoff Launcher working 🙂
You are very welcome.
hemm.. this is working on mint 12 bro.. thank you!!
Is it possible to scroll through programs or do I have to click on page 1, 2, 3, etc.?
Scrolling is supported. To do that, the cursor must be above the page bar. Note that the scrolling is pseudo-circular, not carousel-like.