Ubuntu is one of many Linux distributions with support for LVM, the Linux Logical Volume Manager. LVM is a disk partitioning scheme that brings a level of flexibility to disk management that is not possible with the traditional method. With LVM, you can, if necessary, increase the size of a partition online, that is, while the system is running, without unmounting the partition. You can also add another disk to the system if the old one becomes full. There are many more benefits that LVM offers, but the those two are more than enough reasons to consider using it.
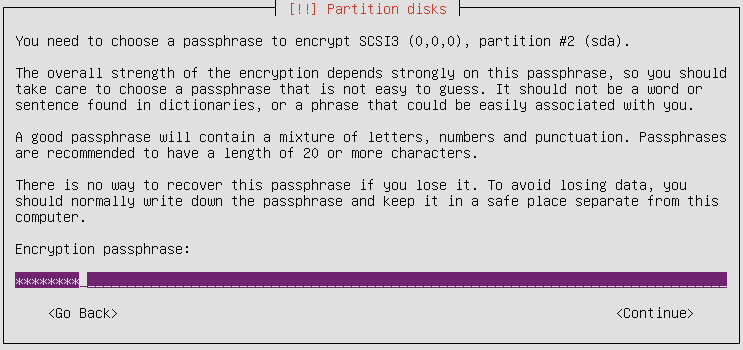
This tutorial presents a step by step guide on how to install Ubuntu 11.04, the latest stable release, on an encrypted LVM file system. Why is it necessary to encrypt the disk? For the reasons detailed here, disk encryption protects your data from unauthorized physical access. Like LVM, there is no downside to encrypting your disk.
Because the edition of Ubuntu with the graphical installer does not have support for setting up LVM and disk encryption, you will have to use an Alternate Installer ISO image. You may download a CD or DVD version here.
If you are new to LVM, here a a few terms you need to understand:
- Physical Volume (PV) – In LVM parlance, this is a disk or disk partition that has been initialized for use by LVM.
- Volume Group (VG) – A virtual container for PVs. So, you create a PV, create a VG, then add the PV to the VG. You can add very many PVs to a VG. The size of a VG is the sum of the sizes of its member PVs.
- Logical Volume (LV) – This is the equivalent of a disk partition. Just like you would create a partition from a disk, you carve out an LV from a VG. When carving out Logical Volumes, a rule of thumb is to allocate just enough space needed to install the system. If necessary, you can always increase or grow the size of an LV. You can also decrease or shrink it, but at the risk of losing data.
When using LVM, the installer creates one non-LVM partition for /boot, and two logical volumes – one for /, the root directory, and the other for Swap, disk space that the computer may use as virtual memory. In this tutorial, three logical volumes will be created – /, Swap and /home. Creating a separate LV for /home makes it a bit easier when you need to upgrade the system.
Ok, enough introduction. Let us get down to business. The tutorial starts at the disk detection phase. Four options are offered. The one of choose is Manual. Enter. Note this is not a graphical installer, so navigation is by keyboard. After making a selection, press the Enter key.

This step shows the disk available. If there are more than one, select the primary one, the one you want to use. Enter.

You will see this only if the disk has not been initialized. Key to Yes, then Enter.

The disk has been initialized. Ready to create the first partition. Select it, then Enter.

We want to create a new partition. Enter.

The first partition will be mounted at /boot. This is where all bootloader-related programs will be installed. On a default installation of Ubuntu, the size of this partition is 258 MB. You may use the same size or go slightly higher. Many Linux distributions assign 500 MB to it. Enter.

If this is a standalone installation, the installer will always want to create the first partition as a primary partition. If you are attempting to dual-boot and there are, say, three primary partitions existing under the other OS, the installer will automatically create it as a logical partition. For this standalone installation, we will take the default. Enter.

Stick with the default here. Enter.

The tasks at this step is to specify the file system and the mount point. For the boot partition, ext2 is the default on Ubuntu. For the mount point, select /boot. Scroll down to “Done setting up the partition.” Enter.

With the boot partition out of the way, the next task is to initialize the remaining space for use by LVM. Select the free space, then create another partition like you did for the first partition. By default, the installer will attempt to set it up as a logical partition. For a standalone installation like this tutorial’s, you may change it to “primary.” If trying to dual-boot with another OS, you will likely want to take the default.

These are the choices available for the “Use as” step. You might be tempted to select “Physical volume for encryption,” but the correct option is “Physical volume for LVM.”

Here is what it should be when you are done specifying how you want to use this partition. Scroll to “Done setting up the partition.” Enter.


“Note this is not a graphical installer…”
Ummm, yes, yes it is. You are using a “TUI”, a Textual UI. It is still “graphical” in the sense that the user chooses from a set menu of items and is guided through the process.
Could you please explain the passage:
“You might be tempted to select “Physical volume for encryption,” but the correct option is “Physical volume for LVM.”
why is that ?
If you follow the instructions on the next page, you should see why that was chosen.
Okay, I read all three pages.
Maybe I’m dumb, but I don’t see how that makes a difference.
As far as I understand, if I follow the instructions, it will be
LVM partition -> encrypted volume -> LVM volumes
However, if I specify the free space as physical volume for encryption, and THEN create an LVM on top of dev_sda#_crypt (the crypto volume that results from using free space as physical volume for encryption), wouldn’t it be like that:
encrypted volume -> LVM -> LVM Volumes
That is, essentially, the same ?
P.S.:
Just tried both in Lubuntu 12.04, and in both cases the LVM seems to end up on sda#_crypt…
… but if I follow the tutorial to the letter, it is sda5_crypt for some reason, however, if I specify the free space as physical volume for encryption, and then specify the resultant sda#_crypt as place for LVM, the cryptovolume gets named sda2_crypt.
No other difference seems to be present…
So, not to be an obtrusive nosy person (I am obsessive, not obtrusive! ^_~), what are the benefits of “encryption -over- LVM” as opposed to “LVM -over- encrypted volume” ?
Am I missing something big and obvious ?
I think this is a case where the installer offers two different options that essentially do the same thing. No matter which one you select, the end result seems to be the same. Don’t sweat the small stuff, though it’s always good to get these things clarified.
Can you tell us more about this? I’d like to find out
some additional information.
Hi, excellent tutorial!
Can someone also confirm, that – if I understand this correctly – once the partition is encrypted, there’s no need to encrypt the home folder too?
In a single-user system, encrypting /home after the disk has been encrypted does not really offer any meaningful security protection.
You can, however, encrypt specific files and folders within your home directory. With that, you may then hide certain docs, so that if another person happens upon your computer when you are logged in and not around, the hidden files will remain inaccessible. But if you have the screenlock activated when you are logged in and not around, you wouldn’t have to worry too much about that.
Thank you. So the only security hole with an encrypted LVM installation is that /boot is installed (& is unprotected) on the local drive. Any ideas (or a guide maybe) on how to properly install /boot on a USB thumb with encrypted LVM on the internal HDD?
I tried setting the USB drive as the /boot while partitioning, set the bootable flag, tried to set filesystem to ext4, tried it with ext2 also, but whatever I do, after start up I get dumped to grub rescue (unknown filesystem). Obviously, BIOS is set to boot first from USB. At the rescue prompt I get
set
prefix=(hd0,msdos1)/grub
root=hd0,msdos1
ls
(hd0) (hd0,msdos1) (hd1) (hd1,msdos1)
Now it seems, that grub is trying to load root also from the USB thumb, whereas the LVM is installed on hd1,msdos1.
(As a side note, why is it called ‘msdos’ – thought I got rid of Windows for good several years ago.)
Any ideas on how to do this properly?
You are obviously more paranoid (security conscious) than I am, which, btw, is a good thing, but “unprotected” /boot on the local drive is not such a big deal. I don’t think you can have it any other way, and I have not come across any case where a computer with an encrypted disk was compromised via /boot.
There have been very recent cases in courts where defendants are being forced to surrender their encryption passphrases because persecutors could not decrypt the drive.
Since you have /boot on a stick, the main system on the local drive, and the system is still trying to load main from the stick, you can edit GRUB to point main to the correct partition on the local drive.
Just to be sure, hd0 is the local drive, and hd1, the USB stick, so “LVM is installed on hd1,msdos1” should not be a correct statement. Right?
Since this is not something I have attempted before, I am not in a position to offer more practical advice on this, but it is an opportunity to try it myself. Let’s work on this together and see how we can make it work.
Yes, let’s, as I’m quite determined to get this to work. Through e-mail this might be easier though, can you contact me @ geophey@mailcatch.com (don’t worry, it’s a disposable address) or directly to my registered one (if you can see it)?
Let’s keep the discussion public, so others might benefit from it.
Well, I tried, and fedora works effortlessly, and with a GUI install. I haven’t found a way in Ubuntu yet.
Trying to get this done with Ubuntu’s installer is a pain in the neck. Canonical needs to work on Ubuntu’s graphical installer and the ncurses installer. They should take a break from trying to redefine the desktop and work to improve the installers.
Hi there, great tutorial.
I’ve followed it like it says, but instead used the language “Portuguese From Brazil” to install.
And when I get to the login in gnome, it doesn’t work the login.
It just get blank, and apparently won’t start gnome.(it show at the start a the update window, and other options, but they are all with strange unicode data, it show symbols instead of special characters).
When I loged in as root(from grub) and got to the /home/user folder it shows also the folders with this symbols instead of the regular characters.
Is this a known bug for encrypting the hole OS or could it be because I’m running in a VM?(using virtual box).
Thanks, and sorry for the bad english
Sounds more like a locale bug.
Yeah, it’s that.
I instaled the en-us version and no errors at all.
Can I just ask you guy one more question?
My gf is trying a dual boot (xp and ubuntu) but wanted a file partition that is accessible from both OS.
In the installation she divided the home in half and made a new FAT32, but in the mount point we got a little trouble… in the end she let the mount point as /windows.
Is this the right way to do so?
Thanks for the fast answer
The best and easiest thing to do is dual-boot as normal. Then you can read and write to the Windows side from Linux. This tutorial should help.
You do not have to do anything fancy.
I see, but that is the point, she’s excited with encryption and wanted to use this tutorial and do a dual-boot all together.
She can configure an encrypted system and still be able to access her Windows side while working in Ubuntu.
Thanks for the clear and consise tutorial, most helpful. There were a couple of screens which were not featured but I was able to guess that bit! Just waiting for it to install now! 🙂
great howto, thanks
Wow, very nice tutorial finid. It worked pretty flawlessly for Kubuntu 11.10 b2, though the alternative install CD evidently must actually be burned to physical CD, as USB live install couldn’t seem to get past the fact that I was installing to my HDD. Thanks again!
If i want create a logical volumen with two physical volumes i need to create two passwords. Is posible create an group volumen before encrypt ?
I’m sorry for my english. Thanks !
I’ve not investigated that use case, but if you refer to the image 3, counting from the top, on page 2 of the article, you are given the option to select one or more PVs to encrypt. I’m not sure about this, but I think if you have 2 PVs, the installer might allow you to specify just one password.
Have you tried it?
Very nice tuto!
To bad that the current installation procces is already a bit different. I installed using your walk through several laptops last 2 weeks, and suprise, the new alternative cd i burned this week is different from the one from the week before, takes a few extra steps to compleet.
Most importent, if installed on the end it asks if grub can be written on the disk, if i use a usb stick, it will write it automatically on the usb stick?!?!
So i burned a new cd, problem solved.
Also in the new installer there are 2 or 3 more screens where you have to say yes to writing the lv and the partitions on disk.
thanks for the tuto!
helped to make my life easier!
Can you do this on an external drive and dual boot with Windows 7?
Windows will not allow you to install itself on an external drive.