 Linux Mint 10 comes pre-installed with a very simple application that could be considered a parental control tool. Other than being a basic, uni-directional domain blocker, it is does not provide any other feature. So, if you want a parental control tool, one that provides all the features you expect in an application of that sort, you will have to install Nanny, an application that is not installed, but is available in the repository.
To install Nanny, launch a terminal and type sudo apt-get install nanny, or use the Software Manager. After installation, there should be an entry for it in Menu > Administration > Parental Control. There should also be an entry for BlackLists (Menu > Administration > BlackLists), which is used to load a blacklist database for use by the content filter component of Nanny.
This is the default interface of Nanny. From here, once authenticated, you can configure time-based restrictions to usage of the computer, Web browser, email client, and instant messaging clients.

As the administrative user, you can configure Nanny to fit your particular environment. Once you have determined how many hours of computer usage you want to allow, you then use the colored bars to set what hours of the day the pre-set time should be applied. One bar is an hour, and each bar is made up of two 30-minute halves.

The same applies to control over browser usage. Aside from the time restrictions, Nanny has a built-in content filtering component. Click on Configure to view the options.

With the content filter, access to certain websites can be blocked.

And allowed for other sites. Just the sites we love.

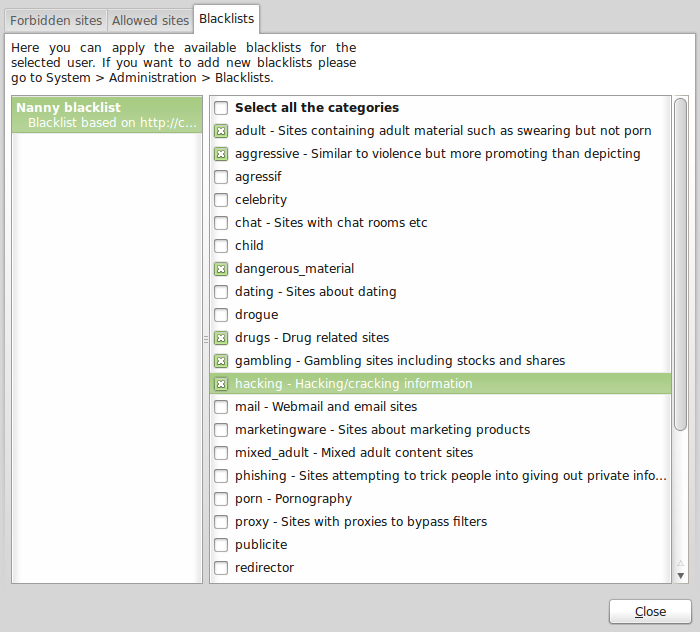
To use the blacklist feature, you need to download the blacklist database from here, then import it into Nanny by using the BlackLists utility – Menu > Administration > BlackLists. The list will then be available from the content filter configuration window.




Can I install Nenny on Ubuntu? And ( :-S ) on Windows, in my Job PC ?
I have just installed Mint Linux 12 on an old PC and am trying to make it ready for use by my kids. I have installed nanny, but when I try to start the Nanny console, I get nothing at all after I put my password in.
I have tried at the command prompt and get the following errors:
$ nanny-admin-console
/usr/lib/python2.7/dist-packages/nanny/client/common/Utils.py:33: GtkWarning: GtkSpinButton: setting an adjustment with non-zero page size is deprecated
object.xml.add_from_file (main_ui_filename)
/usr/lib/python2.7/dist-packages/nanny/client/common/Utils.py:54: FutureWarning: This search is broken in 1.3 and earlier, and will be fixed in a future version. If you rely on the current behaviour, change it to ‘.//object’
for obj in xml.findall (‘//object’):
uid: 1000, name: simon, user_name:
Any thoughts?
I don’t think you can import the blacklist database, it stuck every time I try to import it after downloading. Never works!
Perhaps you missed a step. Those images related to it would not have been taken if it did not work.