This short tutorial shows how to apply the Kali Linux nuke patch to LUKS cryptsetup in Linux Mint 16 and Ubuntu 13.10.
From a physical security and privacy-enhancing perspective, the nuke patch to LUKS cryptsetup is the best news from any distribution so far this year. What the nuke patch gives you, is a cryptsetup command that allows you to render an encrypted disk inaccessible.
It was published by the developers of Kali Linux, a distribution based on Debian and designed for offensive security tasks. You may read about it at A Kali Linux cryptsetup patch that can “nuke” an encrypted disk.
Though this tutorial is targeted at Linux Mint 16 and Ubuntu 13.10 installations, it can be used for any other distribution. Just make sure that all the dependencies are installed. Also, the target system must have full disk encryption configured. Otherwise, what’s the point?
All the steps in this tutorial are accomplished from the command-line, so you need to have a shell terminal open to begin.
1. Install dependencies by typing:
<strong>sudo apt-get install libgcrypt11-dev libdevmapper-dev libpopt-dev uuid-dev libtool automake autopoint debhelper xsltproc docbook-xsl dpkg-dev</strong>. Note: Without the dependencies installed, the next steps will fail.
2. Get cryptsetup source code: Since the source code for cryptsetup is what we’ll be patching (we can’t patch a binary), get a copy of it by typing <strong>sudo apt-get source cryptsetup</strong>. After the operation has completed, there should be a directory named cryptsetup-1.4.3. Take note of that.
3. Grab the patch: After getting a copy of cryptsetup, now we need to grab the patch. That’s accomplished by typing <strong>git clone https://github.com/offensive-security/cryptsetup-nuke-keys</strong>. There should now be a directory named cryptsetup-nuke-keys in the present directory
4. Apply the patch: To do that, cd into the cryptsetup directory – <strong>cd cryptsetup-1.4.3</strong>, then type <strong>patch -p1 < ../cryptsetup-nuke-keys/cryptsetup_1.4.3+nuke_keys.diff</strong>.
5. Build the packages by typing <strong>dpkg-buildpackage -b -uc</strong>. After the build has completed (successfully), there should be two cryptsetup*.deb and two libcryptsetup*.deb packages that will have to be installed.
6. Install the packages by typing <strong>dpkg -i ../libcryptsetup*.deb</strong> and <strong>dpkg -i ../cryptsetup*.deb</strong>. This is what actually gets the nuke option implemented. Now if you type cryptsetup and hit enter, you should see a “luksAddNuke” command.
7. Add a nuke key to the system by typing <strong>cryptsetup luksAddNuke /dev/sdaX</strong>. Replace “X” with the number of the encrypted partition on your setup. On a default installation of Ubuntu and Linux Mint, that number should be “5,” so the command will be <strong>cryptsetup luksAddNuke /dev/sda5</strong>. After typing that command, you’ll be prompted to “Enter any existing passphrase.” On a default installation, the passphrase you enter is the one configured during installation. That’s the encryption passphrase. After that, you will be prompted to enter and confirm the nuke passphrase. That should do it.
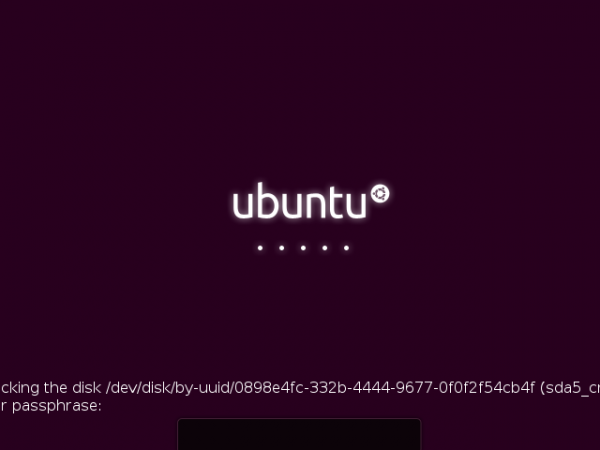
Now that the nuke patch has been applied to cryptsetup, let’s see what happens when a system that has full disk encryption is booted (I used a test installation of Ubuntu 13.10 in a virtual environment for this).
The encryption passphrase must be entered correctly for the system to boot.

If that’s done, the system will boot.

But if the nuke passphrase is entered instead, the keyslots, where the encryption and nuke passphrases are stored, are wiped clean. So the system returns: cryptsetuo: cryptsetup failed, bad password or options. It is the same message the system returns if the wrong passphrase is specified. However, there’s a catch to this. If you backed up the keyslots, it is possible to restore them, and be able to boot the system using the encryption passphrase. See the tail end of How to nule your Kali Liux installation for how to do this.




Would really like to see this article updated for Ubuntu 16.04
I get stuck at step 5. I get the following error:
tail: cannot open ‘debian/changelog’ for reading: No such file or directory
dpkg-buildpackage: error: tail of debian/changelog gave error exit status 1
I don’t know whether this is because I’m missing something or because I honestly believe I don’t have a debian directory. Googling how to fix this brings up nothing of value.
“patch”/addnuke option lost ufter cryptsetup update … 🙁
any way to make it ‘permanent’ ?
See the comment by @toobuntu. Let me know if it works.
Hi finid, thanks but a little more details about how to actually do it (noob,sorry)? What do you do with that script? save it as ..? run when? After doing the steps above, somewhere in the middle … Maybe the article could/should be updated to reflect that since the patch worked yesterday morning, ubuntu made updates to cryptosetup and at 8PM it all the work was for nothing 🙁
Anyway EXCELLENT article and excellent patch!
Doesn’t seem to work on Debian 7 (Wheezy). Is there an update?
/cryptsetup-1.4.3# dpkg-buildpackage -b -uc
dpkg-buildpackage: source package cryptsetup
dpkg-buildpackage: source version 2:1.4.3-4
dpkg-buildpackage: source changed by Jonas Meurer
dpkg-buildpackage: host architecture amd64
dpkg-source –before-build cryptsetup-1.4.3
dpkg-checkbuilddeps: Unmet build dependencies: pkg-config
dpkg-buildpackage: warning: build dependencies/conflicts unsatisfied; aborting
dpkg-buildpackage: warning: (Use -d flag to override.)
Did you try the suggested override?
Thanks!! I need some help though! I am running Kali and want this feature, but my disk is currently not encrypted. I found the below syntax, but this formats the drive.
cryptsetup -c aes-xts-plain -s 512 -h sha256 -y luksFormat /dev/sda1
What syntax can I use to encrypt the drive with the nuke password without formatting my current install?
Thanks for any help!
If the hard drive was not encrypted during installation, I don’t think you can use cryptsetup to encrypt afterwards. That, of course, means that you can’t set a nuke password.
Hello can you write a tutorial on how to apply this on linux mint 17 it will be great to have this feature on mint 17 🙂
Same process applies.
Hello i have some troble apply this to linux mint 16 x^4 Cianamon
After step 1 i apply thr step 2 and i get this
sudo apt-get source cryptsetup
Reading package lists… Done
Building dependency tree
Reading state information… Done
You must put some ‘source’ URIs in your sources.list
What should i do next or what is wrong
By default, Mint does not have source repository entries in its sources.list file. That’s likely the error. To get around it, add source URI’s to the /etc/apt/sources.list.d/official-package-repositories.list file.
Open the file for editing by typing
<strong>sudoedit /etc/apt/sources.list.d/official-package-repositories.list</strong>. Then for every deb entry in that file, add its deb-src complement.Here’s an example taken from that file. The first two lines of that file begin with.
After you edit it, it should read:
Just do the same with each line.
Thank you finid that workt but now on the Build package step dpkg-buildpackage -b -uc
It apear
dpkg-buildpackage: source package cryptsetup
dpkg-buildpackage: source version 2:1.4.3-4ubuntu4
dpkg-buildpackage: source changed by Dmitrijs Ledkovs
dpkg-buildpackage: host architecture amd64
dpkg-source –before-build cryptsetup-1.4.3
dpkg-checkbuilddeps: Unmet build dependencies: build-essential:native
dpkg-buildpackage: warning: build dependencies/conflicts unsatisfied; aborting
dpkg-buildpackage: warning: (Use -d flag to override.)
And i can’t go ther next step
dpkg -i ../libcryptsetup*.deb
As i get this
dpkg: error processing ../libcryptsetup*.deb (–install):
cannot access archive: No such file or directory
Errors were encountered while processing:
../libcryptsetup*.deb
Can you please help me out with this to
That likely indicates that you are not in the proper directory when you issued the command, or you did not include the proper number of “..“.
Check the command again and be sure that you are executing it from the right directory.
found a small error (or typo?). Patching command should of course patch the correct version. If you source cryptsetup-1.4.3 you will have to patch patch -p1 < ../cryptsetup-nuke-keys/cryptsetup_1.4.3+nuke_keys.diff
-crzydg
Thanks, that’s a typo. Correction made.
This could instead be set up with apt-build to ensure the nuke patch is applied to all future upgrades to cryptsetup with little effort. Script the upgrade to something like:
#! /bin/bash
set -e
set -u
pushd /usr/local/src/
git clone https://github.com/offensive-security/cryptsetup-nuke-keys
apt-build –patch /usr/local/src/cryptsetup-nuke-keys/cryptsetup_*+nuke_keys.diff -p1 install cryptsetup
popd
exit 0
Thank you.