Mageia is a Linux distribution forked from Mandriva Linux by former contributors and members of Mandriva, As expected, there was a flurry of activities between the announcement of the fork of the distribution (on September 18, 2010) and the first official (stable) release (June 1, 2011). Teams had to be put together, servers and hosting and the required development environments set up, etc.
In the end, what we have is a community-driven and community-sponsored distribution in contrast to its parent distribution, which is controlled by a commercial entity. This article is a review of this new distribution and also marks its listing in the Desktop/Server Category on this website.
Installer and Installation Process: You can obtain installation images of Mageia as CD, DVD, and network-install ISO images. The CD ISO images are Live CDs, which makes it possible to test the distribution on your hardware before attempting to install it. Most of the screenshots used in this review were obtained from several test installations using the DVD and network-install images in virtual environments and real hardware.
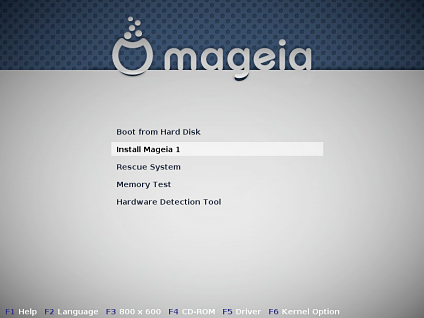
This screenshot shows what you will see if you want to install Mageia using a DVD ISO image. It has a few more options than the CD images, which features just two (options) – “Boot Mageia 1,” “Install Mageia 1” and “Boot from Hard Disk.” The network installation image boots into a text interface. Pressing Enter on the keyboard starts the process that eventually leads to the graphical installation program.

If you have ever installed Mandriva, you will be very familiar with Mageia’s installer – they are the same. And that is a phrase you will get used to throughout this review. Mageia may be a new distribution, but it still shares the same tools as Mandriva. The installer is a point-and-click affair, with the same irritating omission that I have always complained about – the lack of a Back or Previous button at critical steps in the installation process. Shown here are some of the disk partitioning methods available on drakx, the installation program.

The disk partitioning step caters to both guru-level and new users alike. The default view is the “Normal mode.” In that mode, clicking the Auto allocate button prompts the installer to create three partitions. These are for /, the root file system, Swap and /home, with the first partition always configured as a primary partition, and subsequent ones as logical partitions. Thus, Swap and /home are always sda5 and sda6, the first and second logical partitions of an extended partition.
In expert mode (Toggle to expert mode), clicking on Auto allocate gives you the following disk partitioning options:
- with /usr – this creates a separate partition for the /usr file system directory in addition to the defaults configured in Normal mode.
- simple – this configures the same partitions as the defaults in Normal mode
- server – separate partitions are created for /var and /tmp in addition to those created under the first option
The Auto allocate options makes it very easy for all users to configure partitions very fast and easily without going through the steps of creating each partition manually. Debian is the only other distribution that I am aware of whose installer has this same feature.

In normal mode, the journaling file systems available are ext3/4, jfs, xfs, and reiserfs, with ext4 as the default. NTFS and NTFS-3G are also available in this mode. In expert mode, practically all the file systems available on the planet, are supported. I said “practically” because Nilfs is not in the list. Nilfs, a log-structured file system with support for continuous snapshotting, is one of two new file systems in the Linux kernel. The other one is btrfs, and you can see, btrfs is supported. Keep in mind that what you see in this image is just the list of file systems above-the-scroll. There are two more scrolls of file systems. LVM, the Linux Logical Volume Manager, RAID and disk encryption are supported.

At the boot loader configuration step, you have three options – “GRUB with graphical menu,” “GRUB with text menu,” and LILO. GRUB Legacy (version 0.97) is the version of GRUB used. For all three options, you can configure a boot loader password, which by itself does not do a whole lot, but combined with other physical security features, can provide a complete physical security blanket for your computer.

If you use a DVD or network-install image for installation, the installer will give you the desktop options shown in this image. KDE is the default if installation is from a DVD image, while GNOME is the default if a network-install image is used. Do not know why, but that was my observation. LXDE, the third desktop environment supported is available only if you select the “Custom” option. Note: By “default.” I mean the pre-selected option.
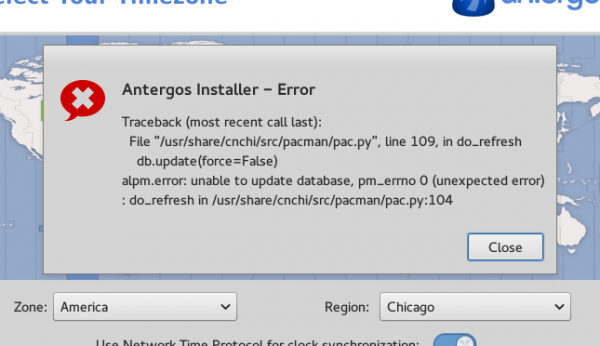
About using a network-install image: A network-installation image weighs in at just about 40 MB, significantly less than a CD or DVD image. However, you never know what is going to happen during installation. For example, the first test installation I made on real hardware using this method was successful. A second installation on the same hardware failed because a few packages were missing from the mirror I selected. The mirror I used for the first installation was not listed during the second installation attempt.
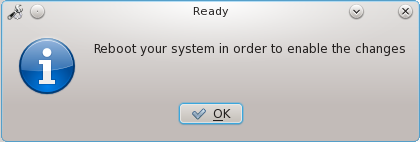
Also, on two subsequent, back-to-back installations in a virtual environment using two different mirrors (iblibio and webconquest), the installation failed with the following error message:

So, while a network-installation image offers a reverse-size advantage, it might be better, for an error-free installation, to use either a CD or DVD image. I prefer a DVD image because it offers more customization options that a CD image though at more than 3 GB, it will take a little bit more time to download than a CD image. The benefits, however, outweigh the extra download time involved.

By this last image, drakx gives you the opportunity to make changes to most of your installation settings – before they are committed to disk. And it is only available if you use a DVD or a network-install image.




I confirm MH’s statement on the forum. Members are not allowed to edit their own posts (closed almost immediately).
This makes a “solved” marking impossible. The community is simply not trusted to edit their own posts.
For a “community driven” distro they are incredibly clumsy and distrusting.
It’s not a matter of trust. It’s just the tools being used.
Mageia is just as open as — if not more than — any other distro.
Some of the structure, such as the permanent wiki, are still being set up.
And we’re still reviewing basic policy on all sorts of things.
(The starting point being that of Mandriva, from which Mageia forked.)
Another review of Mageia 1 for those who is interested:
http://linuxblog.darkduck.com/2011/06/mageia-cal-win-over-humanity.html
The one big strike against Mageia is the way it treats its users. Here’s two examples:
Recently, users who wanted a voice regarding the direction of the distro were told that they MUST join the “dev” mailing list (even though a perfectly good “discuss” mailing list exists). When users expressed some hesitancy, they were basically told “do it this way or don’t do it.”
Mageia also has the most restrictive forum policies I’ve ever seen. Users are not trusted to do something as simple as mark their own posts as “solved.” When users expressed concern, they were, once again, told that their input, their opinion, simply didn’t matter.
Pity.
Normally users can discuss on the Mageia-discuss mailing list. But in certain (very limited) cases, a discussion to decide an important aspect of the development process of Mageia was started on and limited to a particular thread on Mageia-dev, the development mailing list. However previous contributions on Mageia-discuss were taken into account, as well as previous and current discussions on the forum.
Sometimes such limitations are required in order to come to a decision. If a user is involved in the development process, they would normally already be subscribed to the development list. If not, they can join the list to actively contribute their ideas to the particular discussion.
Seriously, who are most likely to have ideas practical enough to be accepted for the development process, if not those actively involved in the development process, or at least following the development mailing list ?
As far as marking your own posts to the forum as solved, I’m sure there must be some misunderstanding. Unless some other contributor to your post raised points that were not solved. Or maybe there was a problem with how you were marking it ? All forums have rules, including Mandriva, from which the forum rules were inherited.
I haven’t yet contributed much to the Mageia forums, as I’m now mostly focused on development and policy.
Thanks for the detailed review. As a past user of Mandrake Linux, hoping mageia develops in the Mandrake’s spirit of making Linux accessible to non-techy users,
That’s our orientation. Trying to be even more friendly to non-techy users.
In our initial refining of our development process, based initially on Mandriva policies, we are having a lot of techy discussions, but our goal is to have a community-oriented distro, not subject to the whims of a commercial distro like Mandriva.
Based on the already user-friendly tools of Mandriva, we are already working on developing better such tools — more friendly to non-techy users.
Is the installer one of those tools that are being retouched?
There is a new web-based tool in an advanced stage of development that provides a more friendly front end/link to the installer, called for the moment mageia-app-db. It also provides a database to available packages – on Mageia and elsewhere. I haven’t yet tested it, although I was involved early on in some design discussions.
There is also a fair bit of discussion on enhancing the installer itself, inherited from Mandriva. (Which is written in Perl.) Despite it being fairly friendly, it does have some weak points.
We are still heavily involved in redefining policy and developing infrastructure, inherited from Mandriva. We’ve already made a fair number of changes.
And there are a lot more improvements to come
You’re welcome to join — Mageia is a community distro 🙂
I have Mageia installed on a 500 gig HD. I have used Mandrake/Mandriva since 7.2. I switched over to PCLOS in 2008. and then to Mint 10 in 2010. Mageia left me wanting in several areas. Nvidia driver has to be located, right driver selected, and installed. Mint does this almost automatically. I had no sound, had to configure that, and, like Mandriva, some of the programs would not run, had to mark ‘select all dependencies’ manually. I think this is one of the reasons I left Mandriva. My system is: MSI 760GM-E51 mobo, 600 watt power supply, AMD 640 quad core processor, 16 gig DDR3, 1.5 TB HD, and I have 3 500 gig HD spares to play on.
It are about 320 Linux distributions already. Do the world need any more? I don’t thinks so. More competition? Well look how many car brands it was. To many, So some brands are gone. Are it any point to sell like Vauxhall and Opel and the only difference is some cosmetic features? Or Dodge, Chrysler and Plymouth.Same car but different names.And the same will happends with Linux distributions to. Some will survive and others will be gone. I think if Mandriva and Mageia would work as one distribution they would compete better as two different distributions.
Who know, maybe the new Mandriva 2011 would not have been delayed at all then?
Well the core of Mageia contributors come largely from those laid off by Mandriva as, apparently due to financial problems, moved to employees in Brazil and Russia.
This core, plus many other key contributors to Mandriva, started a new distro as they wanted a community-based distro that wouldn’t be subject to the whims of a commercial enterprise, and already had many good ideas as how to make a better Mandriva — which became Mageia.
Mandriva is more or less what it would have been without Mageia.
Myself, a longtime Mandriva user, would have been left to go to another distro anyway, as Mandriva cut back some of my favorite applications.
Some parts of Mandriva are definitely worth keeping, like the easy-to-use package installation manager, which is why I really appreciate Mageia.
I don’t have any stats, but I suspect that Mageia is already one of the top 10 distros. This is not some excentric going off in a corner to start his or her’s own version of an ideal Linux. I think it already has a vibrant community, which has encouraged me to make a lot more contributions in the past. If you follow the mailing lists, you might notice a lot of controversy from time to time, but that is part of the growing pains of Mageia, already showing lots of promise.
By the way, Mandriva was already delayed before they laid off most of their key employees. Who were already considering starting a community distro due to internal problems.
One could say that Mandriva, in releasing these employees, indirectly created Mageia.
(Mandriva 2010.2 was just 2010.1 with about 6 months of updates, and not a regular release. You can see that in the 2010.2 DVD’s, which contain update repos.)
Of course Mageia will improve unlike PCLinuxOS. First of all the name isn’t just plain dumb. And second of all Mageia is being produced but a lot of experienced developers, many of which worked for Mandriva SA. PCLinusOS is produced by one individual who gets butthurt if you say anything negative about his work.
The developer of PCLinuxOS seems to take criticism in stride. The fanboys are the nut jobs.
Problem with PCLOS is that the fanboy-ism is not only actively encouraged by the distro’s leadership, but pretty much demanded/required.
And lest there be any doubt, the fanboy-ism comes straight from the top (though perhaps less obviously than in the past):
http://thepcspy.com/read/pclinuxoss_militant_leadership/
“Regarding the Tainted repository, I do not think that I completely understand the developer’s stance on Free/Nonfree software. If you must include “dirty” applications in your repository, which means you are distributing, you might as well install it by default, especially if it makes the system to “just work.” ”
I like how they did it. They put it straight – using some items (depending of the law of your state) may violate some rights and effectively act as tainted so they literally mark them “tainted”. Those things might be ok – but you must check it for yourself. And if those things are ok, why shouldn’t you get them from one of official repositories?
Mageia team seems to care that you don’t compromise security of your system in a reckless way (by downloading some malicious stuff) just to use some perfectly legal (in your country, but illegal in France, where headquarters of Mageia are) software.
(by downloading some malicious stuff) !! ?
If think you are really new to UNIX world :-))…
The quality of this distrib is higher than Mandriva 2010.2 … in terms of global integration !
Perfect for developers !
Serge.
Packages in “Tainted” aren’t illegal in France, which doesn’t have software patents.
(If they were, they wouldn’t be in Mageia.)
Also, few if any such packages are required to make a system “just work”, but can be useful to provide full functionality. (Personally I’ve never found such versions useful.)
It is more packages (or versions of packages) suspected to possibly be subject to legal claims in a few other countries, such as the U.S.A., where software patents are sometimes legally enforceable.
Note however that packages in “non-free” are often very useful for a properly functioning system.
How do you define “full functionality” if you cannot play a video DVD, which is available only if you install libdvdcss, which is available only if “Tainted” is enabled.
So you agree with my post ?
Or you don’t think it is useful to play video DVDs ?
I disagreed with you because you said “… few if any such packages are required to make a system “just work”, but can be useful to provide full functionality. (Personally I’ve never found such versions useful.)”
@finid
ok, the part of my post that you cited can be devolved to 3 statements.
you respond referring to the second statement, seeming to disagree with it, then give an example that seems to support the same statement.
So either you agree with my post, and have a somewhat original manner of expressing yourself, or you don’t quite understand English.
Unless, of course, you are trying to say that “tainted” is not useful to provide full functionality.
By the way, in many cases the same package is available in “core”, with certain functions disabled.
I think somebody has been spending way too much time in front of a PC monitor. I hope I’m not the guilty party. 🙂
To your last point, yes, some packages in Tainted are also available in Core with some features disabled. If Tainted is enabled, for example, you will have a choice between installing vlc or vlc tainted.
Just remember, this is the first release. It’s important that we understand it’s only purpose is to launch Mageia, and that further improvements are yet to come. I think it’s obvious to most that the first release would be nothing more than a clone of Mandriva, as the work required just to launch it was enormous. I have no doubt they’ll improve upon what Mandriva has done, and even move in a different direction in some areas. Give it time to mature.
Yes, Mageia must improve over time. I agree with you..
With recent “un”-improvements in Mandriva, I suspect that Mageia already passes Mandriva, especially for those that don’t use the KDE desktop.
(They stopped officially supporting the other desktops, which now depend on only community support. Since so many contributors went to Mageia, there is a lot less support for the other desktops.)
As well, Mandriva went to another version of the package manager system. They are still trying to get the bugs out.
In any case, Mageia and Mandriva still have a lot in common (much of which there are no plans to change), and thus a lot of potential synergies, as well as a lot of contributors to both.
“I suspect that Mageia already passes Mandriva, especially for those that don’t use the KDE desktop.”
I suspect Bigfoot is real and that he likes to ride the Loch Ness Monster. Suspect all you want…until a frame by frame comparison exists…Mandriva has nothing to prove…they’re not a new distribution trying to organize themselves. Mageia is.
Considering that bigfoot is another name for the grizzly, I doubt the second part of your “suspect”.
My statement was based on my experiences with Mandriva and Mageia, and the feedback I get from other’s involved in the 2 distros.
For one, Mageia seems to be already better organized than Mandriva. By default, Mageia follows old Mandriva policy until decided otherwise, so it is not functioning in a vacuum. And we are progressing nicely on defining new policy.
You base your reaction on what ?
You seem to have missed out the most important part – which repo to select and why?
Most new users will be lost at the selection of repositories.
Good point, but that should be the subject of a short tutorial.