The next partition will be for root. However, the mount point will not be specified here, just the Size and “Use as” values. Knowing that a fresh installation of Ubuntu uses just 3.1 GB of disk space and just about the same for Linux Mint 16, I allocated 12 GB to it, which is sufficient to account for future increase in disk usage. For “Use as,” select “physical volume for encryption,” then type in the passphrase that will be used to encrypt the partition. OK.

Back to the main window again, you see an entry for the new partition (/dev/sda5) and also the encrypted volume create from it (/dev/mapper/sda5_crypt). Note also that no mount point is assigned by default. That will be done manually after all the partitions have been created. Select the free space and click on the + button to create the next partition.

This partition will be used for Swap, so I allocated just 2 GB (2000 MB) to it. From the “Use as” menu, select “physical volume for encryption,” then type in the passphrase. This is where this is different from the installer’s default disk encryption setup. And the minor inconvenience I wrote about earlier is that every partition will have it’s own disk encryption passphrase. What that means is that every time the computer is booted, you’ll have to type in the passphrase for each partition. So if you have three partitions, like the setup for this tutorial, that is how many times you’ll have to specify a passphrase. To make it easier, you can specify the same passphrase for the partitions. OK.

The final partition will be used for /home, so I allocated most of the available disk space to it. OK.

Back once again to the main window, you can see all the encrypted partitions that have been created. The final task at this stage involves assigning mount points. To do that, double-click on an encrypted partition entry.

This is the default “Edit partition” window. All that has to be modified here, is the “Mount point.”

For the root partition, it should be /.

for Swap, select “swap area.”

And /home for the last partition.

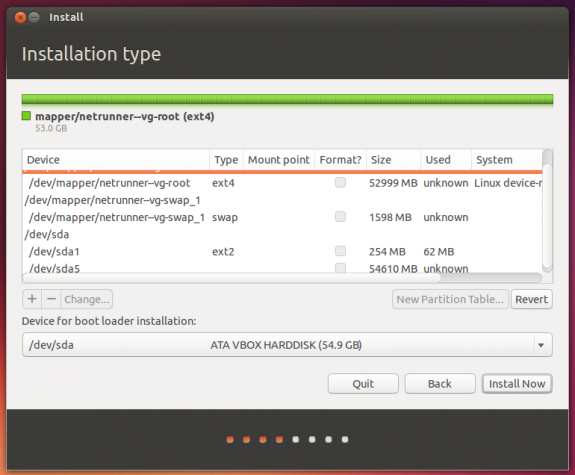
All set. you may click Install Now to continue with the rest of the installation.

On rebooting the computer after the installation has completed successfully, you will always be presented with the prompt shown in this screen shot, once for each encrypted partition that you created. That’s it for setting encrypted partitions manually on Ubuntu 13.10 and Linux Mint 16. If you want to set up a nuke passphrase for the partitions, see Apply the nuke patch to LUKS cryptsetup in Linux Mint 16 and Ubuntu 13.10.


Also ran into the broken support for crypted disks when trying to install Gnome Ubuntu 14.04 next to Windows. Having to type my high entropy disk crypto passwords multiple times is not an acceptable option to me.
So I used the steps below to get all my partitions into a single crypto container.
—-
Follow guide upto the point where you created 1 encrypted volume.
Then push the back button to leave the partitioning tool.
Goto the shell ([ctrl]+[alt]+F1) and execute the following commands
Create LVM volume groups:
# sudo -s
# vgcreate gnome /dev/disk/by-id/dm-name-sda5_crypt
# lvcreate -L 2G -n swap gnome
# lvcreate -L 20G -n root gnome
(next command assigns remaining space to home partition)
# lvcreate -l 100%FREE -n home gnome
# lvs
Switch back to the installer([ctrl]+[alt]+F7)
select “something else” again and “continue”.
Once the tool is done rescanning you should now see the new devices(if not go back and forth again).
Reconfigure the /boot partition as done earlier.
Continue with the guide/installation, upto the point it asks for a reboot.
DON’t reboot yet.
Switch back to the console.
Create crypttab:
# blkid /dev/sda5
# echo ‘sda5_crypt UUID=(uuid from prev cmd without quotes) none luks’ > /target/etc/crypttab
Regenerate initramfs and grub config
# mount -t proc proc /target/proc/
# mount –rbind /sys sys/
# mount –rbind /dev /target/dev/
# chroot /target
# update-initramfs -u
# update-grub2
# exit
Now reboot, and you should be able to boot into you’re newly installed Ubuntu.
(note: if booting hangs with a black screen, press [esc])
Hey
when i type: vgcreate gnome /dev/disk/by-id/dm-name-sda5_crypt i get an error.
The error is: please enter a physical volume path.
I need to encrypt my whole computer (dualboot win+ubuntu) and dont want to type in my encryption password for ubuntu 2 or 3 times…
I use ubuntu mate 14.10
I hope its possible with ubuntu mate.
I cant find an article about it.
Thanks!
Have you verified that sda5_crypt is the device name of your unlocked crypto container?
# dmsetup table
sda5_crypt: 0 512989948 crypt aes-xts-plain64 00000000000000000000000000000000000000000000000000000000000000000000000000000000000000000000000000000000000000000000000000000000 0 8:5 4096
The steps above are written for my setup. Other setups(eg. Distro/Distro version/partition setup) might use other names and numbers. I’m sure that with the man pages and some googleing you will figure out how to get this working for your setup.
Thanks!
Now its working. But now i have another problem…
The command: mount –rbind /sys sys/ gets an error.
The error is: mount: mount point sys/ does not exist.
I hope you can help me with this problem too.
Sorry for the questions. 🙂
Oops, forgot something there. Should be:
# mount –rbind /sys /target/sys/
Sorry but still: mount point does not exist…
The solution might be something as simple as creating the directory yourself. If /target exists, try creating /sys under it with:
mkdir /target/sys
Then retry the original mount command. Just a guess, but nothing breaks if it doesn’t work.
Hey,
after a new try everything works just fine.
Thanks for the post and your help.
Cool.
Thank you David – your instruction helped me to properly encrypt my disk with three partitions! Linux Lite 3.4.
David, you are a life saver! Tried this procedure with Mint 20.1 and, a few ajustments (device names, etc.), it worked like a charm.
Thanks a lot.
Regards,
Luis
thank you for this post!
just to make the boot faster, is there a way to type the encryption password just once? (even for the prize of having the same password for all separate partitions)
thanks!
support for good LVM and disk encryption setup in the current installer is not that good, so, no, that’s not possible at this time.
Note that in this situation, having the same password for all partitions is ok.
These steps no longer work under 14.04. I’ll list some details below. Can you provide any guidance on how to do a similar setup with 14.04?
Details:
I’ve been building similar test systems under 13.10 for months now, and they have all booted sucessfully. However, with 14.04 I’ve found that none of the systems will boot. I’ve built the systems the exact way I have before (identical to these instructions). When booting, I never get as far as being prompted for a pass-phrase. I get the initramfs prompt after the boot sequence times out. One thing I’ve noticed, is that dm_crypt is missing under the module list that I pull from initramfs.
That’s strange. Didn’t know something changed in the installer. Will revisit this asap.
I just installed 2 systems using the same instructions, minus the /home partition. Both booted successfully. One is in a virtual environment (250 GB storage) and the other is on real hardware (320 HDD). Will publish a tutorial using screenshots from one of them in a few hours.
Thanks for this – surely someone cleverer than I could describe how to use initramfs (or similar) so that the passphrase only has to be entered once?
You may need to turn off swap before beginning.
https://bugs.launchpad.net/ubuntu/+source/ubiquity/+bug/1205397
But Swap also has to be encrypted. Otherwise you are not really getting full disk encryption.
I don’t even consider that a bug. That’s the installer just telling you to encrypt the Swap partition.