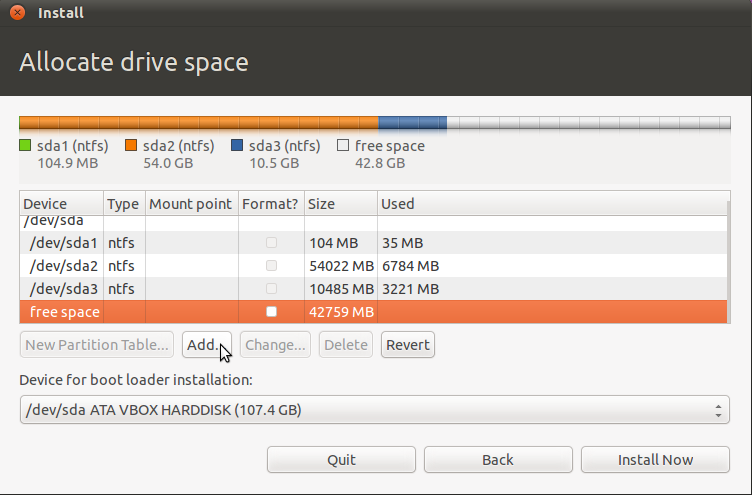
This is what the same window looks like after the change has been applied. Notice the swap space and its size in this window. That is the default created by Ubuntu’s installer. It is the same swap space that will be used by Fedora, so there will no need to create another swap space on the disk. At the bottom of the left side of this window, notice the available disk space. That is what will be used for creating partitions or Fedora 18.
To make this part of the tutorial a bit easier, the Fedora partitions will be create manually. To start, click on the “+” button on the bottom-left side.

By default, Anaconda uses an LVM-based disk partitioning scheme, creating three logical partitions, besides a standard partition for the boot file system. The boot partition is where boot loader related files will be located. The three logical volumes that are created are for root, /home and Swap. Because of an existing swap space on the disk (the one created under Ubuntu), there will be no need to create another swap space under Fedora 18. So you’ll only have to create logical volumes for root and /home.
The first partition to create is the standard partition for /boot. The default size allocated to it by Anaconda is 500 MB. For this tutorial, I allocated 300 MB to it. Be sure to set the mount point to /boot. Click Add mount point.

For the root logical volume, I allocated just 15 GB of disk space, which is more than enough to install a new Fedora 18 system. Set the mount point as shown in this screen shot. Add mount point.

For the logical volume for /home, you can allocate the rest of the available disk space. Add mount point.

Back to the manual disk partitioning “spoke,” you can see all the partitions that you just created. What you might want to change here is the volume group name. When you change it while viewing details for any logical volume, the name change is system-wide. Just be sure to click Apply Changes, if you make any. When you are satisfied with the partitions you created, click Finish Partitioning.

Back to the “hub,” click Begin Installation. I’m sure you noticed that Anaconda has not given you an option to install the boot loader in a custom location. That’s because it does not have that capability. So it installs it in the MBR, overwriting whatever it finds there. In this test system, that means overwriting the version of the Linux boot loader installed by Ubuntu’s installation program.

After installation and reboot, you will see Fedora’s boot menu, with entries for Ubuntu 12.10 and Windows 7, besides one for Fedora 18. Boot into Fedora 18 to complete the second stage of the installation process. After completing the installation and logging in, the next task is to install GRUB 2, the version of GRUB used by Fedora 18, in the boot partition you created. You want to do this because the final task will involve installing the Windows 7 boot loader in the MBR, overwriting that of Fedora 18.
To start this task, launch a shell terminal, su to root and type df -h. In this screen shot, you can see that the device name for the test system’s boot partition is /dev/sda7. With that information, type grub2-install /dev/sda7 to attempt installing GRUB 2 in the boot partition. The system will complain and refuse to comply, but you can force it. To do that, add the “- – force” switch to the command, so that it reads grub2-install – – force /dev/sda7. Doing this puts GRUB 2 in two locations – its new location in the boot partition, and in the MBR, where it was installed during installation. The next task is to remove it from the MBR, and install the Windows boot manager it its place. Reboot.

When you reboot, select the entry for Windows 7 to boot into it.
4. Install EasyBCD: To accomplish the final task, you need to a program like EasyBCD, which makes it very easy to mess with Windows 7’s boot manager. EasyBCD is free for personal use. You may download it from here here. Install it as you would any other Windows application. After installing it, start it, if it does not start automatically.
Now you need to restore the Windows 7 boot program to the MBR. To do that, click on BCD Deployment. Then on Write MBR. That simple operation just replaced the Fedora 18 version of GRUB in the MBR, with the Windows 7 boot loader.

The final, final task is to add an entry for Fedora 18 in the Windows 7 boot menu. To do that, click on Add New Entry, then on the Linux/BSD tab. Select GRUB 2 from the Type dropdown menu, and edit the Name field to match. If you created the same set of partitions for Fedora 18 as given in this tutorial, the corresponding partition number for Fedora’s boot partition as detected by EasyBCD, is Partition 5. The size should help you even further. Be sure to select that from the Drive dropdown menu. Click on Add Entry.

This is a preview of the entries in the boot menu of Windows 7. You’ll essentially be dealing with two boot managers. Selecting the entry for Fedora 18 will take you to its boot menu, where you can then select to boot into Ubuntu 12.10, Fedora 18, or Windows 7.

Note that doing it this way is just one method. If you had created a separate boot partition for Ubuntu 12.10, it would have be easy to add an entry for it in the Windows 7 boot menu.
That is it. Your comments are most welcome.


how to use this second method, please:
“The other option lets you add an entry for all three operating systems in the Windows 7 boot menu. However, that requires setting up partitions for Ubuntu 12.101 manually.”
Would the process be similar if I’ll try to triple boot Windows, Ubuntu and Backtrack 5/ Kali
Yes.
In your case, the order would be Windows -> Ubuntu -> Kali.
It might even be better to dual-boot Windows and Ubuntu, then install Kali as a Guest OS inside Ubuntu using VirtualBox.
I won’t need to do manual partitions in kali right? This will be my first time doing a triple boot because I’ve already done booting ubuntu and windows 7.
Some features in virtualbox are disabled.
If you set aside an unpartitioned space after Ubuntu, you shoulgn’t have to, though I have not tried triple-booting with a Debian installer as the final installer, so I’m not entirely sure.
What features in VirtualBox are disabled?
Woops I made a mistake in my last comment. I forgot that installing guest additions after the OS installation enables other features.
Same here I haven’t done any triple boot, hopefully I won’t have any problems this Wednesday. Guess I’ll follow this guide and your advice finid thanks btw!
Hi, let me add some words. firstly, I’m afraid that with above procedure you lost swap for ubuntu (pointing at swap in next installation changes uuid of the partition. swap should be mounted manually). secondly, probable there is no w7 on older computers. the method doesn’t work with xp. using grub as a bootloader is (in my opinion) more universal. as a bootloader also grub4dos can be used – installed via puppy. works fine.
let me point out shortly different method. ubuntu or its derivative might be used for managing grub (I’m using mint). moreover there is grub customizer for grub manipulating (of course all might be done manually, but with grub customizer is easier)). order of installation linux distros (windows first) is not important but finally only one grub (this from ubuntu/mint) should be installed. at the moment I have four systems (xp/mint/fuduntu/semplice) installed on my six year old notebook.
well, I must also say that fedora 18 installation is a bit ‘unfriendly’. nice there is fuduntu which I started to use instead of fedora 17.
cheers