This is the latest article on Fedora on this website. To view the complete list of Fedora-related articles, visit the distribution’s category page at http://linuxbsdos.com/category/fedora.
Despite the shortcomings of the new Anaconda, the Fedora systems installer, it is still kinda easy to set up a dual-boot system between Fedora 18 and any other operating system. Note that “kinda easy” does not necessarily means that it is straight-forward, because it is not.
You just have to know how to go about it, that is, workaround the drawbacks of the new Anaconda.
In this article, a step-by-step guide on how to dual-boot Windows 8 and Fedora 18 on a single hard disk drive (HDD) is presented. A drawbacks of the new Anaconda is this: It gives you no choice on where GRUB 2, Fedora’s boot loader, is installed, and will install GRUB 2 in the Master Boot Record (MBR), overwriting Windows 8’s boot files.
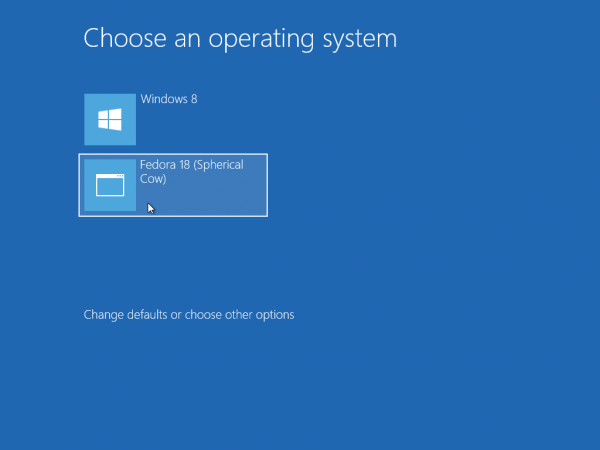
But by the time you are done with this tutorial, GRUB 2 will be in the Partition Boot Record (PBR) of the boot partition of the Fedora installation, and Windows 8’s boot program will be restored to the boot manager, making it the primary boot manager, so that every time the computer is rebooted, you will see this screen, or a bland, black one. (Keep in mind that installing GRUB 2 in a PBR is not officially sanctioned, but installing it anywhere else creates a lot more headache.)

Note that all the screen shots used in this tutorial were taken from a test installation in a virtual environment. But be rest assured that I tried it first on real hardware and it worked. Using a virtual environment just makes it easier to grab screen shots. Note also that the test installation on real hardware was not on UEFI hardware, but on legacy BIOS, and on a 200 GB HDD.
Also, the Windows 8 installation was a fresh installation of a 32-bit version of Windows 8 Pro, not an OEM installation. So, there are only two Windows 8 partitions involved, which are the default that the Windows 8 installer creates. The effect of this is that I am left with two primary partitions to use for installing Fedora 18, aka Spherical Cow. And finally, I let Anaconda create its partitions automatically. If you want to create partitions manually and are new to the Linux way of addressing partitions, you might want to read guide to disks and disks partitions in Linux before proceeding.
Ok, enough introduction. Let’s get started. I am going to assume that you have an existing installation of Windows 8, so I’ll not cover its installation here. Therefore, I’ll start at Anaconda’s installation hub. If you have not done so already, grab an installation image of Fedora 18 from here. I used a KDE Spin image for this tutorial, but use whatever you prefer. They all employ the same installer.
1. Anaconda’s Hub: The first step of the new Anaconda is the language and keyboard selection step. This is its second step, also known as the Hub. (The new Anaconda follows a hub-and-spoke model.) If you are using a Live CD installation image, this is exactly what you’ll see. The same step from a DVD image is slightly different. Regardless of which image you are using, you are going to select the same module on the hub. And that module is Installation Destination. Select it and click Continue.

2. Detected Hard Drive: At this step, you will see all the HDDs detected by the installer. If you have more than one connected to the computer you are using, and you have no idea which one is the first or second, simply mousing over it will bring up a tooltip telling you if it’s sda or sdb. Select the target or destination HDD and click Continue.

3. Manually or Automatically Reclaim Space: On the first screen of this step, the installer will give present information on the disk and what can be done to reclaim space or shrink it. The problem is I could not figure out how to make the installer shrink the Windows 8 partition automatically, like the old Anaconda does with ease. Clicking the Reclaim space button does not help.

Because all it does is bring you to this step, where the Reclaim space button is grayed out. If you know how to make Anaconda shrink an existing partition automatically, please post a comment. My only option here was to click Cancel.

And come back to this screen, where I enabled “I don’t need help, let me customize disk partitioning.” Reclaim space.

4. Manually Reclaim Space: Reclaiming space or shrinking an existing partition is easy. You just know how to go about it. When you get to this screen, you will see a list of detected OS installations on the left pane. The prospective installation of Fedora 18 will be listed first. On this screen shot, the Unknown is actually the Windows 8 installation. Clicking on it will reveal all the partitions under it.

5. Shrink A Windows 8 Partition: Windows 8 partitions will be listed under Unknown. The goal here is to shrink the main partition, which, in this case, is the C drive. Select it and look to the far right of the window. The Desired Capacity box will show the current size of the partition. You will have to change the number in that box to reflect the amount of disk space you want to use for Windows 8.

For this installation, I chose to keep 30 GB for Windows 8. Make your selection and click Apply Changes.

The size of sda2 will change from the old to the new size you just specified. Now that we are done with reclaiming space from Windows 8’s C drive, time to create partitions for Fedora 18. So, click on New Fedora 18 Installation.




Hi I followed your steps was trying it on fedora 20 the problem is i’ve reached upto installing grub2 in the boot partition but I can’t boot into windows as you specificed that there is no boot record so how should I boot into windows?
With Fedora 20, I think thinks are a bit easier. After installation, there should be an entry for the Windows boot manager in the GRUB menu, whether you partitioned the Fedora end manually or used the automatic partitioning option.
Can you at least boot into Fedora?
Is there some like EASYBCD for FEDORA 20?
Is there some explanation as https://neosmart.net/wiki/easybcd/dual-boot/linux/fedora/ for FEDORA 20???
Yet to be published, but I’ll get it done in a week.
Hi,
I’ve followed the process. At the end after rebooting it is still booting in to Fedora not windows so I cant proceeed further.
Pl reply wit help
The new anaconda is certainly no improvement; technically yes but setting ip a Win8 dual boot was breathtaking…
Not that I like Win8 but it was’t my laptop you see. Thanks for the help provided here!
When i was installing fedora 18, at the last of the installation phase it shows the error “boot loader installation failed.”
this is my Acer Aspire V3-571 free dos laptop running windows 8 in one partition.
I googled and found to disable the “secure boot” in UEFI..but in my pc i could’t find UEFI setting like that in advance options.
kindly help me to solve this problem
I think it is required that users should be able to disable UEFI on a Windows 8 machine. If you are not able to, you might want to call Acer’s tech support and complain. If they intentionally left out that option, returning the unit to them and telling them why will send the right message.
This very good article 🙂 .
Maybe in next time I hope can read Article “How to Dual-boot Fedora 18 (RAID 0)& WIndows 7/8 (RAID 0).
With that much sarcasm, perhaps you should write one yourself.
Thanks for this tutorial!
I’ve installed fedora 18 but I am not an MBR partition table but the GPT is the same as the above is different please help me
Could you explain what you want help with in a little bit more detail?
I install dual boot windows 8 pro with fedora 18 and my hard drive is GPT type. after Fedora 18 installation process restart my computer later emerged grub 2 fedora 18 and fedora 18 straight into no option to boot into Windows 8 and How did the solution in grub 2 is not no option to boot into Windows 8
Hey do u think its possible to do the same except with ubuntu 11.10 or the newest one? If so u think u can help us with a tutorial on how to do it? thanks man your site is awesome.
Hi, does it work with windows 8 pre-installed (x64 normal version) ?
It should.
Ok thx, i’ll try.
I tried to install Fedora 18 but i have a problem when i reboot, i get directly into the UEFI without being able to do anything else and I have nothing in the “Boot Options Priorities”. Reseting settings doesn’t help and my usb key with W8 recovery either, I’m a little desperate do you have an idea to fix it ? thx
Shrinking is supposed to be possible from the ‘reclaim space’ screen, but we had to take it out of f18 late in the cycle due to a bug. it will be back in f19. As you wrote, in f18 you need to go through custom partitioning to shrink.
you do actually have a choice with the bootloader; you can choose not to install one at all. may be slightly better for your purposes, or not. That’s on the ‘full disk summary and options’ screen.
Thx a lot for that tuto but new installer is annoying i went to install it side by side with windows 7 i couldn’t complete installation i already make free space for fedora 18 but i didn’t know how to use it ? any help ?
Post the partitioning scheme here. That is number of partitions and their sizes. Primary or logical?
ok that picture defines everything
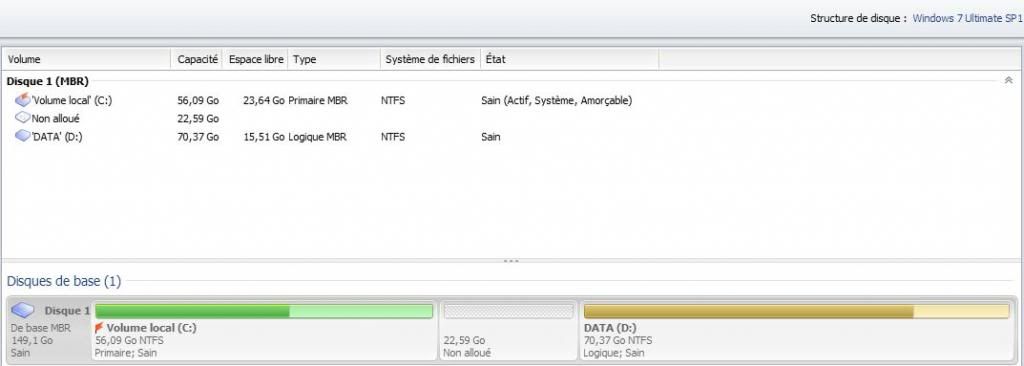
and i don’t want to install Grub in MBR and F18 don’t leave you any choice
(Sorry for my English it’s not my primary language )
I just wish people will stop apologizing for their English.
Anyway, so there are 3 partitions – C, D, and free space (unallocated). Since D and the free space are the possible candidates for installing F18, which one do you want to do?
By the way, where is your system partition?
system partition in “C” and i want to install F18 in free space, if i do it like this tuto is the result will be the same (with windows 7) ?
hello again i completed installation and i did all the steps only problem is when windows boot loader come and i choose fedora it load to me some terminal ” Grub> ” and i didn’t know what i type to enter to fedora ?
Oh shit i feel so stupid right now lol, i fix everything the problem is i used an older version of EasyBCD ( 2.1 not 2.2) so in step when i select GRUB 2 from the Type dropdown menu the “automatically locate and load” wasn’t available in version 2.1 so shit happened when i upgrade my easyBCD i choose partition where grub2 installed and everything work just fine thx a lot for this tuto it really helped me and sorry for the annoying lol .
thank you…the new installer is such a down grade from the old one..but now i understand it better..thanks again !