
BackTrack Linux is now known as Kali Linux. You may read all Kali Linux articles and tutorial at http://linuxbsdos.com/category/kali-linux.
This is the just another tutorial on BackTrack 5 published on this website. You may read the previous tutorial’s on this distribution’s category page at http://linuxbsdos.com/category/backtrack.
BackTrack is a Linux distribution based on Ubuntu Desktop, but specifically designed and loaded with applications for security and penetration-testing professionals. The latest edition is BackTrack 5 R3. The R is for Revolution.
When attempting to dual-boot a Linux distribution with Windows 7 on a single hard disk drive (HDD), the most important decision you’ll have to make is where to install GRUB, the boot loader on virtually all Linux distributions. By default, the Linux distribution’s installer will want to install it in the HDD’s Master boot Record (MBR). However, doing that overwrites the Windows boot loader, so the recommended location for GRUB when dual-booting with Windows, is the boot or root partition of the Linux installation. That requires creating partitions manually, which is not a difficult task, if you have some knowledge of disk partitioning in Linux. If you don’t, guide to disks and disk partitions in Linux is a highly recommended read.
If you’ve ever attempted to dual-boot BackTrack 5 and Windows by installing the former on partitions that you created manually, you know that the installer will not allow you to install GRUB in the boot partition or any of the partitions used for BackTrack 5.
In this article, you’ll see how to install GRUB in the root partition using a backdoor method. It’s a very simple method that does not require manual disk setup for BackTrack 5. Here are the steps involved:
A. Install Windows 7: If you have an existing installation of Windows 7, then you do not have to reinstall. If you decide to reinstall, you may optionally set aside the disk space that will be used for BackTrack 5. Because this step of the installation process for the system used for this tutorial was done on real hardware, there are no images for show for this step.
B. Install BackTrack 5 R3: There is a GNOME and a KDE version of BackTrack 5. The GNOME version was used for this tutorial, but it does not really matter which version you use. You may download an installation image from here. Burn the downloaded image to a DVD. You will be using one of the installer’s automated partitioning modes to create partitions and install the system. By default, BackTrack’s installer creates two partitions. The first will be mounted at /, and the second for Swap, with GRUB installed in the MBR.
C. Install GRUB in BackTrack’s Root Partition: After the last step, this step calls for installing GRUB in BackTrack’s root partition. When this step is completed, you will have GRUB in two locations – in the MBR, and in the root partition. But this is only temporary, because in the next step, you will be wiping GRUB from the MBR.
D. Reinstall Windows Boot loader in the MBR: After the last step, boot into Windows 7 and reinstall its boot loader in the MBR.
E. Add BackTrack 5 to Windows Boot Menu: Finally, add an entry for BackTrack 5 R3 in Windows 7’s boot menu.
Now that you know what it takes, here’s a step-by-step guide on how I did it, starting from step B.
1. BackTrack 5 Partitioning Methods: Reboot the computer with BackTrack’s installation DVD in the optical drive. At the boot menu, select the default and press the Enter or Return key. By default, BackTrack doe not boot into a graphical desktop. At the command prompt, typing startx will start the GNOME or KDE desktop, depending on the version you are using.
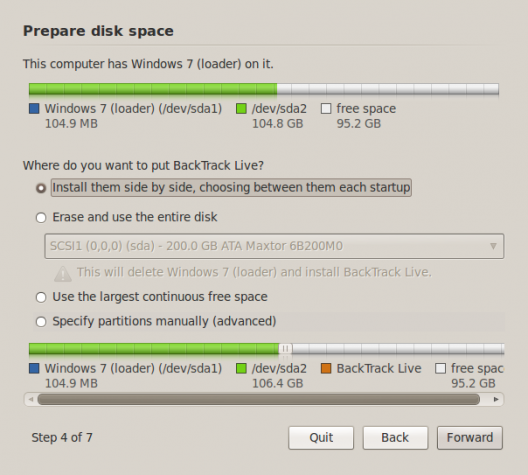
Once in the live desktop, click on the Install BackTrack icon on the desktop to launch the installer. Then click until you get to the step shown in the image below. In the test installation used for this tutorial, I installed a fresh copy of Windows 7, leaving some unallocated space for BackTrack 5. You can see the scheme in the upper green bar. If you do not have the luxury of reinstalling Windows 7, the installer will take care of freeing up space it needs to install the system. That is the default option.
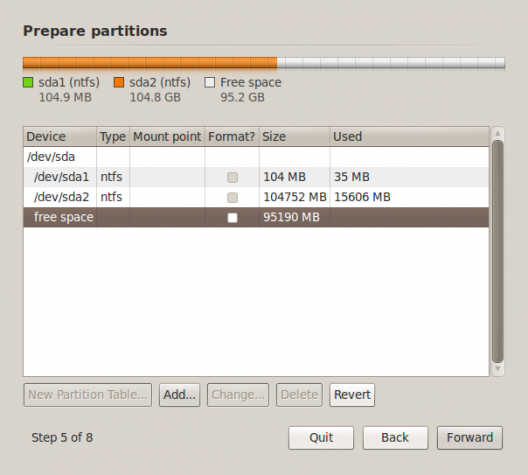
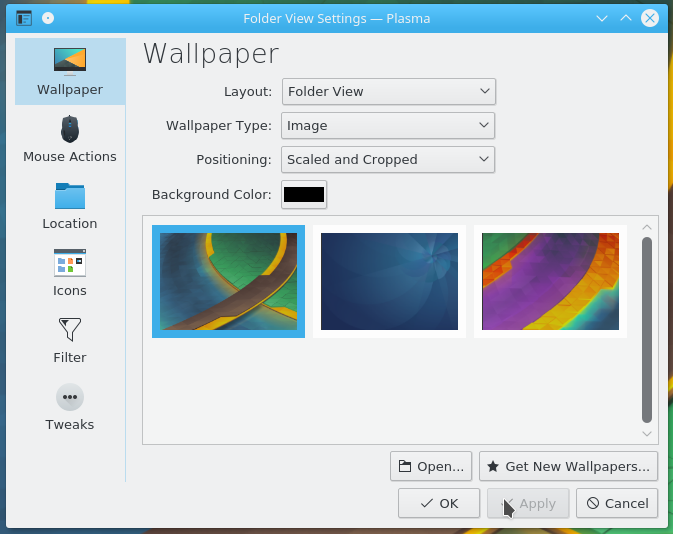
2. Advanced Partitioning Tool: This image is just to show the existing partitioning scheme as seen from the installer’s Advanced Partitioning Tool. You get here by selecting Specify partitions manually (advanced), then clicking Forward in the previous step. You didn’t have to come here, but if you did, click the Back button.
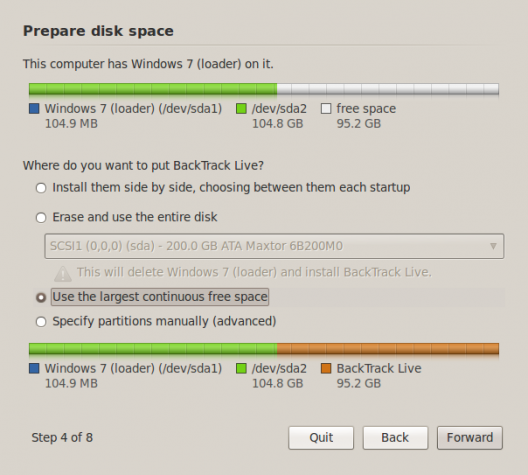
3. Install BackTrack 5: Ok, back to this step, the best option for me was Use the largest continuous free space. By selecting that and clicking Forward, the installer took care of the rest.


It does not finds my presisting operating system
You should be installing Kali Linux, not BackTrack, which is no longer being developed.
When I install backtrack 5 ,after press f12 and then i write “startx”it shows the kernal version not found.please help me
Why are you using BackTrack? BackTrack is now Kali Linux. See my latest posts about it here.
Download the latest version at https://www.kali.org/.
PLEASE READ !
My backtrack 5 doesn’t see my windows 7. It says, this computer doesn’t have any operating system installed on it. No one answered this question by now. Help !
Is this a new install attempt? If so, why are you using BackTrack?
Kali Linux has replaced it. See BackTrack 5 or Kali Linux 1.0.
Btw, Kali has a better installer than BackTrack, so give it a try.
yes, it is a new install attempt. one pc with win7 32 bit sees it, the other(a newer one) with win7 64 bit or win8 64 bit (tried with both) doesn’t .why?
It probably has to do with the fact that the 64-bit systems are installed on a GPT partitioning scheme, which BackTrack’s installer does not support. I think that problem has been solved in Kali Linux, which is why I’m recommending everyone to sop using BackTrack.
It is no longer being maintained. Kali Linux is the present and the future of the distribution.
Regarding the issue with GPT, see Why is Windows 8 on SSD invisible to Ubuntu 12.10′s installer? and Zap GPT data structures from a disk, while preserving existing MBR partitions.
Thanks for your advice !
I’m trying kali right now. Just have to create a live usb and I’m on my way !
I have windows 8 now. I’ve read about one guy who had the same problem as I had : after installing backtrack you get no operating system. Will it work for kali?
It has worked before, but even at that, you’ll never know if it will work for your system unless you give it a shot.
Note that Windows 8 itself presents a set of issues that have nothing to do with Debian or any other distribution. I’m talk about the so-called Secure Boot or Restricted Boot.
See articles about Kali that I’ve written at here.
I’ve tried. Kali doesn’t see windows… whole drive appears to be empty…I’m giving up…I can’t find any solution
If all else fails, you can install Kali as a Guest OS on Windows using VirtualBox.
hey
the screen shot you provided isn’t for backtrack 5 r3
it doesn’t contain the option side by side
only erase or Specify partitions manually (advanced)
what can i do to install the side by side without losing my files
Instead of using BackTrack 5, why not get Kali Linux, which is BackTrack reincarnated. The installer is much better.
See Kali Linux
Finally . .
Thankz 4 the information man. i need this. can’t find the solution to install it without Virtual machine ..
Hope you are aware that BackTrack is now Kali Linux.
hallo
ich bin scon über rascht das man nie eine anwort bekommt, das man auch mal was machen kann, ich habe mir backtrack gekauft, habe auch das buch 2x, aber es geht nun mal nicht habe auch schon zu wffi free, geschrieben , aber nichs, kann mir einer helfen , das ich auch mit backtrack 5R3-5R2, was machen kann , kann mir vieleicht einer eine anleitung zukommen lassen , das man auch alles hat , bei denn was da im netz ist, ist nichts halbes und nichs ganzes, bitte um anwort
sir i have installed bcktrack 5 R3 .. they require the login field when i typed “ROOT” as login then password field is required and at the password field nothing is typed please help me soon..
The username is root and the password is toor.
Btw, Kali is the new BackTrack. More about it here.
Wow….finally xDD
Haha. Thanks for the mega help.
Think this will answer alot of ppl’s problems such as mine initially xD
I have yet to try it, let you know of the results
Thanks again =)
Sorry ah, to add on.
Is it workable with UEFI systems?
For me, the only way for BT to even detect my Win7 partitions is by installing everything in UEFI mode.
This was done on a non-UEFI system, so can’t say for sure. That will be the next one.
T.T suspected so…
UEFI, screwing up linux everytime.
Although it is not suppose to be an issue, maybe BackTrack again sigh