This is the LVM Physical Volume setup window. The File System Type should already be pre-selected with the right option. If not, select it. For the size, type in what you would like to allocate. The system used for this tutorial had about 300 GB of disk space, and I allocated 200 GB of that to the Physical Volume. On a hard drive, where the Physical Volume is the second partition being created, Anaconda will create it as a primary partition, so you do not have to check Force to be a primary partition. OK.

Back to the main partitioning window, you can see the two partitions you just created, plus the free space still unallocated. The next task involves creating a Volume Group and the logical volumes. To do that, select sda2 sdb2, and click Create.

Select LVM Volume Group.

This is where the Volume Group and logical volumes will be created. By default, Anaconda assigns a Volume Group name based on the system’s hostname. So, in this example, the hostname is hu, therefore, the default Volume Group name is vg_hu. Anaconda does about the same with the names of the logical volumes. But you do not have to stick with the system-assigned names. Choose simpler ones.
After naming the Volume Group, click Add to start creating the logical volumes. Note that as with the default installation, we are going to create logical volumes for the root file system directory, home and Swap.

This is the logical volume setup window. The options to modify here, are the Mount Point, Logical Volume Name, and Size (in megabytes).

Here is the same window with the values for the root logical volume specified. When specifying the size of a logical volume, you only need to allocate just enough to install the system. You can always grow or expand it with free space from the Volume Group. OK. 10,000 MB (10 GB) is more than enough for a new installation of any edition of Fedora 17.

For the home logical volume. OK.

And, finally, for Swap. OK. For guidance on how much disk space to allocate to Swap, see this answer to a question at the Forum.

So, the Volume Group and logical volumes have been created. Click OK to exit this window.

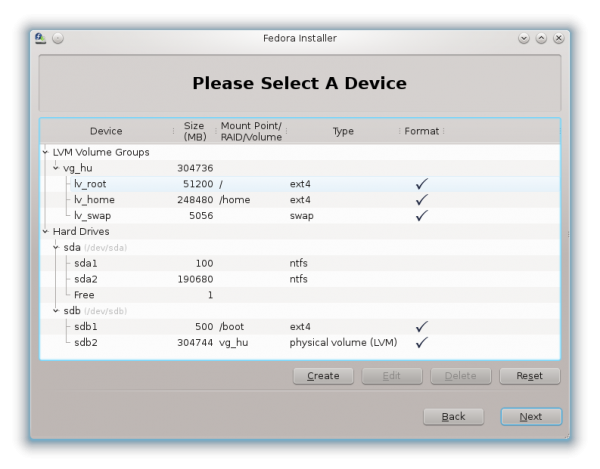
Back to the main partitioning window, you can see all the partitions and logical volumes, plus the free, unallocated space. That free, unallocated space could be used at some point in the future to expand the Physical Volume or to install another distribution or operating system in dual-boot fashion. Notice that I also left some space unallocated in the Volume Group. That can be used to grow any logical volume that runs out of space or to create new logical volumes. And that expansion can be done online. That, is the beauty of LVM. Click Next to continue with the rest of the installation.

At the boot loader configuration step, you have the option to choose where GRUB, the boot loader, will be installed. By default, the installer will want to install it in the Master Boot Record (MBR). On a standalone system, that is, with Fedora as the only OS on the hard drive, that is where it should be. At this step, you may also opt to configure a boot loader password for added security. To be sure that GRUB will be installed in the MBR of the right hard drive, click on the Change device button.

That opens a new window that shows where GRUB will be installed. From this window, you can also change the BIOS boot order. Doing it here saves you the task of changing it after installation.

After installation, reboot. If you did not change the BIOS boot order in the step shown in the last image, the computer will reboot into Windows 7. Rather than going through the process of installing another application to use for adding an entry for Fedora in the Windows 7 boot menu, it is better and easier to change the default boot device to sdb. Then on each reboot, you will have the option to choose either Windows 7 or Fedora 17 from GRUB’s boot menu.
If you would rather not change the default boot device, then download EasyBCD, a free application from NeoSmart Technologies, from here. Follow the instructions in this article to add an entry for Fedora 17 in Windows 7’s boot menu.



Dual-boot / Windows 7 and Fedora 17 /18
=======================================
” By default, the installer will want to install it in the Master Boot Record (MBR). On a standalone system, that is, with Fedora as the only OS on the hard drive, that is where it should be.”
Could you be more precise on this point. This is the point where most people mess-up but the way you treat it is so trivial that does not make sense. So, exactly where to put the bootloader on a dual-boot windows 7 and Fedora 17/18.
Thank you
John
The master boot record MBR is not part of any partition described. Every hard drive has its MBR at the beginning.
The beauty of a 2 drive setup here is that the sda-windows drive (and its MBR) remain untouched so the BIOS could boot the Windows drive like it always did -OR- (the goal here) boot the Linux-sdb drive first, and BIOS uses the MBR of the linux drive where the Linux bootloader was just installed. This Linux bootloader also sees Windows giving you the option to boot either OS.
I noticed in the step for creating a Volume Group and the logical volumes, you say to select sda2. Shouldn’t that be sdb2 since sda2 is where Windows 7 resides in this tutorial?
Yes, you are right. That should be sdb2. Just a case of where the description and the screen shot are not in accord.
Thanks for sporting the error. It has been corrected.
Finid, would you please consider writing a tutorial on how to resize and otherwise manage LVM partitions AFTER installation?
I understand the benefits of being able to resize an installed operating system’s partitions under LVM, but don’t know how to do so.
Thanks!
That tutorial is actually 80% complete, just been too lazy to finish and publish it. Should be ready soon.
I’d never call you lazy. You have the best Linux tutorials I’ve found on the web — they’ve really helped me since I started getting into Linux last year. And your reviews are always interesting. I especially like the attention you give to issues others seldom address, such as physical and network security.