Linux Mint 13 Cinnamon and Linux Mint 13 MATE are the latest editions of the popular Linux desktop distribution based on Ubuntu Desktop. This tutorial presents a step-by-step guide on how to dual-boot either one with Windows 7 on a computer with a single hard drive.
Because the Cinnamon and MATE editions of Linux Mint 13 share the same installation program, the steps involved are the same regardless of the edition you use. For this tutorial, a 32-bit installation image of the Cinnamon edition was used.
If your computer is running a self-installed copy of Windows 7, the default number of partitions will be just like the ones shown in the image below. Keep in mind that the partitions on an OEM (Original Equipment Manufacturer) installation could be different. For this tutorial, the operating assumption is that you computer is running a self-installed copy of Windows 7. Note: On your computer, make a mental note of the amount of free space on the C drive listed on this image. You will need the information during the installation of Linux Mint 13.

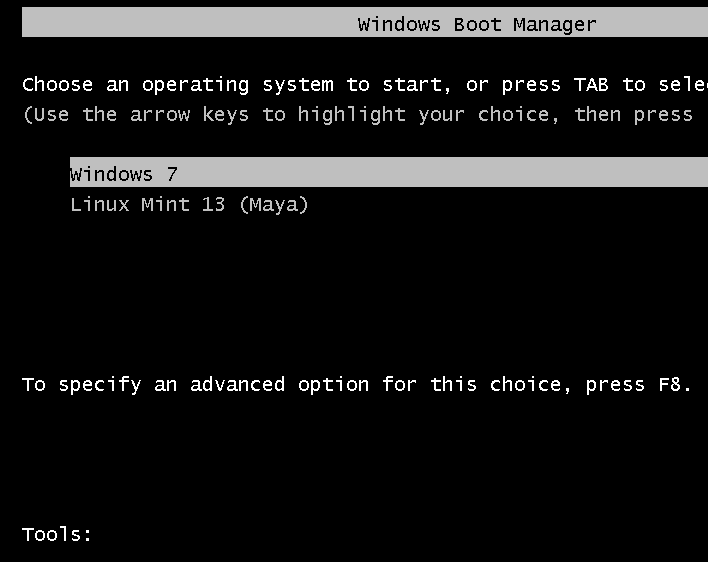
The objective here is to install Linux Mint 13 on the same hard drive, with GRUB, Linux Mint’s boot loader, installed in the boot partition (of Linux Mint), leaving Windows 7’s boot programs in the hard drive’s Master Boot Record (MBR) untouched. Then using another application to add an entry for Linux Mint 13 in Windows 7’s boot menu, so that at boot time, you will be able to choose which operating system to boot into. Selecting Windows 7 will cause the computer to boot into Windows 7 and selecting Linux Mint 13 will boot the system into your newly installed copy of Linux Mint 13, but not after a brief stop at Linux Mint’s boot menu.

After creating partitions for and installing Linux Mint 13, the new partitions as seen from inside Windows 7 will look a lot different. This image shows the partitions from the computer used for this tutorial after the dual-boot operating has completed.

For this tutorial, the partitions that will be created for Linux Mint 13 are: a partition mounted at /boot; root partition mounted at /; a partition mounted at /home; and a Swap partition. You do not need to create all four, but that is what will be done for this tutorial.
What do you need to complete this tutorial? Just five items:
- This tutorial
- You, and an Internet-connected computer, needed to read this tutorial.
- An installation image of Linux Mint 13 (MATE or Cinnamon edition). You may download it from here. Burn the downloaded image to a DVD, or transfer it to a USB flash drive.
- The target computer running Windows 7 (Note: you may opt to reinstall Windows 7 anew)
- EasyBCD – a free software from NeoSmart Technologies that will be used to add an entry for Linux Mint 13 in Windows 7’s boot menu
Note: If you are not familiar with disk partitioning in Linux and how to dual-boot operating systems, it is highly recommended that you read guide to disks and disk partitions in Linux and tips for dual-booting Windows and Linux before continuing with the rest of this tutorial.
Now that we have a pretty good idea of what we need to accomplish, time to get it done. To start, boot the computer from the Linux Mint 13 DVD installation image that you made. Linux Mint 13 DVD is a Live DVD and by default, will boot into a Live desktop environment. Click on the installer’s icon on the desktop to start the installation process. When the installer starts, click through the first steps until you get to the one shown below. You definitely do not want to select the second option. Like the second option, selecting the first option will lead to an automatic partitioning of the free space needed to install Linux Mint 13.

Selecting the first option will actually bring you to this step, where you can see how the installer will resize the main Windows 7 partition (the C drive). The problem with selecting the first option, is that GRUB will be installed in the MBR of the hard drive, where it will overwrite Windows 7’s boot files. Since this is not what we want to do, the only option left, is the last option (Something else). So, if you are at this step, click the Back button.

Selecting Something else and clicking Continue will bring you to the Advanced Partitioning Tool. “Advanced” does not mean that the tool is really advanced, it just means that it is for people who know how to partition disks in Linux. If you read and understood the material discussed in guide to disks and disk partitions in Linux, consider yourself an advanced user.
The main window of Advanced Partitioning Tool is shown below. By default, the partitions listed at this step – sda1 and sda2, are the two Windows 7 partition that we saw on the first image on this page. In Windows’ parlance, sda2 is the C drive, while sda1 is the System Reserved partition.

The task here is to resize sda2, freeing up enough space that will be used to create the partitions for installing Linux Mint 13. To begin, select sda2 and click Change.

This is the resize window, also known as the Edit Partition window. The sda2 on the computer used for this tutorial has about 320 GB of disk space. How much of that disk space we can free up depends, of course, on what is available. This is where you have to be very careful.

The system used for this tutorial was a recent installation, so Windows 7 has only used about 7 GB. With that, I decided to allocate 100 GB to Windows. That amount is what should be shown in the New partition size field. And that is all you need to do here. Click OK.


Works perfectly. Thank you!
Followed this step-by-step and it worked wonderfully. Thanks!
Hello, I was wondering if you could help a noob to linux! I followed your guide and everything went well, right up to the point of doing EasyBCD and dual booting. I get the option of Windows 7 or Mint 15, but when I boot to mint 15 I get a Grub command line, and from here I am lost! What could cause this issue?
Tell us a little bit more about your disk. The size of the partitions, what type of PC you have, etc
Sure…
My setup is this:
Toshiba Satellite C655
Internal drive: Toshiba 640gb
External: Seagate Backup Plus 1tb (which I cleaned, removed all the Seagate software.
Of course I’d made a good DVD installation disk for Maya (Mint 13), booted from it and when it came to partitioning part of the install, I chose to partition the clean external drive:
/boot: 500 mb
/ : 20gb
/home: 400gb
swap: 4gb
This left about half the 1tb external “unallocated”. Worked fine, Maya installed. After I then rebooted from the external usb drive, and voila! Maya was there, working fine.
The only step I then needed to add to your fine instructions was to download and used Gparted to change the large unallocated space to “ntfs” so that both drives – the internal Windows and external Mint could both access the external ntfs partition, very handy.
Thanks again.
You don’t need to use GParted. Mint has a system utility called Disks that you can use for that operation. Search for it in the menu.
And note that installing to an external drive is, technically, not dual-booting.
My experience has been that it is better to create the common NTFS partition from inside Windows, but if you can create it using Mint’s Disks and it works, then that’s fine too.
My Mint 13 doesn’t have a “Disks” utility via the menu search, so I was forced to download Gparted and it can partition and define both drives (internal and external) easily.
Although I can use the Window’s partitioning tools from the Win 7 enviroment, I found that Gparted used from a linux boot to be much easier for manipulating all drives.
As far as the “true” or “technical” definition you propose, with “dual booting” meaning only from a single drive, although I’m aware some of us use that informal definition, I’ve seen just as many who do not.
The more general definition seems to be being able to boot to one of two OS’s (the “dual” part), not simultaneously, from the same machine (whether from the same drive or not). On a single drive the choice is made from the MBR, on a dual drive setup the choice is make through the F12 (or equivalent) menu.
Much ado… but would ask why you prefer the NTFS partition on the Window’s drive in my situation (two drives)?
Actually, I plan to create another NTFS in the internal (Windows) drive, so that I will have an empty NTFS partition on both drives. This way I can backup the Windows internal to the Linux Mint external and vice versa, on the theory that both drives are highly unlikely to fail simultaneously (tho anything is possible).
You takes yer chances…
The NTFS partition does not have to be on the Windows drive. I just said it is better to create it using the Windows partitioning tool, because the last few times I created one from a Linux distribution, Windows could not write to it.
If an external drive is involved in this type of setup, then I wouldn’t consider it dual-booting. That’s the other point I’m trying to make.
I modified these great instructions to install Mint 13 on a USB external drive. Since my laptop internal is 500gb, and the external is 1tb, I decided to install Mint 13 on the external as a dual boot using F12, but keeping both OS’s and drives entirely separate, save for a shared NTFS partition on the external. Before starting I made sure the drive was clean and formatted for Windows, and connected to my laptop.
Booted from a Mint 13 iso in DVD drive, connected to internet and started “install”, then “something else” and went into Advanced Partition.
First task: highlighted external drive (sdb for me) then deleted all existing partitions to end up with one big “free space”. I then followed the instructions to add boot (500mb), root (20gb), home (half the remaining free space)and swap (4gb) partitions, I was made sure grub boot would be installed to the external (sdb), then installed.
After all was done I rebooted from the internal Windows, and then using F12 from the external to make sure both worked. Grub was on the external as intended. Only issue: Although the Linux boot was able to “see” the internal Windows drive, the Windows boot could not see the “free space”.
I then booted in Linux, installed Gparted and took a look: the remaining external free space showed as “unallocated” so I then changed it to a primary “ntfs” partition.
Result: both drives and OS’s can now see and write to the external NTFS. I have a dual boot Mint 13/Win7 laptop with both systems safe from one another but able to share the external NTFS partition as needed. A good start, thanks for the guide…
Excellent – worked first time. Thanks!
First of all thanks a lot for your tutorial: it is really good. I followed your steps one by one for Mint15 on Win7. It installed as required and after adding Mint to bootlist via BCD, i saw it too. But when i click on mint on startup, it takes me to a command prompt related to grub; i can not get into mint directly. Then what i do is to reboot. By the way, my computer has two hard drives, each is 750gb. Windows is installed in one of them and i installed mint on to the other one. Is it a broblem? Thanks in advance.
If you are dual-booting on 2 HDDs, then you don’t need to do anything using Easy(BCD).
You just have to determine what OS to boot by default, then make the HDD with that OS the default boot disk.
Assuming that Win7 is the first OS to be installed on one of the HDDs, and then Mint 15 was installed on the other. The Mint installer will add an entry for Win7 in its boot menu, so if you make the Mint HDD the default, you can boot any OS you like any time you start the computer.
Thanks for quick reply.
I changed the boot order from bios and booted from the second hard drive: as you said, grub loader showed up and i successfully started mint. But on the grub list, windows did not show up, just a windows recovery entry was included.
Two questions: Is it possible to enlist both OS in one boot-list? If it is possible, from which hard drive should I boot in?
Final question: Is there any good in installing mint in another hard drive, separate from the hard drive on which Win7 is installed?
Note that when possible, it is better to dual-boot on 2 HDDs. So that if something bad happens to Windows it is not likely to affect the other HDD, at least not immediately.
Make the Linux Mint HDD the default, and if you don’t see an entry for Windows in this boot menu, read on.
There should have been an entry for Windows in the boot menu of Linux Mint. If not, reinstalling GRUB in the Mint HDD should add it automatically. What is the device name of the Mint HDD, is it /dev/sda or /dev/sdb?
If you don’t know, you can find out by starting an application called Disk from the menu. Just open the menu and search for “disk.” You should see all the HDDs attached to the computer.
If the Mint HDD is /dev/sda, then from a shell terminal, type
sudo grub-install /dev/sda. Usesudo grub-install /dev/sdbif the HDD is /dev/sdb. The command will reinstall GRUB in the HDD specified.Just be careful not to specify the Windows HDD, as that will overwrite Windows boot files in the MBR.
Thanks a lot. You made my day, good job.
Very helpful and worked perfectly for Linux Mint 15 on a Dell with Windows 7 installed. Thanks!
hi, I do not speak english and do not even know how to write (I’m using google translator) but your tuorial was very efficient, I managed to install linux mint 13 in dual boot with windows 7 and efi bios with 4 primary partitions (I converted a partition from primary to logical) and I followed step by step instructions and it works great
thanks
Aww. You went through a lot of trouble then to post this. Ins’t that nice of you. 😉
Great stuff but do you know a work around for dual booting this way with Mint 15 & XP? (EasyBCD only work with Vista upwards)
Also, I’m wanting to include a FAT32 partition in there so I can share files between the OSs, any ideas on how to go about that?
Thanks for the tutorial.
I don’t have XP, so I’ve not tried it to see how it can be done. You may have to learn how to use a Microsoft tool to do what EasyBCD does.
To share files between the OSs, you don’t have to do anything special, certainly no need for a FAT32 partition. After installation, you can access your Windows files from Linux right from the file manager. See How to access Microsoft Windows files and folders from Linux.
That’s true but from what I’ve read Linux has no problem reading from NTFS but it’s write ability is prone to data corruption on occasion as MS is protective over its code.
I really want to be able to bounce the files back and forth between programs in the different OSs without the risk of damaging it, a FAT32 “no-man’s land” seems like a good neutral way to accomplish this.
I know that this solution is not to everyone’s taste but it is the solution that I would like to try before I fall back on anything else.
Thanks for taking an interest.
I’ve never lost data copying files to and fro an NTFS partition between Linux and Windows. But if you choose FAT32, be sure to create the partition from Windows.
Thanks, I will do.
Still leaves me with the problem of EasyBCD not working with XP…
I found a copy of Windows XP, which I’m not usre whether it will boot or not. If it does, I’ll try and set up a test installation to see if I can dual-boot it with Mint 15.
Worked like a dream with mint 15 and windows 7 as well. Great tutorial!
COOLIesT tutorial EveRRRRRRRRRRRRR!!!!!!!!!!!!!!!!!!!!!!!!!!!!!!!!!!!!!!!!!!!!!!!!!!!!!!!!!!!!!!!!
i had so many confusions with linux..you literally solved em all!!!…this guide is very very well written..i am pretty sure you are one of wisest linux masters out there!!!!…awesome guide for windows users and linux n00bs like me!!!!!!…:D
oh,you know this is not only tutorials really it is a complete course.
I don’t see any benefit to adding Easy BCD. After I installed BCD and booted, I still get the GRUB options page where Linux and Windows 7 are listed. If I select Linux Mint it launches. If I select Windows 7 that takes me to the Easy BCD launch page where there are two options.
By far the best explanation there is to find in the Realm of the Internet! Thank you for allowing me to experience Linux!
worked like a dream with linux mint 14 and windows 7, thanks very much