One tool that has seen very little or no change over the past several releases in Ubuntu Desktop is the installation program. So it is somewhat surprising that some users are having a hard time dual-booting Windows 7 and Ubuntu 12.04 using a tutorial written for Ubuntu 11.04.
Stemming from comments in that article, and email from readers, I decided to revisit that tutorial using Ubuntu 12.04. So the purpose of this article is to show how to dual-boot Windows 7 and Ubuntu 12.04 on a computer with one hard drive. And it will be on a computer with an existing installation of Windows 7. If there is a need to, you may reinstall your copy of Windows 7.
If you want to attempt this on a computer with two hard drives, see how to Dual-boot Ubuntu 12.04 and Windows 7 on a computer with 2 hard drives.
To get started, download an installation image of Ubuntu 12.04 from here. Depending on your platform, you may download the 32- or 64-bit image. Screenshosts used in this tutorial were taken from test installations using a 32-bit installation image in both a virtual environment using VirtualBox, and on real hardware. In either case, I did not encounter any errors that others have reported, so I am certain that if you follow this guide, you should have a computer with both Windows 7 and Ubuntu 12.04 installed in a dual-boot configuration.
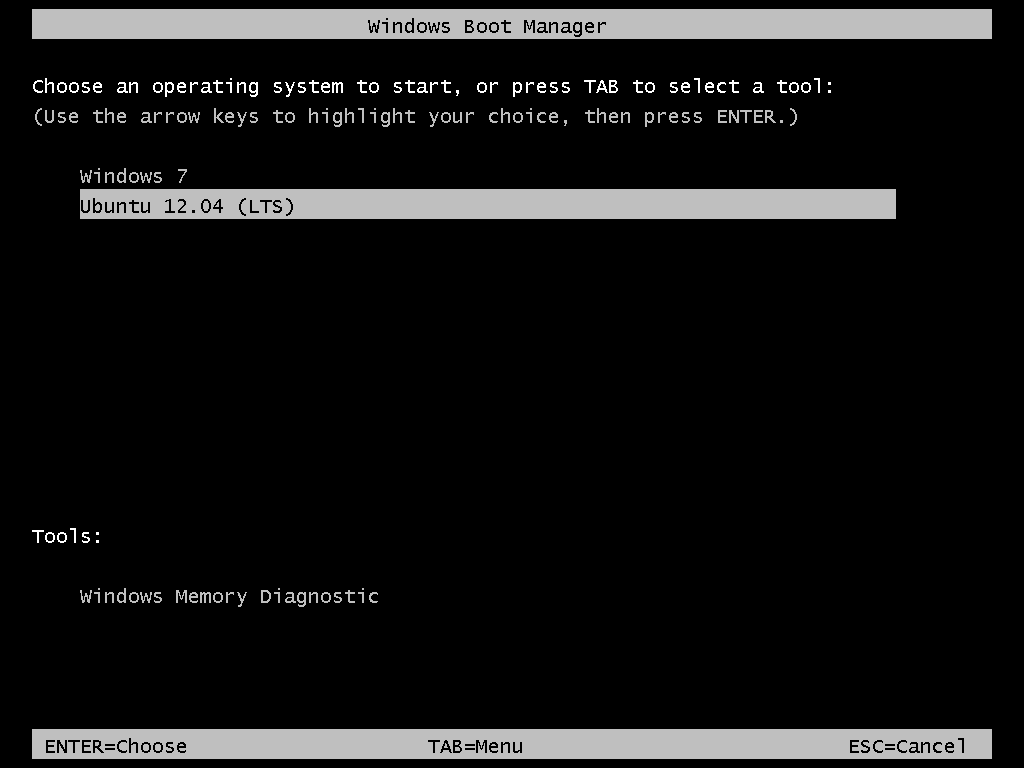
So that anytime you reboot the computer, you should see Windows 7’s boot menu with two entries listed – Windows 7 and Ubuntu 12.04 (LTS). Then you may choose to boot into Windows 7 or Ubuntu 12.04.
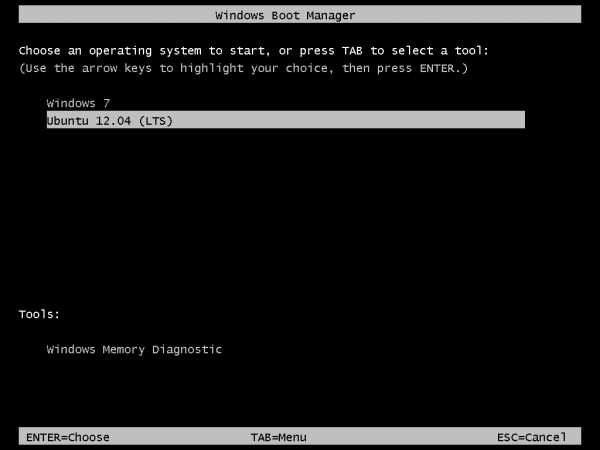
Now that you know what the overall goal is, how do you get from here to there? First, understand that if you have a computer running Windows 7, that Windows 7’s boot manager is responsible for making sure that the system boots. Installing Ubuntu on the same hard drive throws another boot manager into the mix. So the most important decision you are going to make about this, is which boot manager (Windows 7’s boot manager or Ubuntu’s) do you want to be responsible for primary boot operations?
When dual-booting Windows 7 and a Linux distribution on a computer with one hard drive, the best option is to have Windows 7’s boot manager be the primary boot manager. Why? Because whenever you reinstall or update Windows 7, its installer will overwrite anything it finds in the portion of the hard drive where critical boot-related programs are installed. That portion of the hard drive is known as the Master Boot Record (MBR). Also, certain anti-virus programs have been known to mess with the contents of the MBR, so installing GRUB in another location will ease the maintenance headache associated with your system. This point determines where GRUB will be installed.
If you are not familiar with disk partitioning (in Linux) and dual-booting, it is highly recommended that you read guide to disks and disk partitions in Linux and tips for dual-booting Windows and Linux.
By default, a new installation of Ubuntu 12.04 is installed on two partitions – a main partition, and Swap. The main partition is usually a primary partition and the Swap, a logical partition. And if Ubuntu is the only operating system on the hard drive, you will see both partitions labeled /dev/sda1 and /dev/sda5. Because you are going to install it on a computer with another operating system on it, the partitioning scheme will have to change.
The recommended partition scheme that will work better with the system you are about to install will have at least three partitions. They are the:
- Boot partition – This is where GRUB will be installed, instead of in the MBR. Installing GRUB in the boot partition is where users have encountered errors, so pay particular attention to what you do with this partition
- Root partition – This is where all the programs will be installed
- Home partition – This is optional, but it helps to have your files and folders on a separate partition
- Swap space
I think what you need to do should be pretty clear now. Time to begin the process! If you have not done so already, burn the installation image (of Ubuntu 12.04) you downloaded to a CD or transfer it to a USB stick, and boot the computer from it. When booted from the CD, you will be given the option to boot into a Live Desktop or start the installation without visiting the Live Desktop. It does not matter which option you choose, but booting into the Live Desktop and starting the installation from there seems to be a very good choice.
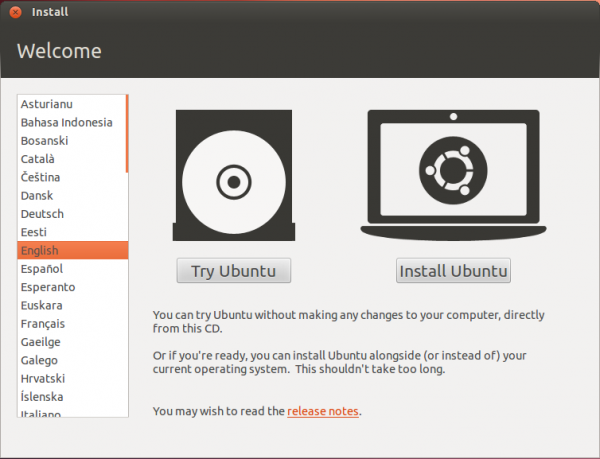
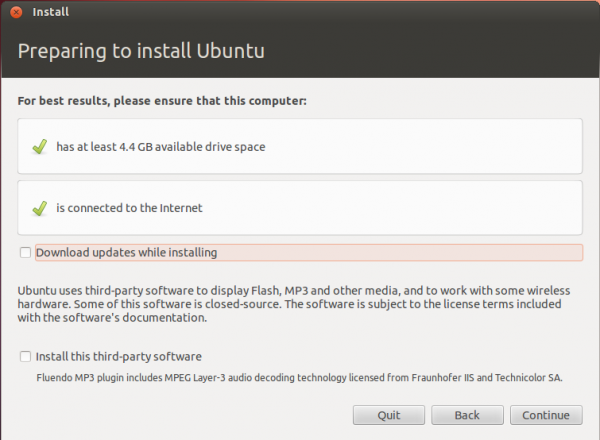
Whether the installation process is started from the Live Desktop or not, clicking through the installer gets you to the step shown in the image below. The most important information here is the minimum disk space (4.4 GB) recommended for a successful installation of Ubuntu 12.04. That piece of information will help you determine how much disk space to allocate to the root partition.
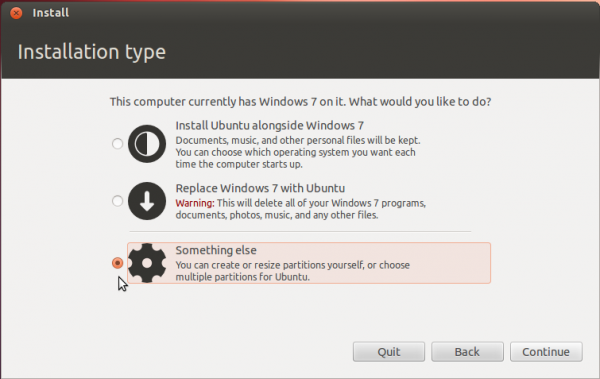
Clicking Continue from the previous step will land you here. If, as in this example, you have Windows 7 installed on the target hard drive, you should see the same three options shown here. Because you will be creating partitions manually, the option you want to select is Something else.
That should bring you to the Advanced disk partitioning tool. Again, if we are operating from the same point, that is, if you have a default installation of Windows 7 on the target hard drive, you should see two ntfs partitions (/dev/sda1 and /dev/sda2) listed. The main Windows 7 partitions, also popularly known as the C drive, is your sda2. To install Ubuntu, you will have to resize that partition. Note: If have free unallocated space on the hard drive, you do not have to go through this partition resizing process. To resize the partition, select it and click the Change button.
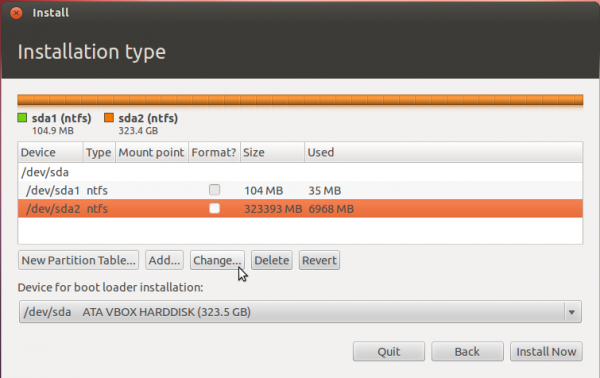
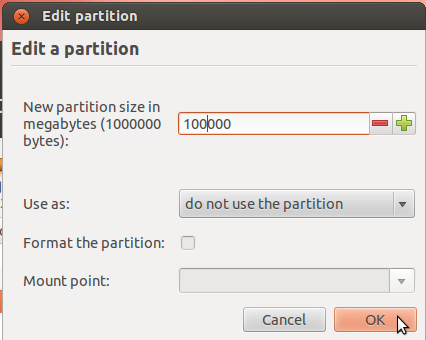
That should open this window. The only thing to do here is tell the installer how much disk space you want to keep for Windows 7. The rest will be used for Ubuntu. The system used for this tutorial has about 324 GB of disk space. I chose to keep 100 GB for Windows.
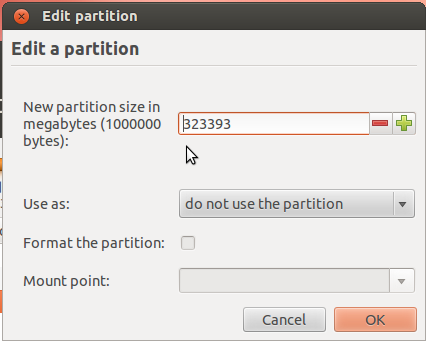
So the window now looks like this. Click OK.
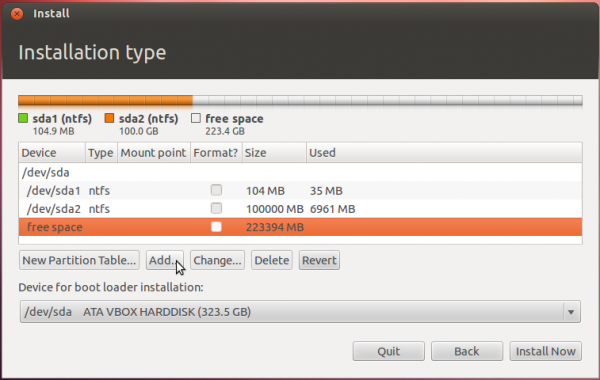
After the partition has been resized successfully, you should see the freed space marked as free space. Select it and click Add to start creating partitions for Ubuntu 12.04.



Hi,
thanks for this very good tutorial. I was into my third day of trying to get Linux Mint installed and working alongside Windows 7, and your tutorial helped me finally get it to work (if not perfectly..yet).
For the benefit of anyone else tearing their hair out with dualboot issues:
I have an 64 GB SSD that hosts the Windows 7 OS. In addition to that I have 320 GB and 1 TB drives.
I initially tried to install Linux Mint to a an empty partition on the 320 GB HDD (in Windows this would have been I drive), with boot, root, home and swap partitions, just as outlined here. I then used EasyBCDEdit as per instructions in another tutorial (sorry don’t have the link), but could not get Windows Boot Manager to load Linux Mint. And after finishing all the steps in your tutorial, I had this same problem. At boot time I would be presented with two choices, WIndows and Linux Mint, but when selecting Linux Mint I got the following error message:
Try (hd 0,0) NTFS5: No Ang2
Try (hd 0,1) NTFS5: No Ang2
Try (hd 0,2) Extended
Try (hd 0,3) Invalid or null
Try (hd 0,4) EXT2:
From (hd 0,2) onwards those are the partitions created in this tutorial then. Swap does not show at all.
I eventually got Linux Mint to load by selecting Grub (legacy) and manually selecting the boot partition under “Device” in EasyBCD. BTW I had created a 500 MB boot partition for Linux and it showed up as (Partition 3 – Linux 476 MiB).
Now I first get the Windows Boot Manager, then the Grub loader after that….sure I will find the solution to this yet, but right now I am just happy to get Linux Mint to load at all!
BTW, Windows 7 freaked out a bit after I repartitioned the C drive and formatted part of it as Ext4 – I was prompted to run a consistency check. It took perhaps 5 minutes to execute and on seems to have been a one-time thing.
Many thanks again for the tutorial. Now on to exploring Linux, newbie as I am to it…! 🙂
Great article, but I am stuck at Installation type step:
Installed Win7 on Dell Optiplex-790, it has created a 100MB boot partition and next to it an NTFS one for Win7, left 60GB free space for Ubuntu at the end of the disk.
Rebooted with Ubuuntu 12.04, got the first and second screen, then when clicked on continue, it does not seem to be able to see the free 60GB space and the partition selection window is flat empty showing the /dev/sda only as selectable. Not sure what causes it. Any advice would be greatly appreicated.
At that step, click the Something else option. That should take you to the Advanced Partitioning Tool. You should see all the partitions on the disk. From there, you can start creating partitions for Ubuntu.
As i told u Finid, i got new lappy from Dell. 4gb RAM, I5 3rd gen processor, AMD G.Card 1gb 7670M. Initialy 2 partitions C: (275 gb, win7), D: (6xx gb, empty space) of 1TB HDD. So i installed ubuntu 12.04 (64 bit) in the 6xx gb space after selecting option ‘Install ubuntu alongside win7’. At booting i am getting ubuntu OS selection Menu. Things going fine yet :). Your tutorial was a great help and presentation is awesome. Thnx 🙂
Great!
On your last step of first page, I have made a free space, but it is shown as ‘unavailable’ and I couldn’t ‘add’. I seem to have four primary partitions before making the 5th partition to install Ubuntu. So how would I overcome this?
Delete the last partition and create it as an extended partition, then you can create the remaining partitions as logical partitions. See this article.
I got a new dell lappy inspiron 15R. I5 3rd gen, 4gb Ram , 1gb AMD 7670 graphic card. win7 preinstalled. I need dual boot with ubuntu.
what should i choose 32/64 bit ubuntu 12.04 ?, should i choose fedora stead of ubuntu ?
& will ubuntu 12.04 reconise my graphic card ? if No ,then can anyone help me to provide the link for its drivers.
I’m guessing this is a 64-bit machine, and it is powered by 64-bit version of Windows 7. If true, the best way to go is to download the Live CD/DVD version of the distro you want (Ubuntu or Fedora) and test-drive it from the Live Desktop.
Then you can determine which one recognizes all the hardware components. That’s the way to go.
When you are done testing, stop by and share the results with us.
Hello.
This tutorial is great! Well done!
But I still have a question: may I do a home partition (where I will store all my data and files) in the ntfs format on Windows? Because I already have a large partition reserved for this purpose in my Windows and I want to know if I can use it from the Ubuntu too.
(sorry for my english. I’m not a native speaker!)
Thanks!
Assuming that you created partitions on your system exactly as given in this tutorial, and you have an ntfs partition that you created in Windows for your file and data.
And your question is, can you access the file and data in the ntfs partition form Ubuntu?
The answer is yes. See this tutorial.
Hi everyone again! So for those who installed Ubuntu 12.04 suceessfully! What do you think about except hardware recognition which is amazing!!! my Huawei usb modem stick designed to work with Windows was installed easily without any downloads! personally I dont like the look of Ubuntu so if you have any suggestions to make it look better i am ready to take it!
Best Tutorial ever of this kind I have seen so far. Excellent work!! And Thanks
And you are welcome.
hi sir i am also agree with richie. it is very good tutorial.but sir i want to learn ns2 also please give me some link about it.
Glad the tutorial was helpful, but what is ns2?
Fantastic…. Im quite new to Ubuntu and this worked perfectly… Thankyou
Thanks very much for the detailed tutorial – worked a treat!
Excellent work you’ve done. My machine is working with two OS now. All thanks to you and your wonderful article. I’ve got no problem at all in following your tutorial except that I got a little headache at the partition making part because my HDD is 340gb plus I use 2 HDD so I need to make the /home and swap partition in another HDD. But I’ve no problem or errors at all in the process. Thanks.
I’m sorry. A little correction there. My HDD is not 340GB.
Hi there, this was really a very good article on dual booting.
I took time to read carefully and understand the steps and then executed every step with care/attention and got the desired result in the first go. It took about 2 hrs to get things working, starting from creating a Bootable DVD with ISO image of Ubuntu. I already had Window 7 installed on my PC with 1 primary partition and 4 logical partitions. I used one of the unused logical partition and deleted it to create a free space and then followed the article step by step.
Good work! Thanks for sharing your knowledge.
Cheers
Balkar
Please excuse my ignorance.
1) In the procedure outlined in the article, after creating the logical partitions for Ubuntu, is it the installation process, that creates the primary partition incorporating those logical partitions, or is this something that must be done by a command?
2) Before reading the article, with Windows 7 in one primary partition on my acer laptop, I installed Lubuntu, unintentionally in two primary partitions – one for swap. Then I installed PC-BSD. The PC-BSD partition is recognized by the file system, but not by the Master Boot Record which recognizes and starts the Windows 7 and Lubuntu. Not being familiar with GRUB, What is the best procedure to get the MBR to recognize the PC-BSD partition?
3) And can I delete and reinstall Lubuntu between the Window7 and PC-BSD partitions?
4) When I get something with a larger drive, I want to install Windows, Lubuntu, PC-BSD, and a lamp Ubuntu with a desktop for work and testing. Is this a correct order of installation?
I alrdy have windows 7 installed in my system. But when I try to install ubuntu 12.04 from a live cd it shows that “This computer has currently no detected operating system” and no partition table is shown. Please tell me what to do??
On the disk partition options step, click on the Something else option, then go to the next step.
You should see all existing partitions on the target disk. Then start creating partitions manually.
but the next step is “Install now”. Is it safe to click on that. Are you sure that it will not format my C drive?
No, when you select Something else, clicking Continue takes you to the Advanced Partition Tool. That is shown in the fifth image on the first page of this article.
Apparently, selecting GRUB2 and letting EasyBCD locate where it is, doesn’t always work. There are now posts on the forum, that if that produces a non-booting Menu entry, and all other remedies fail, then try GRUB.
http://neosmart.net/forums/showthread.php?t=9548&p=72432#post72432
It worked for me, after a couple of weeks of failures. I’m triple-booting Windows 2000 Pro, Windows 7 Pro, and LinuxMint12.
How did you finally make it work? for it gets stuck with “initializing cmain..”
Hey.. did you get it to work? Coz I got stuck at the same point and the solution given by RonC is not working for me..