Linux Mint 12 is the latest release of the Ubuntu Desktop-based branch of Linux Mint. This release comes with several desktop options, a few screen shots of which have been posted here.
By default, Linux Mint 12 ships with a guest session enabled, so a password-less access to the system is possible from the login screen to anybody with physical access to a Linux Mint 12-powered computer. If you do not want that level of openness on your computer, this tutorial will show you how to disable that guest session, and also how to create additional user accounts on the system.
This image shows what the login screen looks like, with the guest session underlined. To begin the process of disabling it, open a shell terminal and type the following command: sudo gedit /etc/lightdm/lightdm.conf.

That should open the LighDM configuration file in GEdit, a text editor. The original content of that file is shown below.

All you need to do to disable guest session from the login screen is to add the allow-guest=false declaration to the end of the file as shown here. Save and close the file.

That should be all you need to do.

The second stage of this tutorial is to show the simple steps involved in adding or creating a new user account. There are two types of accounts defined in Linux Mint 12 – Administrator and Standard. The account created during installation is, by default, of the Administrator kind. The next few screen shots will be used to show how to create a Standard account, one that does not have administrative privileges on the system.
To start, launch System Settings from the user profile widget. Click on User Manager, which should open in place. There are two steps in take here. First, unlock User Manager. Second, click on the “plus” button to create the new account.

From the Account Type menu, select Standard, and fill in the other credentials for the account. If you want to give the account admin privileges, select Administrator from the menu. Click Create.

By default, a newly created account is disabled because a password has not been specified for it. Click on the arrowed line to create a password.

Set a strong password for the account. Click Change.

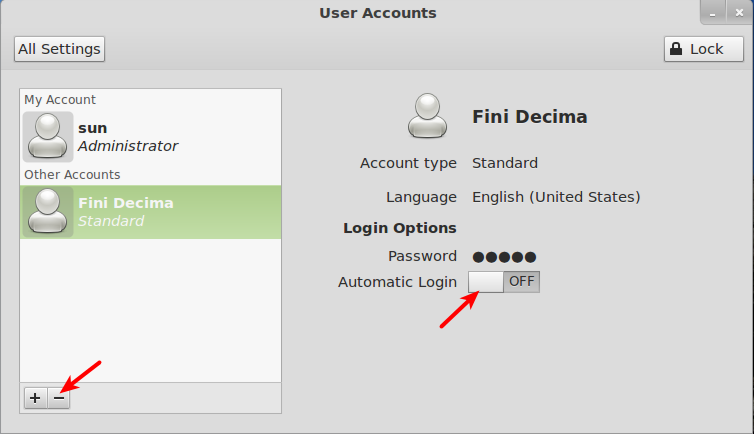
Back to the main User Manager window, you will find the new account listed with the existing ones. To delete an account, select it and click on the “minus” icon. And to enable automatic login for any account (not recommended), select the account from the same window and turn it off by clicking on the button (upper arrow).




The first part doesn’t work on Linux Mint 17.1 Cinnamon. The lightdm.conf file isn’t found at that location. :\
I wanted to add a user. Looks like a nice tutorial except I can’t find System Settings. What’s the user profile widget?
I’ve managed to a add a user. However, to do it, I did ‘sudo apt-get install gnome-system-tools’, and then ran the Administration -> ‘Users and Groups’ program.
Great tutorial. Makes it seem simple now looking back. I just did the ‘add account’. Quick and easy now that I know. Thanks a lot.
I know this works in Ubuntu 11.10..but does not work on Mint 12.
From the screenshots in the article, it is obvious it works. Try rebooting the PC. Should not be necessary, but try it.
Disabling guest session as you indicate doesn’t work. Asus Eee PC 701SD, Linux Mint 12 (CD 32 bits). Everything else but not MATE, I don’t need it.