The computer should boot into the Ubuntu CD/DVD, and give you the option to boot into a Live desktop or to start the installation, bypassing the Live environment. If you boot into the Live desktop, click on the Install Ubuntu icon on the desktop to begin the installation. When the installer starts, click Forward until you get to the “Allocate drive space” step,

On the “Allocate drive space” window, the installer presents several options. Because partitions are going to be configured manually, the option to choose here is “Something else.” That will start Ubuntu’s Advanced partitioning tool.

On the Advanced partitioning tool window, the installer presents the detected partitions. Notice the two ntfs partitions. The third partition is the boot partition of the Fedora 15 installation and /dev/sda5 is the first logical partition on the system configured for use by LVM. Ubuntu’s desktop installer does not “understand” LVM, so as far as it is concerned, there is nothing on that partition. In other words, it does not “know” that Fedora 15 is installed on the same disk.
For Ubuntu, separate partitions for the following mount points will be configured: /boot, Swap, / and /home. Because the number of primary partitions allowed has been exhausted, they will all be logical partitions. To begin, select the free space, then click Add.

For the boot partition, a disk space of 500 MB should be more than enough. And the mount point is /boot. OK.

With the boot partition configured, select the free space, then click Add to create the next partition. Note that this step will have to be repeated for the other partitions.

Next partition will be for Swap, so select “swap area” from the “Use as” dropdown menu, and allocate a reasonable disk space to it. The default is usually 2 GB. OK.

The third partition will be for /, the root file system. File system type is ext4. It does not have to be ext4. Btrfs is another good option, but to use btrfs, the partiton layout will be slightly different. See how to install Ubuntu 11.04 on a btrfs file system for guidance. Ubuntu 11.04 recommends a minimum of 4.4 GB of disk space for installation, so the space allocated for / in this example should be more than enough. OK.

The last partition will be mounted at /home and like the rest, the file system should be ext4. Unless you have other plans, the rest of the available space should be allocated to it. OK.

All the partitions are configured. Before clicking Install Now, you need to change the location where GRUB will be installed. By default, the installer will install it in the MBR, but we need it in the boot partition of the Ubuntu installation. So, click on the “Device for boot loader installation” menu and select the entry for the boot partition – /dev/sda6.

This just to show what the window should look like before you click on Install Now. Once that is done, continue with the rest of the installation.

After installation, the system will reboot into Wiindows 7. Now, we need to add an entry for Ubuntu to the boot menu by using EasyBCD just like we did for Fedora 15. So, start EasyBCD. This screenshot shows the previous entry. Click on the Add New Entry tab..

Then on the Linux/BSD tab. Select “GRUB 2” from the Type dropdown menu. Unlike Fedora 15, which uses GRUB Legacy, Ubuntu uses GRUB 2. You may change the name to reflect the distribution being added. Click on Add Entry.

This shows you a preview of Windows 7 boot menu. You may change the order here, and change the default.

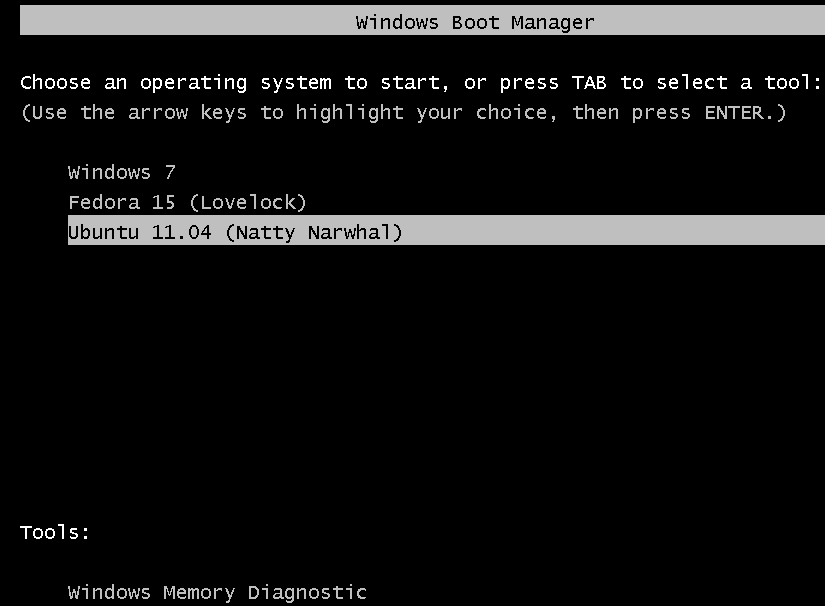
And this is the real thing. You see this every time you boot the computer. When you try to boot into Lovelock or Natty Narwhal, you will be presented with GRUB’s menu. Note that you can use any two Linux distributions for this setup. So, you could triple-boot Windows 7, Linux Mint and Ubuntu, Windows 7, Mandriva and Linux Mint. Your choice.

You can have quality articles like this delivered automatically to your Feed Reader or Inbox by subscribing via RSS or email. This website now has a Question and Answer section. Use the commenting system for simple comments, but for more involved assistance, please use the Question & Answers section.


hi hi
please make toturial
for install centos beside(side) win7&ubuntu installed 🙁
i want help:(
Start with Windows 7 installed. Install Ubuntu, then Install CentOS. At each step, be sure to leave a spare partition for the next OS.
If you tell me how many Windows partitions are on the target HDD, I’ll be able to give you a more detailed suggestion on how to proceed.
Thankx for this. Well explained. Very helpful for me.
In your tutorial you had only 2 primary partition earlier at the start point. But I have 3 primary partitions consumed by windows:
1st: System Reserved
2nd: Windows Installation
3rd: Application Software (I install windows software here)
Unallocated space 120 GB
I want to install 3 Linux OS in this Free space. Is is possible? How to do it?
Unless you are using GPT-based partitioning, you have just 1 free primary partition left. That 120 GB of unallocated space will be created as an extended partition. From there, you then create the logical partitions to install the Linux distro(s).
So the answer to the first part of your question, is yes, it is possible. The second answer will depend on what distros you intend to install. If you are new to disk partitioning in Linux, start with guide to disks and disk partitions in Linux.
What are the 3 distros you intend to install?
Thanks for quick reply.
I want to install these three distros:
1. Fedora 17 (I’ll use this mainly) within 70 GB
2. Debian or Debian based distro (Just for testing)within 30 GB
3. Any other distro (other than above two, just for testing ) within rest of the space
Some more question:
I will install Fedora 17 from Live USB. Do I need another third party tool to make that unallocated space as extended partition or Anaconda installer of Fedora will take care of that? I mean how to make an extended partition ?
If Fedora 17 will be the main distro, and you only want to use the other 2 for testing, one option (the easiest) is to install Fed. 17 on all 120 GB of free space, then install the other two in a virtual environment inside Fed. 17.
Virtualbox is the easiest app that will enable you to install any other OS in a virtual environment.
Anaconda or Debian’s installer will create the partitions you need.
Note that if you opt to install all 3 on real hardware, it will be easier to install a distro, like Fed. 17, last, as an installer that does not support LVM will not “see” an LVM partition. (Fed 17 uses LVM by default.)
I don’t think you need a 3rd-party tool to make a bootable Fed. 17 USB.
Thanks for the walkthrough.
How can I tripple boot windows vista, ubuntu, and Red Hat enterprise Linux?
In the order that you listed them. It might be best to put in a second HDD for Ubuntu and RH. A small HDD for Vista, and a lager one for the Linux distros.
i tried it & work very well
thanx for well explained post..
I have Windows XP, Linux Mint 9 and Linux Mint 11. On the top of it, I installed Ubuntu (by selecting ‘install alongside other OS’ option). Ubuntu is installed and after update-grub, it is even listed in the grub (It was not, before). But when I choose Ubuntu 12.04 from grub, some CLI type commands are listed in the screen and Ubuntu doesn’t load.
What do you think is the issue? It was an automatic install and hence I am not sure if it created a / folder. Do you think I should reinstall Ubuntu? The customized installer in ubuntu is very complex. Do you have a tutorial for the same?