For those Windows users who have discovered what Linux has to offer, but for one reason or another are not ready to completely abandon Windows, dual-booting between the two operating systems is one method of keeping a foot in both worlds. And to help those users, this article presents a step-by-step guide on how to configure dual-booting between Windows 7 and Ubuntu 11.04 on a computer with one hard drive. The same steps may be used to dual-boot both between both systems on a computer with two hard drives.
In attempting to dual-boot between Windows 7 and Ubuntu 11.04, you will either install Windows anew, then install Ubuntu 11.04 alongside it, or install Ubuntu 11.04 alongside an existing installation of Windows. This tutorial uses as example, a case of installing Ubuntu 11.04 on an existing installation of Windows 7.
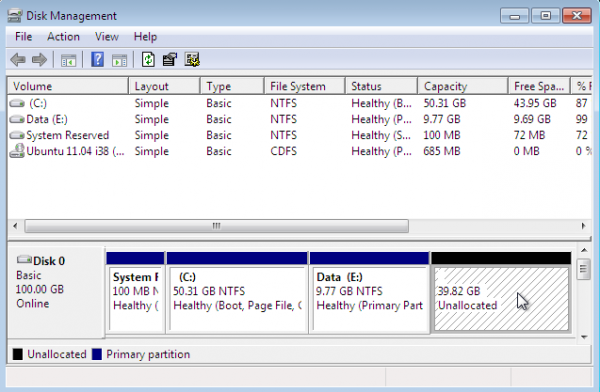
As shown in the image below, the existing installation of Windows 7 used for this tutorial has three primary partitions. And because of the limitations of the MBR partitioning scheme, only one primary partition is available for installing Ubuntu 11.04. By using an extended partition, we can configure as many partitions as we need for Ubuntu.
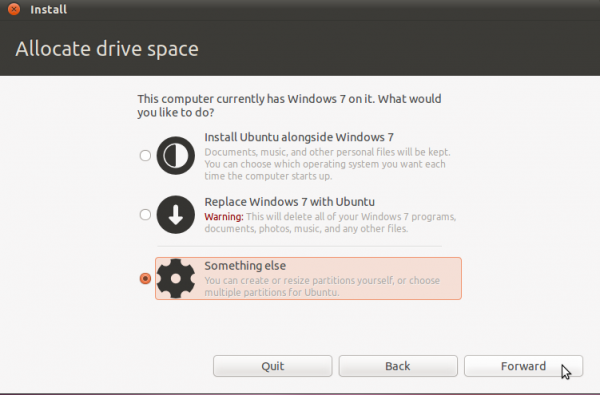
To begin, boot the computer using a Ubuntu 11.04 CD or DVD. At the disk partitioning step, the installer will present several options. Because the installer will not automatically partition and configure the free space, using the installer’s advanced partitioning tool is the only method of creating the necessary partitions. To launch the advanced tool, select the “Something else” option, the click Forward.
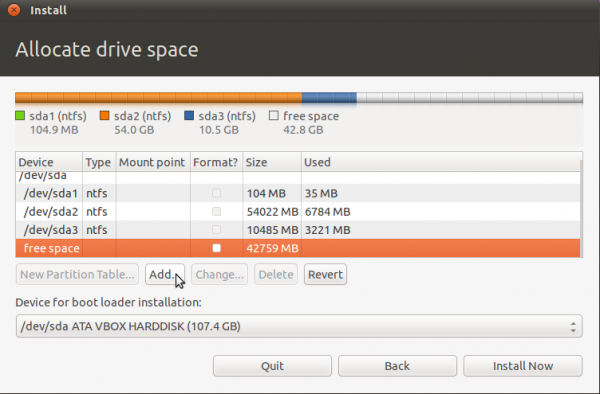
This is Ubuntu’s advanced partitioning tool and the detected partitions. The first three partitions are obviously the ntfs partitions that we saw in the first image. Because there are three existing primary partition, the last partition will have to be an extended partition, under which logical partitions for installation of Ubuntu will be configured.
By default, Ubuntu’s installer configures two partitions – the first for /, the root directory, and the second for Swap. When creating partitions for installing any desktop Linux distribution, my recommendation is to create the following four partitions:
- /boot, the boot partition. This is where programs critical for booting the system will reside.
- /, the root directory. The bulk of the programs used for running the system will be installed here.
- Swap, unformatted disk space for use as virtual memory.
- /home, the partition where your home directory will be located. In the course of using the system, files and folders you create will reside in various folders here.
So, to start setting up these partitions, select the free space and click on Add. Note that this step will have to be repeated for all the partitions.
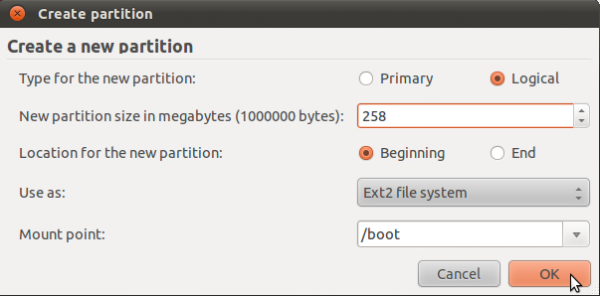
The first partition will be for /boot. When setting up an LVM-based system using an Alternate Installer ISO image, the default disk space allocated to /boot is 258 MB. However, only about 22 MB of that is used, so anything thing between that size range will do. For this tutorial, the default will be used. The mount point will, of course, be /boot. The default file system is ext2. OK.
The second partition will be for Swap. It is possible to install Ubuntu without Swap. However, if you attempt to do that, the installer will try to discourage you with the following warning:
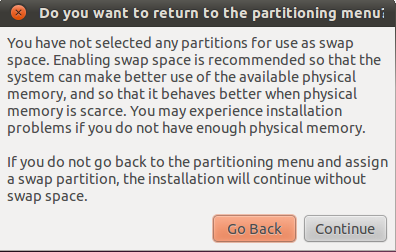
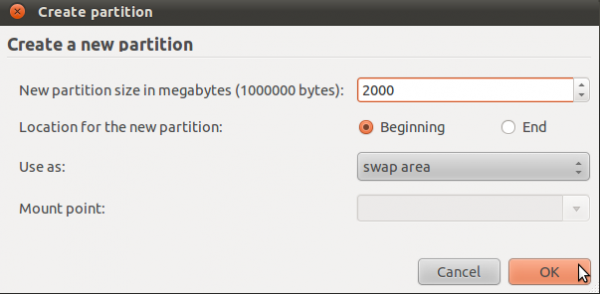
For the record, I have been able to install Ubuntu 11.04 successfully without Swap. The sky has not fallen yet, but I have not tried to put the system in Suspend or Hibernate mode. In any case, save yourself a load of trouble and configure Swap. The suggested size for Swap is 2000 MB. Select “swap area” from the “Use as” dropdown menu. OK.
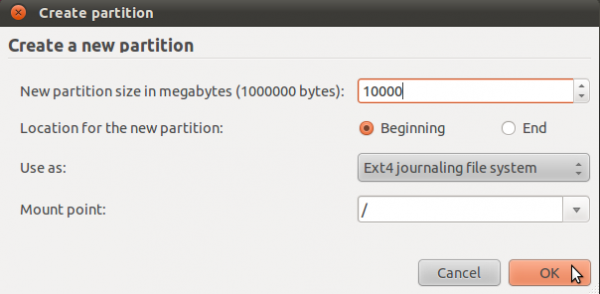
The third partition will be for /, the root directory. The default journaling file system on Ubuntu 11.04 is ext4. You may stick with it or choose another journaling file system available. Btrfs is supported, but this partitioning scheme is not for btrfs. If you are interested, how to install Ubuntu 11.04 on a btrfs file system is a good place to start.
The installer recommends a minimum of 4.4 GB for Ubuntu 11.04, but on a new installation, less than 3 GB of disk space allocated to / is used. Note that as you install additional applications after installation, disk space used will grow, so be generous here. I think 10 GB should be more than enough. OK.
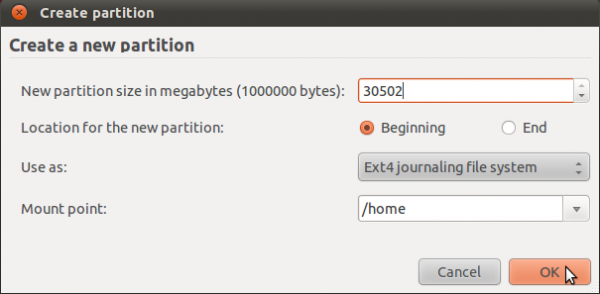
The last partition will be for /home. The file system is ext4, and you may allocate all available disk space to it. OK.





I have a problem with GRUB, slightly different from awillwa’s problem. What happens is that after I have the installation run, all goes well until it gets to the part where GRUB should be installed. Here, it says that it cannot install GRUB in the boot partition of Ubuntu 11.10. It is a fatal error, according to the installer. I can still use Windows 7, but I really want to dual-boot the two OS’s.
What is the size of your HDD and how much of that is used for Windows?
Note that this type of error could be due to corrupted CD/DVD
Hi, I don’t have a solution, but I am having the same issue. I am running [or attempting to, anyway] Ubuntu on a portable external hard drive connected to a MacBook Pro–I’m using rEFIt to boot, just FYI.
The thing is, though, I’ve tried to install Ubuntu and Kubuntu, on separate occasions, so I’m not convinced that it’s an issue with the installation CD.
Furthermore, it’s not anything I’m doing, at least I don’t think: I’ve already had Ubuntu 11.04 installed on this hard drive, but I had to format it one day. But I can’t get it back on there.
What is going on here?
Hi Pacmaz, just wondering what is the size of the /boot partition? I got my dual boot with Win 7 and Ubuntu 11.04 to work with grub installed in /boot but made the partition bigger than 500mb. Good luck
I was having the same issue when I tried to install (several times each) either Kubuntu 11.10 or Fedora 16 in a dual-boot setup with 7 – a fatal error when I tried to load GRUB2 in an extended partition (/boot – using 200MB for the partition size). I had been formatting the /boot partition as EXT2. Finally tried formatting the partition as EXT4 and I was able to install GRUB2 to it without any problem. Can’t tell you WHY – I don’t know enough about GRUB2 to say, only that it worked for me. Perhaps there’s some incompatibility with GRUB2 and EXT2 when the /boot partition is not a primary? I didn’t run into this issue in older distributions running the old version of GRUB.
I had formatted the /boot partition as EXT2 because it seems that every tutorial tells you to do that. However, I just read an article somewhere online (sorry, don’t remember where) where the author stated that with today’s super-large HDs and fast CPUs, using EXT2 for /boot really isn’t necessary any longer.
Anyway, using EXT4 for /boot is what worked for me. 🙂 Good luck!
Thank you!This solved my problem.
I haven’t had the chance to follow up on this at all, but I will definitely try it this weekend.
Update: nope.
Ubuntu did manage to get through the full install, no fatal error messages or anything, I was pretty excited. But! when I restarted by MBP and try to boot Ubuntu through rEFIt, I’m given this ‘no such device’ sort of warning on the grub64.efi load screen.
At this point, I think that unless there is a fix for this, I’m done with trying Ubuntu until I can get a machine dedicated only to one OS. This is enormously frustrating.
hey u might have used an 64 bit iso of ubuntu so might have not supported that if u want to just try ubuntu u can just get it in a pendrive
or getting it double boot
I just got the upgrade message last night for 11.10. and i hit yes and went to bed without thinking. This morning i looked and it was stuck at getting permission for updating the GRUB and i have hit a panic. Because i installed using your guides method to install GRUB to the /boot partition, will the automatic distribution updater know to update the files there or will it make a new copy over the MBR. It is still sitting there waiting for me to allow the overwrite/update at home when i get back from work. I will keep it there until i find it is safe to continue, i sadly didn’t even backup, and there is sensitive data in my windows that i can not loose.
Thanks,
Aaron
I love you more than I care to express. This is by far the tutorial I’ve come across and I’ve been looking for awhile. It was such a great help and worked wonders. Many thanks to you good sir.
Hey i was just wondering if u could do the same with a triple boot. I am already dual booting windows 7 and ubuntu 11.04 using this guide. I was thinking of doing a triple boot with ubuntu 11.10 doing the same thing but i dont know if EasyBCD will recognize the Grub for ubuntu 11.10. I dont really want to mess my set up since i been happy with it but i want to try ubuntu 11.10 to see if its better than 11.04. Thanks for the tutorial u make it so easy for a complete linux noob like myself. 🙂
You can try Ubuntu 11.10 by installing it in a virtual environment running in either your current installation of Ubuntu 11.04 or Windows.
In Ubuntu 11.04, use the Software Center to install virtualbox and you can run as many other operating systems or distributions that you want. For the record, Ubuntu 11.10 looks and feels much better than 11.04, so upgrading is highly encouraged. See some screenshots at http://www.linuxbsdos.com/2011/10/13/ubuntu-11-10-screenshots/
Hi,
I’m using DEll Inspiron i7. I have installed Win 7 (Home Premium) + Ubuntu 11.04, While booting Grub list Ubuntu and Win7, on selecting win 7 it will become black screen and then again the Menu screen is displayed. Please help …
after i did the last reboot and hit the ubuntu 11.04 on the window boot manager it didnt give me the list which let me choose. It gave me something like it could not find the device or something
This is perfect – just how documentation should be. It is up-to-date, well illustrated and comprehensive.
I have an Asus Eee PC 1015PEM with 100 + 125 GB drives (C: and D:). Thanks to your help, C: still has W7 Starter, and D: is now running Ubuntu 11.04 perfectly, with EasyBCD making it all too easy.The filesystem usage is just 2.8 GB, leaving a massive 114.2 GB to play with.
I hope other people searching for a way of adding Linux to their netbook will pick up on your site and my experience.
Thanks
Rich
Hi I followed the instructions step by step all the way until I configured the partitioning section of ubuntu and then I had to restart the computer, which normally, according to the instructions, should have booted to windows, but when it tried booting it had an error message: 0x0000225. It said it couldnt find the boot files for windows. The boot order is correct so it should have booted from the hard drive but I dont know what happened. I keep hearing about “GRUB” does that have to do anything with my problem? The grub section of the instructions doesn’t come up until after ubuntu was installed and after windows booted. If it really is something with grub, what are the steps to fix my problem? I’m currently in the process of fixing just windows with the recovery disc.
By the way its windows 7 that’s installed and ubuntu 11.04 is the one I’m trying to dual. If you can help I would greatly appreciate it.
Thanks
Correction- “0xc0000225”
NOT “0x0000225”
Great guide. I’m installing for the second time (hosed my entire computer from the Windows side). The only suggestion I would have is to either move the part about where to install GRUB to the first page or put a large warning on the first page. I know it’s entirely my fault, but even though I read through the instructions a few times, I got an itchy trigger finger and proceeded without doing the first step on the second page.
I actually followed the instructions for the EasyBCD step after I screwed up initially (unknowingly). I got this weird situation where it would boot up into the purple Ubuntu menu. If you selected Windows it would bring you to the black Windows screen and you’d have to select Windows from there. If you selected Linux from the black Windows screen it would take you back to the purple Linux screen. So, you could go in circles if you wanted to (I mean, just to have fun, I guess).
Anyway, thanks again. I’m excited to dig into Linux.
Hello, I thank you a lot for this little tutorial, it was really benefic for me and it saved me a lot of trouble.
I want just to report something I noticed, that is for the EasyBCD software, when I have gone to the link for this software I found a button that says Buy Now for .. even thought you have said it is freeware. So, what’s the matter?!.
Tank you again.
At the time I wrote that, EasyBCD was completely free. But there has been a slight change since.
For personal use, it is still free, but for commercial use, it is not. So, you can still download and use it for free (I just did that less than two hours ago).
The link is http://neosmart.net/dl.php?id=1
Ignore the Buy Now button and scroll all the way down to the page and click on the “Download free for limited, non-commercial use” link.
Hi. Thank you for writing this guide. For some reason, my Samsung N150 Plus has stopped booting from the external CD/DVD drive.
Would launching the Ubuntu installation app from within Win 7 Starter make a difference or cause problems with the end result?
Thanks
Sarah
It’s better to transfer the Ubuntu installation image to a USB flash drive and install from it. Wubi is not such a good idea.
am new to the ubuntu OS. I tried the wubi installation and am having problems. I think I’ll have to go through this tutorial but am having difficulties in understanding the partitioning. I need your help. My apologies!
What aspect of the partitioning do you need explained?
Excellent article! Followed the instruction to the t and it works.
Similar to Adnan. I did the ‘side by side’ install. At Grub, I select “Ubuntu, with Linux….” which starts, asks me to log in then opens with the music playing on the colored screen. Problem is its blank. Just the colorful background. No menu, nothing. The mouse moves kinda herky-jerky as well. I shut down the laptopp and try again with same results.
Help!!!! Please. 🙂
I installed win 7 and ubuntu side by side, writing grub to the mbr. Now when I boot, I get the proper menu, and it has no problem booting into ubuntu, but when i try to load windows, it processes for a second or two and then takes me right back to the grub menu… Any Ideas?
Strange …
You may have to reinstall GRUB, but before you go that route, look inside /boot/grub/grub.cfg. What partition does the entry for Windows point to?
If it matches where you know Windows was installed, try re-installing GRUB with grub-install ‘(hd0)’.