For those Windows users who have discovered what Linux has to offer, but for one reason or another are not ready to completely abandon Windows, dual-booting between the two operating systems is one method of keeping a foot in both worlds. And to help those users, this article presents a step-by-step guide on how to configure dual-booting between Windows 7 and Ubuntu 11.04 on a computer with one hard drive. The same steps may be used to dual-boot both between both systems on a computer with two hard drives.
In attempting to dual-boot between Windows 7 and Ubuntu 11.04, you will either install Windows anew, then install Ubuntu 11.04 alongside it, or install Ubuntu 11.04 alongside an existing installation of Windows. This tutorial uses as example, a case of installing Ubuntu 11.04 on an existing installation of Windows 7.
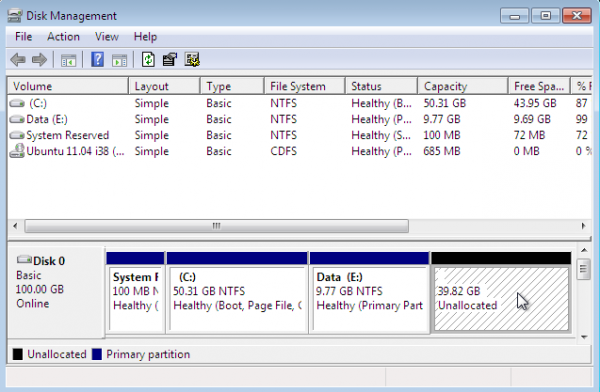
As shown in the image below, the existing installation of Windows 7 used for this tutorial has three primary partitions. And because of the limitations of the MBR partitioning scheme, only one primary partition is available for installing Ubuntu 11.04. By using an extended partition, we can configure as many partitions as we need for Ubuntu.
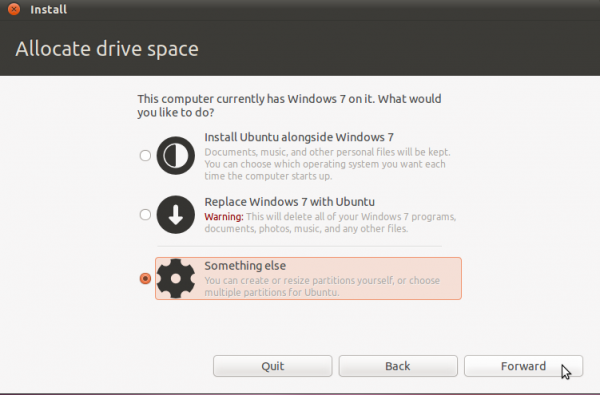
To begin, boot the computer using a Ubuntu 11.04 CD or DVD. At the disk partitioning step, the installer will present several options. Because the installer will not automatically partition and configure the free space, using the installer’s advanced partitioning tool is the only method of creating the necessary partitions. To launch the advanced tool, select the “Something else” option, the click Forward.
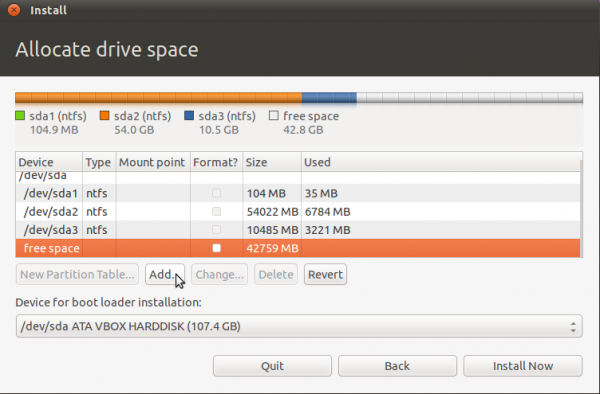
This is Ubuntu’s advanced partitioning tool and the detected partitions. The first three partitions are obviously the ntfs partitions that we saw in the first image. Because there are three existing primary partition, the last partition will have to be an extended partition, under which logical partitions for installation of Ubuntu will be configured.
By default, Ubuntu’s installer configures two partitions – the first for /, the root directory, and the second for Swap. When creating partitions for installing any desktop Linux distribution, my recommendation is to create the following four partitions:
- /boot, the boot partition. This is where programs critical for booting the system will reside.
- /, the root directory. The bulk of the programs used for running the system will be installed here.
- Swap, unformatted disk space for use as virtual memory.
- /home, the partition where your home directory will be located. In the course of using the system, files and folders you create will reside in various folders here.
So, to start setting up these partitions, select the free space and click on Add. Note that this step will have to be repeated for all the partitions.
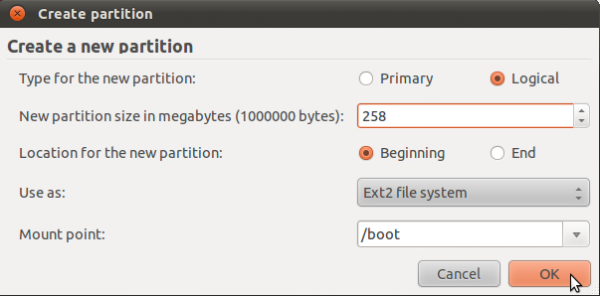
The first partition will be for /boot. When setting up an LVM-based system using an Alternate Installer ISO image, the default disk space allocated to /boot is 258 MB. However, only about 22 MB of that is used, so anything thing between that size range will do. For this tutorial, the default will be used. The mount point will, of course, be /boot. The default file system is ext2. OK.
The second partition will be for Swap. It is possible to install Ubuntu without Swap. However, if you attempt to do that, the installer will try to discourage you with the following warning:
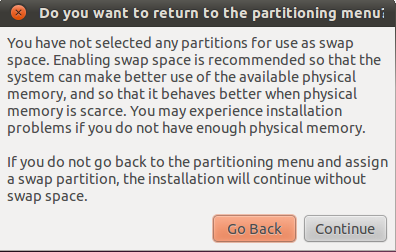
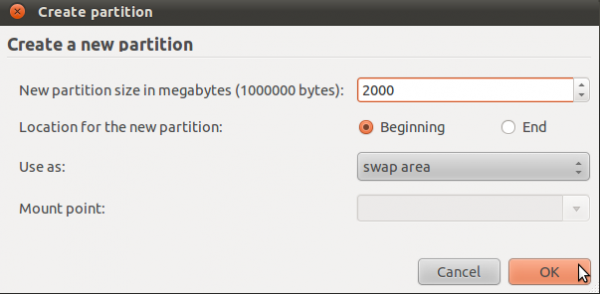
For the record, I have been able to install Ubuntu 11.04 successfully without Swap. The sky has not fallen yet, but I have not tried to put the system in Suspend or Hibernate mode. In any case, save yourself a load of trouble and configure Swap. The suggested size for Swap is 2000 MB. Select “swap area” from the “Use as” dropdown menu. OK.
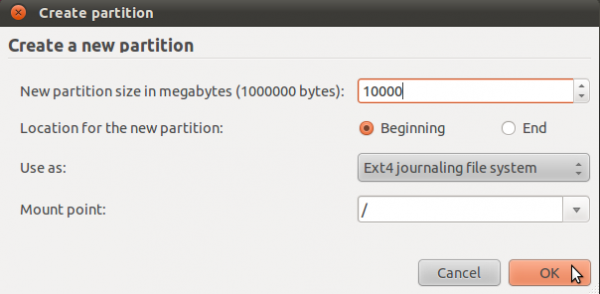
The third partition will be for /, the root directory. The default journaling file system on Ubuntu 11.04 is ext4. You may stick with it or choose another journaling file system available. Btrfs is supported, but this partitioning scheme is not for btrfs. If you are interested, how to install Ubuntu 11.04 on a btrfs file system is a good place to start.
The installer recommends a minimum of 4.4 GB for Ubuntu 11.04, but on a new installation, less than 3 GB of disk space allocated to / is used. Note that as you install additional applications after installation, disk space used will grow, so be generous here. I think 10 GB should be more than enough. OK.
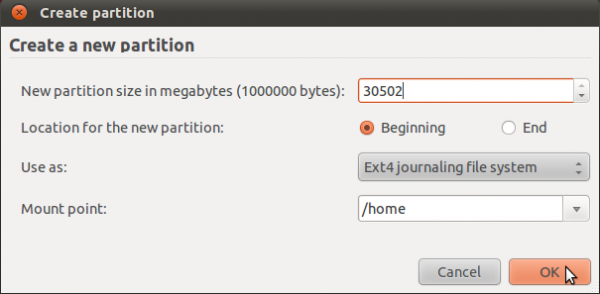
The last partition will be for /home. The file system is ext4, and you may allocate all available disk space to it. OK.






Hi,
I think I came to this site a little too late. I chose the option “[install Ubuntu alongside Windows 7” and now when my computer boots up, I do not get any option for windows 7. Instead my monitor keeps on complaining that the input is not configured for this monitor and then after few seconds it takes me right into the Ubuntu login screen. Did I loose my Windows? or is it just that I can’t see the dual boot option? Any help is appreciated. Thanks.
It’s never too late to find us. Like Vegas (USA), the “party” begins when you find us 🙂
I don’t think you lost Win7. Looks like a monitor mode issue. The mode is probably higher than what GRUB is configured to handle.
Thanks a lot finid. Any suggestions of how to fix that? My apologies I am new at this.
Based on the comments and the quality of the tutorial, this seems like the best way I’ve found to set up a dual boot. I’m reluctant to try it though without knowing how to uninstall Ubuntu. If someone could show me how this is done, or point me to another tutorial, I’d be extremely grateful.
What is your system like? Other than Ubuntu, what else is on the hard drive. Paint a good picture and we’ll work you thru what to do and how to do it.
And the best place to ask questions is http://linuxbsdos.com/ask
It’s still part of this site, but geared more towards questions and answers.
Thanks, I went ahead and made a post:
http://linuxbsdos.com/ask/?ptype=preview
Does not seem to have been published. You may have to repost.
Wow, I can’t believe I just did that, sorry I just posted it.
http://linuxbsdos.com/ask/?ptype=preview&alook=1&qid=450
very informative and easy to follow guide.
There is a windows installer for ubuntu that makes all in one step. Why so complicated?
How many partitions does that windows installer create? Does it create a separate partition for /home. And if you are referring to Wubi, that’s a bad idea.
I used this guide and installed Ubuntu, went totally smoothly. I might have to reinstall Ubuntu due to a problem and I want to preserve my home partition. How do I do that? I have the same partitions as this guide.
What steps do I have to make?
Reinstall, and when at the installer’s Advanced partitioning window, do not format the partition for home. Format other (Ubuntu) partitions but the home partition, and that should preserve your home directory.
very clear instructions, thanks a lot!
Super excellent article. I only wish I had read it first before my first failed attempt. I messed up just expecting “along side windows” would work. Again, thank you very much.
Aren’t you making this a tad more complicated than necessary? Just select the option to “Install Ubuntu alongside Windows 7” option during the installer and you’re set. The only reason to set your partitions manually is if you have a specific need to do so (e.g., if you want to separate your /home and / partitions). Also, I’m having trouble understanding why anybody needing instructions on how to dual boot Windows and Ubuntu would need to have a separate /boot partition. Just saying, maybe it would be better to give beginners the simpler, yet still functional, approach, which is built right into the very installer with a single option.
As a user who’s had multiple bad experiences with putting GRUB in Windows’ own MBR area in the past, I was extremely reluctant to go there again and was looking for a guide that described how to do it the other way around, in a way that could be applied to a second hard drive too, rather than partitioning a single-HDD system, and one that was written since 11.04 AND with a convenient method of doing this all from a USB stick and not a CD. This post was the first I’ve found that covered all of those points clearly.
You may be right about the separate partitions and your other points, but in regard to the “Install alongside” vs. “Do Something Else” options I was very grateful to see this post describe “Something Else”.
Thank you so much. The “simple” [install Ubuntu alongside Windows 7] did not work for me. I had to reformat and reinstall Windows and Ubuntu twice, before I finally came to realize that I needed to do it a different way. Thanks for your post, it has been very useful.
Shouldnt we change the file system to ext4 although it works fine with ext2??????
You can use any FS you want on /boot. Ext2 is the safest bet, but many distros use ext4 by default.
@Eric:
We are all students.
:^]
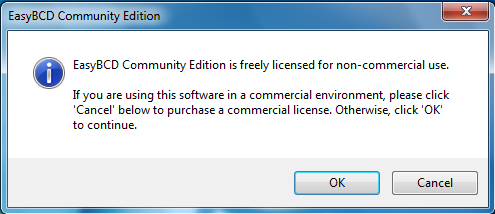
Unfortunately I’m still stuck. EasyBCD doesn’t want to let me make an entry that actually points to my Ubuntu installation on a second hard drive. Since this is getting into more in-depth help I’ve started a questions in the Q&A area instead. Thank you for your help so far.
Once you select “GRUB 2” from the Type dropdown menu on the Linux/BSD tab. the other options are deselected, or greyed out. Easy BCD takes care of the rest.
Only when GRUB Legacy is involved do you have to specifically tell Easy BCD where GRUB was installed.
I’m quite sure that didn’t work the first and even the second times I tried it. But I kept going back and fiddling with EasyBCD and now everything is working. Perhaps I had made an error the first time or two that I just didn’t see… Thanks again, looks like I’m all set up now.
I followed these instructions and was a happy new Ubuntu 11.04 user for a couple of days. But then I started having boot problems, where the system told me my /boot partition could not be mounted. I searched the net and found mainly results that indicated I should update my /etc/fstab to identify the /boot partition by UUID rather than device id. Unfortunately the device wasn’t showing up in /dev/disk/by-UUID either so I couldn’t do that. The other significant search results were several answers that indicate exactly this problem can occur if a /boot partition of less than 500MB is used.
Perhaps you should investigate that and consider altering the advice to use between 22 and 258 MB? Although I can’t say this for sure until I’ve finished the reinstall I’m currently proceeding with.
There are several Ubuntu bugs on file circa April 2011 regarding an issue where ubi-partman fails with exit code 141, another problem that happened to me with your method, and I wonder if these two problems share a common cause. Could it be related to the fact that I’m installing Ubuntu to a different physical drive from my Windows drive and therefore was able to use primary partitions or a mix of primary and logical partitions? You didn’t say much about whether to prefer primary or logical, etc.
I usually assign 500 MB to /boot, but Ubuntu 11 (the Alternate Installer version) uses 258 MB, that is why I chose that value in the tutorial.
If you are installing Ubuntu to a second HDD, then GRUB should be installed in the MBR, not to /boot. There are known issues with installing GRUB to /boot, but none has been a factor in any of my installations. If you install GRUB in the MBR, the recommended location, you should not have any issues.
The nature of the partitions (logical or primary) does not really matter. At least, I have not seen any indication that it does. Virtually all Linux distributions create the /boot partition as primary (where one is available), and the other partitions as logical. Where the maximum number of primary partitions has been exhausted, or where there is just 1 left, /boot and everything else are configured as logical.
Comments like yours help me fine tune these tutorials, so I’d appreciate any further info you can pass on from your installation.
Oh good, so should I be able to just remove GRUB from /boot and install it to the MBR and save my current installation and not have to reinstall? I didn’t actually start the reinstallation that i mentioned above, while I went to make more coffee and research more 😀
I don’t know anything about removing and reinstalling GRUB, but I’ll go search for that info. Any further pointers welcome. I will comment later on whether moving GRUB solves my issue. By the way, any comment on the “ubi-partman failed with exit code 141” issue during the install from USB stick?
To install GRUB to MBR, use:
sudo grub-install '(hd0)'Those are single quotes. If necessary, you may have to return to EasyBCD, delete the existing entry to Ubuntu and add a new one.
Correction: The command above will install it in the MBR of the first HDD, so you might want to modify it, unless you want to that way. To install it in the MBR of the 2nd disk, run:
sudo grub-install '(hd1)'But if you ran the first command already and you want to regain the Windows7 boot menu, start EasyBCD, click on the Bootloader Setup tab, then on the Write MBR button.
I’m very hesitant to install GRUB to the MBR on hd0 for exactly the reasons given on page 2 of your tutorial above… Other times I have tried that resulted in inability to boot Windows and I had to go through all of the manual fix-it tools on the Windows recovery console: diskpart, bcdedit, bootsect, bcdboot, bootrec. Actually ended up completely reinstalling Windows after a similar fiasco one time.
In fact I was completely turned off to the idea of dual-booting Windows and Linux after those previous experiences and was so glad to find your tutorial which was the first one I ever saw whose method for installing GRUB on my Linux drive instead of in the MBR worked for me.
So why is it that installing Ubuntu to a second HDD means that GRUB should be installed to the system’s MBR instead of to /boot? I’m confused when you say that yet you also say installing it to /boot has never been an issue for you. Do you mean you have always done this on systems with a single HDD only?
In short, I haven’t had a 1-HDD system for many years, and I very much want to keep GRUB and Windows’s boot loader separate using your original method. I hope there is some other way around this. I still don’t understand why I had a working system at first and then a couple of days later the /boot partition was unable to be loaded. I’ve checked the HDD with various tools and it doesn’t seem to have any physical problem.
Maybe I’ll just wipe it and attempt a fresh install.
Installing GRUB to /boot has never been an issue for me. So far, only one other person had an issue with these methods, and that was a very special case. You can read the user’s comments here. His name is Siva.
The MBR is the recommended location for a bootloader, but where that may lead to other issues, as in when dual-booting with Windows, you can install it to the boot partition. In your case, this should not be an issue because you are dual-booting with 2 HDD, so GRUB should go in the MBR of the 2nd HDD. That is what I always recommend. I am very explicit about it.
Oh, NOW I get it. Sorry for all the length of comments here. I wasn’t realizing that it could go in the MBR of the Ubuntu HDD, not in the MBR of the Windows HDD. I missed that simple distinction and I think understanding this will make my next attempt work out fine. Thanks again.
I would just like to say thank you. Your detailed explanations and screen shots are perfect.
Just for the record, this worked on a Dell Mini 1012 flawlessly using Windows 7 and Lubuntu 11.04. I am having zero issues and the battery life on each OS is pretty close to being the same.
My next goal is to triple boot this machine.
Thank you again!
Thanks this article was really helpful and it works well too.. will u plz tell me da way if i want to uninstall ubuntu and get dat space to use with windows again.
Thanks
Just log into your windows account and delete the 4 partitions you created before.
Thank you so much. I am just trying Ubuntu for the first time and you saved me a whole bunch of headache and research for understanding just what in the heck I am doing.
Hey hi. Lot of thanks for making it so simple with graphic and lucid illustratious explanation. Would in debt forever for this info. IT helped me a lot