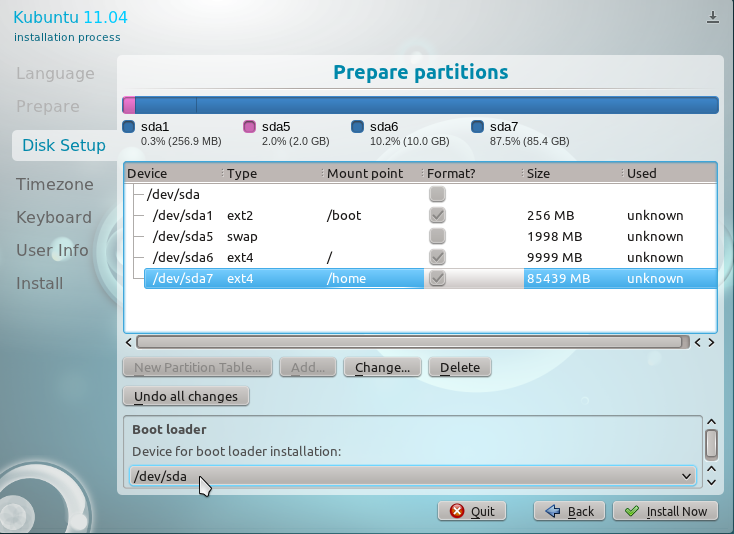
Like the Ubuntu 11.04 installer, the Kubuntu 11.04 installation program configures just two partitions by default. These are for /, the root directory, and Swap, disk space for use as virtual memory. To make upgrades less tasking, it is recommended that a separate partition be created for /home, the directory where your home folder will be located.
This article presents a step-by-step guide on how to configure these partitions manually. A similar article for Ubuntu 11.04 is available here. Note that this article is based on the graphical installation program, not the Alternate installer, which uses an ncurses-based installation program.
To start, download an ISO installation image here and burn it to a CD or DVD. Boot your computer from the resulting CD or DVD, and click to the disk partitioning step.
Depending on the contents of the hard disk in the computer, that step will look similar to the one in this image. To create partitions manually, the option to choose is, well, “Manual.”

The objective here is to create the following partitions:
- /boot, the boot partition. This is where programs critical for booting the system will reside.
- /, the root directory. The bulk of the programs used for running the system will be installed here.
- Swap, unformatted disk space for use as virtual memory.
- /home, the partition where your home directory will be located. In the course of using the system, files and folders you create will reside in various folders here.
To start creating partitions, just click on the free space. The “Create Partition” window will open.

The first partition to create will be mounted at /boot. When setting up an LVM-based system using an Alternate Installer ISO image, the default disk space allocated to /boot is 258 MB. However, only about 22 MB of that is used, so anything thing between that size range will do. For this tutorial, the default will be used. The mount point will, of course, be /boot. The default file system is ext2. OK.

With the first partition out of the way, click on the free space again.

This time we want to create the partition for Swap space. The suggested size is 2000 MB, which is just about the default if the installation disk is about 100 GB. Select “swap area” from the “Use as” dropdown menu. OK.

The third partition will be mounted at /, the root directory. The default journaling file system on Kubuntu 11.04 is ext4. You may stick with it or choose another journaling file system available. A new installation of Kubuntu 11.04 takes up about 3 GB of disk space, so anything above that will do. OK.

This is the last partition to be configured and it will be mounted at /home. You may assign all available disk space to it. OK.

With all the partitions configured. You may continue with the rest of the installation. Keep in mind that GRUB 2, the boot loader, will be installed in the Master Boot Record (MBR) of the disk. The next article on Kubuntu 11.04 will show how to dual-boot with Windows 7.

You can have quality articles like this delivered automatically to your Feed Reader or Inbox by subscribing via RSS or email. This website now has a Question and Answer section. Use the commenting system for simple comments, but for more involved assistance, please use the Q & A section.


Thank you for your tutorial. I really needed this in installing kubuntu 🙂 It really helped a lot. More power!
I am surprised that Ubuntu installer still doesn’t offer creation of SWAPFILE on root partition. On my new installation I don’t use SWAP partition but I create swapfile on Linux filesystem. “Windows way…” 😉 I understand that separate SWAP partition has some advantages but for most users there is no real difference compared to swap file. Advantage of SWAPFILE is that I can adjust size in easy way and disk layout is simpler; just one partition for Windows and second one for Linux.