The first LV will be for /. Like the VG’s name, the names for the LVs can be anything you feel comfortable with. For ease of management, it is better to use a name that reminds you of the mount point. I like to name the LV that will be used for / as root, swap for that which will be used for swap, and home for the LV for /home. Continue.

How much space do you want to allocate to the root LV? By default, the installer allocates 10 GB to his LV. You can assign a lower value if you wish. Note that a default installation of Debian 6 uses about 3.1 GB of disk space Continue.

Repeat the last four steps for other LVs. When all LVs have been created, the screen will look just like the one below. Scroll to “Finish.” Continue.

The final task is to assign a mount point and a file system to the LVs. Select any LV and click Continue.

If “Use as” is not selected, scroll to it, then Continue. On the screen that opens, select a suitable file system. The default is ext3. Other than btrfs, any other available journaling file system will do.

Then assign a mount point. Continue.

Repeat the last three steps for other LVs. When all the LVs have mount points and file systems assigned, the main screen will be just like the one below. Scroll to “Finish partitioning and write changes to disk.” Continue.

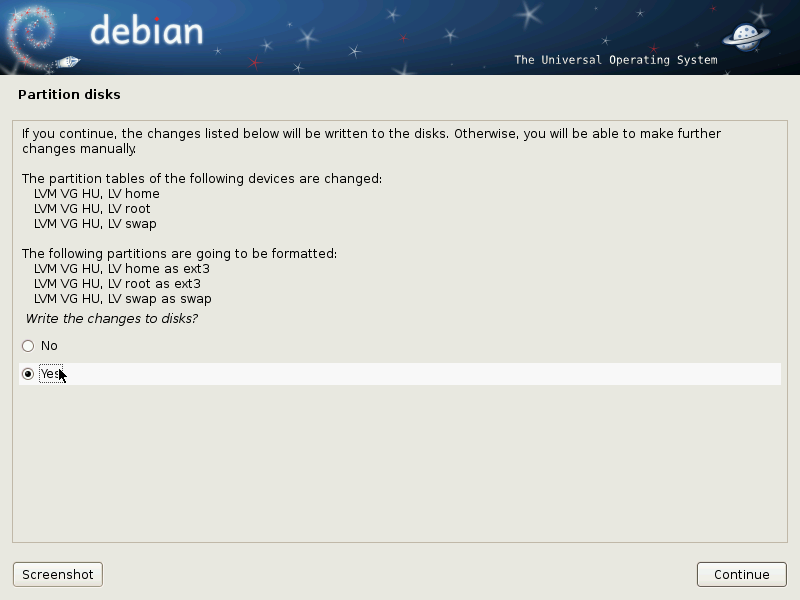
Select Yes. Continue.

That’s it folks. It’s a long tutorial, but attribute that to the Debian Installer. If this article is your introduction to LVM, I hope it was easy to grasp. A soon-to-be-published article will cover basic LVM management tasks. Check back soon or subscribe via RSS or email.
I hope this guide has been helpful. If you need further assistance, feel free to ask for help at the forum. It is a better environment for discussing and resolving issues than the commenting system. Gratias.


Thank you for the very helpful HowTo. I am going to use it the dual boot Debian on a second HDD with Windows XP Pro.I have tried to install Debian 4 times today, using LVM and letting the installer sort it out with multi-partitions on the 250 GB drive I want to use. Each time it has failed as GRUB does not show the Windows OS and Debian black screens. I have tried putting the boot flag on both OS but no luck. Ishal try aging following your advice but can you please suggest the correct installation of GRUB to complement this HowTO? /boot, /, Windows, somewhere else?
Recommended location for GRUB in this type of installation is in the /boot partition.
Thank you for listening
I created a logical volume for “Swap” and I have to mount it and pick a file system. I understand “Swap” does not use a file system. What should I chose for this under “use as:” for file system choice? I’ve been using ext3 for all other logical volumes. Thank you.
> I created a logical volume for “Swap” and I
> have to mount it and pick a file system. I
> understand “Swap” does not use a file system.
> What should I chose for this under
> “use as:” for file system choice?
> I’ve been using ext3 for all other logical
> volumes. Thank you.
My apologies. I just noticed that one of my choices is: ‘Swap area’. Is this the correct choice?
Select “swap area” or whatever the option is called from that menu. Once you do that, the other options will be grayed out.
Ok Thank you finid.
Hi finid,
Is it okay to click on ‘label’ and name the partition ‘boot’? I see you left this as ‘none’ (default).
Also I noticed in the very beginning of the install under ‘help’ that it said:
-begin-
In order to start your new system, a so called boot-loader is used. It can be installed either in the master boot record of the first hard disk, or in a partition. When the boot-loader is installed in a partition, you must set the boot-loader flag for it. Such a partition will be marked with ‘B’ in the main partion menu.
-end-
Do I need to ‘set’ the boot-loader flag? When they mention the word ‘set’, I assume they mean turn the flag ‘on’ in the partition menu for /boot? I see the default is ‘off’.
Thank you
Hi finid,
I am ready to complete your tutorial and click to “Finish partitioning and write changes to disk.”
If you can please answer the question above in regards to the boot-loader flag being set to ‘on’ or ‘off’ I’d appreciate it. I clicked set boot-loader flag to ‘on’. I hope that was the right choice. Thank you.
The Debian Installer is really antiquated when it comes to these things, but that should be fine.
Ok finid thank you very much. I’m ok to go !
Hi Finid,
I’m currently installing Debian Squeeze (netinst file 191MB) and I’m utilizing your excellent tutorial for setting up the first partition called /boot.
On page 2, you begin by saying:
-begin-
“On this screen, select a suitable file system type. Keep in mind that the default is ext2. I have chosen ext3, a journaling file system, just to show that it does not matter. There is a small overhead associated with using a journaling file system, but it is nothing to fret about”.
-end-
I noticed you suggest ext3 file system for the first partition (/boot) as well as ext3 for the remainder of the tutorial, however you recommend ext4 on your ‘Ubuntu’ tutorial installs. Why please?
Debian lists ext2, ext3, ext4 and a whole host of other file systems as a choice for /boot.
I googled, “ext3 or ext4 for Debian Squeeze” and I felt as if I was asking, “What is the best Linux Disto?” 🙂 The answers were subjective and different but the majority suggested ext4 for everything (including /boot).
source: http://forums.debian.net/viewtopic.php?f=10&t=60928
Thank you
That Debian tutorial was written when ext3 was the default file system in Linux. Now, it is ext4. That is why it is used in the latest tutorials.
Ext2 evolved to ext3, which then evolved to ext4.
Ok thank you. I did however decide to stay with your initial recommendation and chose ‘ext3’ for the install.
Debian wiki page said ‘ext4’ is still under testing and unstable in ‘Squeeze’. There is no date on the wiki page link (below), thus I have no idea when it was last updated. As a result, I can only “play it safe” and stay with ‘ext3’.
source:
http://wiki.debian.org/Ext4
That page was last edited in February 2012.
Great tutorial!
I’m following this Manual LVM Partitioning tutorial in my ‘Debian Squeeze’ partition
set-up.
However I’ve been reading a lot about the different directory options such as (/boot,/,/home,/var,/user,/srv,/opt,/usr/local etc.) that are available. As you know there are many options and it can be a very subjective subject.
Can you please recommend a ‘smart’ partitioning scheme? This is my first GNU/Linux install. I am very familiar with windows as I have partitioned drives numerous times in that OS environment.
I don’t want to get lost in a complicated debian partition scheme during this first
go-around. But on the flip-side, I don’t want to set-up a directory tree/partition that is so simple that it gives me little control.
Computer System specs:
– iwill-DVD266R mob
– ‘Dual’ Pentium III (total: 2.0 GHz cpu speed)
– 1 gig DDR RAM (max on MOB 4 gigs)
– Hard drive 0 – Windows 2000 already installed on 40 gig IDE HDD set to ‘Master’.
– Hard drive 1 – 80 gig EIDE HDD dedicated to Debian and set to ‘Slave’.
Both Drives on the same Ribbon Cable plugged into primary IDE on MOB
– CD R/RW
– DVD R/RW
– USB 1.0 (2 ports)
– Floppy Drive
Objective with Computer System:
– Dual-boot with windows 2000 and Debian using two hard drives (one for each OS).
– I will be the only user.
Primary objective with Linux:
– Learn programming in ‘C’, C++, Objective C, and Java
– listening to music
– Video and Photo Editing
– Everyday tasks: Libre Office Suite, Programming IDE, Firefox, VLC player etc.
Proposed Directory Partitioning Scheme recommended as a ‘starting point’ by Debian (partition sizes are my suggestions):
/boot 500 MB
/ 15,000 MB
/user 20,000 MB
/var 3,000 MB
/temp 2,000 MB
/home 30,000 MB
swap 5,000 MB (only 1 gig of DDR RAM available)
source: http://www.debian.org/releases/stable/i386/apcs02.html.en
Any suggested directory partitioning schemes and partition sizes would be appreciated.
Thank you
Keep it simple. Start with /boot, /, /home and Swap. or even simpler with /, /home and Swap. Either one will work.
I am glad to see this introduction to LVM in the Debian install context.
I am really a beginner at LVM, but my limited experience has taught me to think ahead about how the LV’s will be used, and what name will be descriptive. This same idea applies to the VG name also.
For me, I found that creating the PV’s, VG’s and LV’s in advance of the install was more straightforward than performing those steps in the install. This gave me time to think about naming conventions. And, the command line interface to LVM is pretty easy, but requires some practise.
Primarily, I learned you should plan your PV’s VG’s and LV’s to accomodate multiple Linux installs.
For instance, your LV’s could be:
Squeeze-root (instead of just root)
Squeeze-home (instead of just home)
swap (since swap can be common across installs)
That way, you can keep your LV’s straight between installs.
An idea for your next iteration, is touching on how renaming the LV’s affects the Linux installs depending on those LV’s.
I enjoy your info, and look forward to more.
Steve.
You are right, but the naming convention depends on the environment. If there is going to be just one Linux installation, then the names used here will do just fine. The names you suggested will work perfectly in a multi-Linux installation.