Ubuntu 15.10 is the latest edition of Ubuntu, the popular Linux distribution sponsored by Canonical.
This tutorial shows how to dual-boot the desktop edition of Ubuntu 15.10 and Windows 10 on two hard drives. To complete this successfully, you, of course, need to have a computer with two internal hard drives, with Windows 10 installed on the first hard drive. Ubuntu 15.10 will be installed on the second hard drive.
Using two hard drives to set up a dual-boot system between Windows 10 and Ubuntu 15.10 ensures that both systems are completely isolated. GRUB, the Ubuntu 15.10 boot loader, will be installed in the EFI Boot Partition of the hard drive it’s installed on, not that of the Windows 10 hard drive.
On the computer used for this tutorial, Windows 10 is installed on a 500 GB Western Digital hard drive. The second hard drive is an old 200 GB Maxtor unit. That’s the one that I installed Ubuntu 15.10 on. Note that one or both hard drives can be solid state drives (SSDs), not just standard hard drives.
To ensure that GRUB is not installed on the EFI Boot Partition of the Windows 10 hard drive, you’ll have to disconnect the Windows 10 hard drive from the system. That means disconnecting the power and SATA cables from the hard drive.
And if you have not already done so, download an installation image of Ubuntu 15.10 from here. After downloading it, burn it to a blank DVD or transfer it to a suitably-sized USB stick. After that’s completed, boot the computer with the installation media that you just created in place.
To ensure that the computer boots into the UEFI version of the Ubuntu 15.10 installer, access the computer’s boot menu by pressing the F11 or F12 key before the boot process completes. Shown in Figure 1 is the boot menu of the test computer. This image was taken before the Windows 10 hard drive was disconnected.
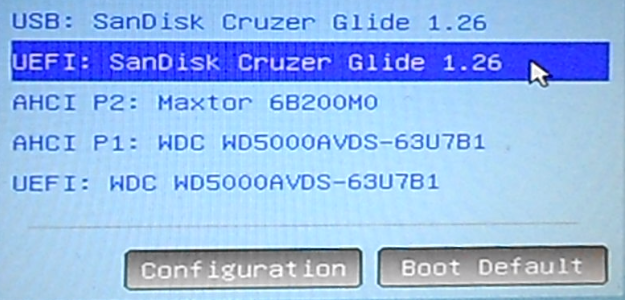
Figure 1: Computer boot menu showing two hard drives
This shows the same computer boot menu without the Windows 10 hard drive. Selecting the UEFI: SanDisk Cruzer Glide 1.26 entry and pressing the ENTER key will cause the computer to boot into the UEFI-aware version of the installer.
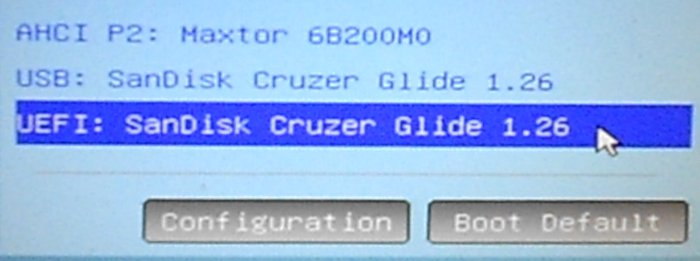
Figure 2: Computer boot menu showing one hard drives
You’ll be given the option of booting into a Live desktop or straight to the installer. Either way, after the installer starts, navigate to the step shown in Figure 3. This shows the installer’s partition methods. You may opt to accept any of the automated partitioning methods, or opt to create the partitions manually.
With an automated partitioning method, the installer will not create a separate partition that will be mounted at /home, where your home folder will be located. So if you need to have your home folder on a separate partition, the manual approach is your only option. In that case, see the Creating GPT Partitions section of GPT and MBR manual disk partitioning guide for Ubuntu 15.10 for guidance on how to create partitions manually for Ubuntu 15.10.
For this tutorial, I chose an automated partitioning option. Note that the target disk I used for this had an existing installation of Ubuntu 15.10, so I had to reinstall it. Whatever option you choose here, click the Install Now button afterwards.
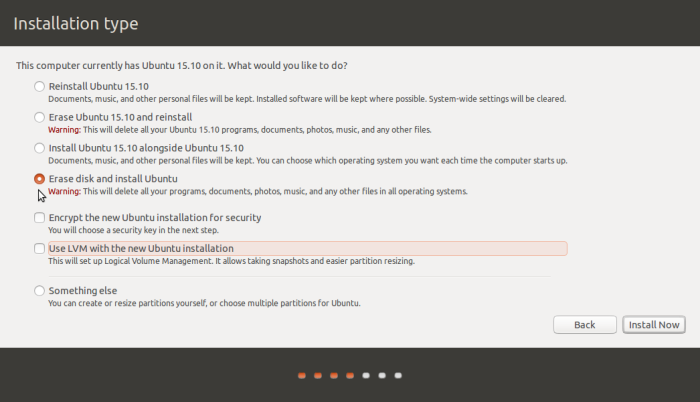
Figure 3: Ubuntu 15.10 partition methods
This is just the installer showing you the partitions it has created and will format. Click OK.
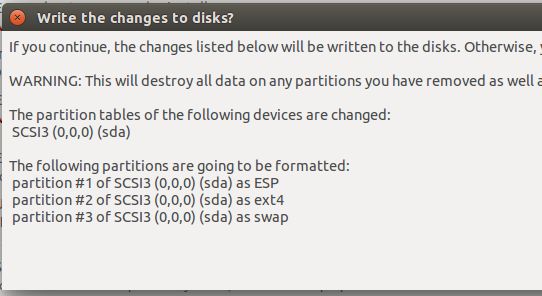
Figure 4: Partitions to be formatted on Ubuntu 15.10
The installation should take about ten minutes. When it’s completed, reboot into the new system. If the system works as expected, shutdown the computer and reconnect the other hard drive, that is, the Windows 10 hard drive. Then reboot into Ubuntu 15.10 again. After logging in, open a shell terminal and type the following command: sudo update-grub.
That will regenerate the GRUB configuration file, scanning the system for other operating systems as it does so. The command’s output from my test system is shown below. Make sure that there’s a line in the output that indicates that it detected the Windows Boot Manager on the other drive.
#
Generating grub configuration file ...
Warning: Setting GRUB_TIMEOUT to a non-zero value when GRUB_HIDDEN_TIMEOUT is set is no longer supported.
Found linux image: /boot/vmlinuz-4.2.0-16-generic
Found initrd image: /boot/initrd.img-4.2.0-16-generic
Found Windows Boot Manager on /dev/sda2@/efi/Microsoft/Boot/bootmgfw.efi
done
#
An entry for all detected operating systems will be added to the GRUB menu. In this case, it should correctly detect the Windows 10 on the other hard drive and add an entry for it in the Ubuntu 15.10 GRUB menu, which should appear just like the one shown in Figure 5. You may now reboot into Windows 10 to make sure that it still boots correctly.
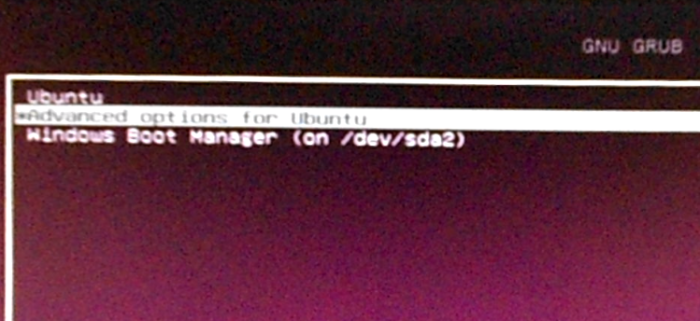
Figure 5: GRUB menu of Ubuntu 15.10
The next time you access the computer’s boot menu, you should see entries for both boot managers – ubuntu and Windows Boot Manager, besides entries for the two hard drives. Note that on UEFI systems, at least on mine, the default operating system is the last oen the computer booted into, regardless of the boot setting in the BIOS/UEFI utility.
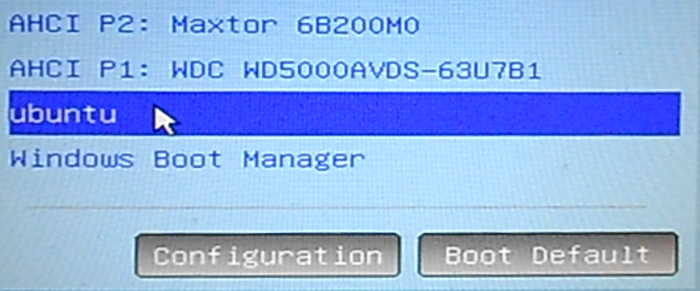
Figure 6: Computer boot menu showing Ubuntu and Windows boot managers




Can you get rid of the dual boot and return to Windows only simply by unplugging the Ubuntu drive or does this change something about the boot in BIOS/UEFI?
If the Ubuntu drive is the primary drive, yes. If on a UEFI system, you’ll still have to get into the BIOS/UEFI utility and change the boot order.
I successfully added this when my OS was windows 8.Now, I am happy with my Windows.Linux is quite complicated.
I have installed Ubuntu with Windows present before, after later on re-sizing, deleting partitions in GParted, Grub fails & I am unable to boot into Ubuntu. Running Boot Repair from a Linux Live CD fixes this, however when Grub fails again running Boot Repair has no effect.
Would using this method of installing Ubuntu with the Windows drive unplugged, solve the Grub problem?
If you can do that, yes.
Then after installing Ubuntu and reconnecting the Windows drive, run the sudo update-grub command to help GRUB discover the Windows installation and add an entry for it in the GRUB menu of Ubuntu.
I attempted to use the guide above and the information in the top comment; however, in both cases I was unable to install Ubuntu. I kept getting an error message saying: “The creation of swap space in partition #6 of SCSI1 (0,1,0) (sda) failed” while installing Ubuntu.” If anyone would be able to help, I would appreciate it!
This should work for most systems that use UEFI and which have two HDD.
Dell Inspiron E5440.
-Main HDD – 256GB Samsung SSD (Windows 10 installed)
-Secondary HDD – 64GB Transcend mSATA SSD (Mint 18 was installed to this drive)
A) UEFI/BIOS – 1) Set to UEFI mode only (no legacy/CSM). 2) Disable secure boot 3) Disable Intel Rapid Start (if equipped) 3) Disable fast boot in UEFI (note this is different than the “fastboot” setting in Windows 8/10). The options in your UEFI/BIOS might say something like Full/Minimal/Automatic for boot mode. Select Full (or thorough, or complete, etc whatever your UEFI vendor has chosen to call it).
B) Disable fastboot in Windows 8/10 under advanced power options. Restart computer to ensure that this subsequent boot and the next reboot/shutdown will be in “normal” mode.
B1) Optional – Install Macrium Reflect (free) and create a backup image and reinstallation media should something go wrong with Windows 10.
C) Use Rufus to create a bootable USB stick with your choice of Ubuntu based distro. Make sure in Rufus that you CHOOSE the option UEFI/GPT only. This ensures the Linux environment boots only into UEFI mode during your install.
D) Reboot computer and press key for one time boot menu (Dell is typically F12). Selected your USB stick from the boot options – note make sure it says UEFI in front of the USB stick in the boot menu. If not, return to Windows and recreate your USB stick with Rufus ensuring you choose the UEFI/GPT (only) option.
E) Boot into Linux live environment and begin install.
F) When you get to the installation option, choose SOMETHING ELSE at the bottom of the Ubiquity installer.
G) Find your secondary HDD that you will be installing Linux to. In my case it was listed as /dev/sdc (with /dev/sda being the windows drive and /dev/sdb the USB drive [which was invisible in the installer]). Partition the target drive as follows:
-select Make New Partition Table
-1st partition, 650MB size, EFI as the type (this will list as /dev/sdb1 efi in the partitioning tool once you create it)
-2nd partition, 10GB min (20+GB better), mountpoint is root (/) ext4 as file system
-3rd partition, 2GB min, swap, (if you wish to use hibernation, the swap needs to be just slightly larger than your total amount of RAM – example I have 8GB so the size of this parition was set at 9000MB)
-4th partition, remainder of space on drive, mountpoint home (/home), ext4 as file system
******
IMPORTANT
******
F) BEFORE clicking “Install Now”, from the “device for boot loader installation” option button, select the 650MB EFI partition you just created as the target for the bootloader. (example /dev/sdc1 in my case). Then click “Install Now”.
G) Finish installation process. And reboot (removing the USB stick when your UEFI/BIOS screen logo appears).
Upon reboot, after UEFI/BIOS reads the new bootloader entry that Linux has added to it, you will be presented with the grub menu with a listing of your Linux distro as well as a listing to boot Windows 10. Boot into Linux. Install any updates and then reboot and attempt to enter Windows 10 from the grub menu to make sure that grub correctly handles the hand-off to the Windows 10 bootloader.
WHAT YOU HAVE DONE. You have installed the Linux EFI bootloader to the newly created EFI partition. In the process of this, Linux has added an entry to your UEFI listings in your systems UEFI/BIOS. Linux has also automatically detected your Windows 10 install and added a grub menu item to boot it. Your computer at this point will now automatically boot to Linux unless you choose to boot to Windows (from the Grub menu).
What you haven’t done. You haven’t in any way altered your Windows 10 install or its bootloader or even so much as touched the Windows 10 EFI partition. Everything is reversible simply by removing the Linux UEFI listing from your UEFI/BIOS settings. How to do so varies from each vendor.
Thanks.
Should be in wiki.
You just sooooo saved my day. I have been trying to install ubuntu basically all day, allways it shut down due to some error. Thank you thank you thank you. And yes, THIS should absolutely be in some wiki. Actually unplugging the hard drive as in the article would not have been easy for me with my laptop (don’t have the tools). Thanks again! Great contribution!
good guide – this is what solved my installation woes.
Only difference was my win10 system disk is an M2 slot ssd which means instead of dev/sda efi it showed the system disk as dev/nvme0n1p1. I selected the efi partition on that for the boot manager (did not make a second efi partition on the 2nd ssd on dev/sda where ubuntu installed to – just /, /home and /swap partitions) and thankfully it installed fine.
I got caught out by the secure boot setting in the asus bios, ubuntu was hanging on trying to install nvidia drivers and then when I restarted there was some kind of error stopping login. Once I turned secure boot mode to legacy (only other option to secure boot being on) then everything worked fine.
Awesome guide, extremely helpful!
Thanks
My Win 10 Pro installllation is the free upgrade from Win 7 Pro and therefore is booting Legacy. I have Win 10 Pro on a 500 GB SSD and wish to install Ubuntu on a 1 TB disk drive in the system. The 1 TB drive is NTSF. I have approx. 650 GB free space on the 1 TB drive and want to devote about 250 GB to a Ubuntu installation. Win 10 Pro is running fine and I don’t particularly want to attempt converting my SSD drive from MBR to UEFI (without data loss!), although the Asus M97M Plus motherboard supports UEFI. Would this method work if I leave the Windows SSD in MBR status? Recommendations?
If the BIOS settings is MBR, that is, Legacy BIOS, not UEFI, then you don’t have to change anything. Just install Ubuntu in the free space on the 2nd HDD. The Ubuntu install script will auto-detect what version of the installer to load.
Before installing it, though, disconnect the data cable from the SSD, to prevent the Ubuntu installer from installing GRUB, the Linux boot loader, on it. that way, it will only have the option to install it on the MBR or boot partition (if you create one) of the 2nd HDD.
So you may create a boot partition, root partition, home partition, and swap partition.
Thanks for info. My current settings under the Asus MB “BOOT” heading are::
CSM (Compatibility Support Mode)/Launch CSM is ENABLED (other choices are Auto and Disabled) and, under that heading:
Boot Device Control is set to UEFI and Legacy OPROM (the other choices are Legacy OPROM Only and UEFI Only)
Should I leave that setting or change it to Legacy OPROM only? The Asus MB manual isn’t much help here.
Very clear and helpful article. Suppose the hardware system is a new skylake motherboard and cpu. No problem for Win 10, but is Ubuntu 15.10 ready for skylake dual boot yet ( Jan 21, 2016)? What distro(s) is/are ready? I suspect there is a growing number of new skylake owners waiting and watching to add a linux ssd to their Win 10 system for a dual-boot setup. What is a realistic assessment of skylake dual-boot installation in Q1 2016? Thanks for any input.
My understanding is that Linux kernel 4.3 has support for Skylake, so if your Linux distro ships with that kernel version of newer, you should be good to go, though you may run into some issues.
for new hardware like that, you never really know until you take it for a spin yourself.
Hi, I have a notebook whose primary hard disk is not easy to get to (without loving warranty). Windows 10 came in this drive.
I’m trying to install Ubuntu on a second disk (installed inside a caddy in the dvd sata slot), but is not possible for me to disconnect the primary disk.
How can I tell the Ubuntu installer to put grub on the EFI partition I created on secondary drive, please?
If you created the Ubuntu partitions on the second HDD manually, then select the EFI Boot Partition on that drive as the “Device for boot loader installation”.
If after installation you find that GRUB is installed in the first HDD, then reboot into Ubuntu and install reinstall GRUB by typing sudo grub-install /dev/sdbX, where “X” is the device number of the EFI boot partition of the second HDD.
IF that worked, you may then delete the GRUB folder from the EFI Boot partition of the first HDD.
That should be it.
So if I’m in the same situation as Francesco, I need to place the disc (resulting from burning the .iso) in the second hard drive (which in my case is an SSHD) and then boot onto the UEFI partition of the SSHD and then follow the rest of your tutorial (from the installation part to the end).
Or is using a USB stick/external HD/DVD necessary ?
How to dual-boot Windows 10 and Ubuntu 15.10 on two hard drives: If the system works as expected.
I find that I have to press the F1 key to boot into Ubuntu 15.10, that’s without connecting my other hard drive (Windows 10) yet. Comments/fix?