This tutorial shows how to dual-boot Linux Mint 17.2 and either Windows 10 or Windows 8.1 on a single hard disk drive and on a computer with UEFI firmware.
Two test computers were used: One is an OEM laptop upgraded from Windows 8.1 to Windows 10. The other is a self-built desktop with a fresh installation of Windows 8 Pro upgraded to Windows 8.1.
Whichever version of Windows you use, the steps will be the same. If you’re new to Linux, it’s recommended that you read A beginner’s guide to disks and disk partitions in Linux.
To complete this tutorial, you’ll, of course, need a computer (desktop or laptop) with an existing installation of Windows 10 (or Windows 8). You may choose to install your version of Windows anew.
You’ll also need an installation image of Linux Mint 17.2, which is available for download from here. NOTE: This tutorial is for the Ubuntu-based version of Linux Mint, and not the Debian-based version, also known as LMDE. After downloading the installation image for your platform, transfer it to a USB stick or blank DVD.
If you have an existing installation of Windows 10, it’s best to shrink the C drive to free up enough space for Linux Mint. And if you’re installing a fresh copy of Windows, you can specify how much of the disk space you want the Windows installer to use. The unallocated space will be used for Linux Mint.
Only three partitions will created for Linux Mint 17.2. They will be mounted at / (root). /home, and Swap. If you don’t have enough disk space, you can skip the /home partition and just create two partitions. Your home folder will be created under the partition mounted at / (root).
Figure 1 shows the partitions on a self-installed computer as seen from the Windows 8 computer. This was from a test installation when the C drive was reduced after installation. Notice the recovery partition at the beginning of the drive.
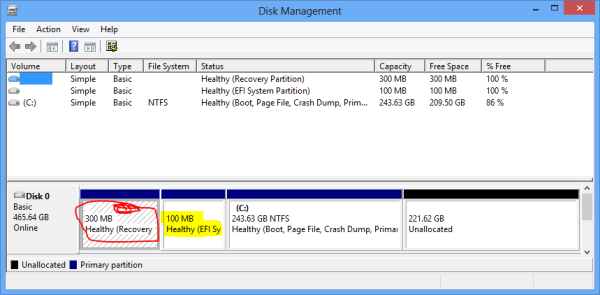
Figure 1: Disk partitions on a Windows 8 computer after shrinking the hard drive.
This image was taken from another test installation on the same computer as above, but when the drive was manually partitioned during the Windows 8 installation. Notice that in addition to the recovery partition at the beginning of the drive, the installer also created another one after the C drive.
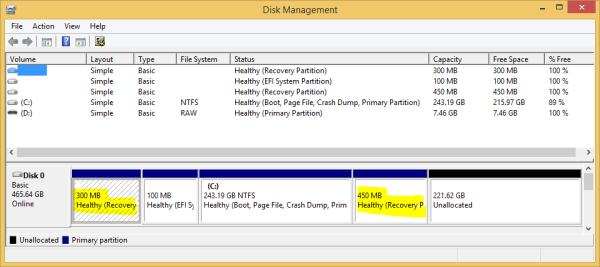
Figure 2: Disk partitions on a Windows 8.1 computer.
In Figure 3, taken from an OEM Windows 10 computer. There are many more partitions. But like in Figure 1, the C drive was reduced to create the free space needed to install Linux Mint 17.2.
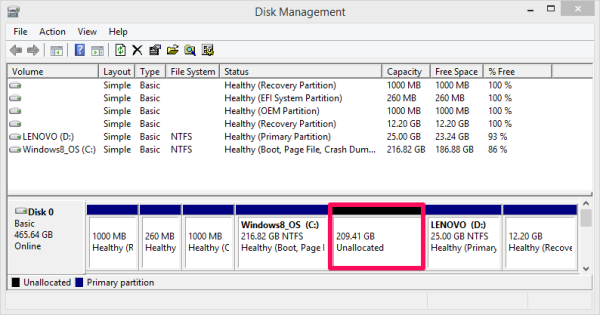
Figure 3: Disk partitions on an OEM Lenovo Windows 8 laptop upgraded to Windows 10.
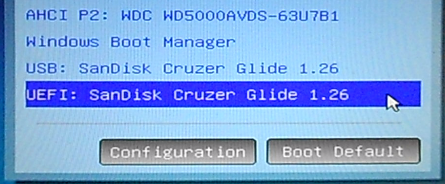
So if you have everything in place, (re)boot the computer with the installation media in the optical drive or USB port. And to be sure that you’ll be booting from the UEFI-aware version of the installer, access the boot menu as the system boots and select the UEFI entry similar to the UEFI: SanDisk Cruzer Glide 1.26 entry shown in Figure 4.

Figure 4: Entries on a computer’s boot menu.
The computer should boot into the Live desktop. While there, double-click on the icon of the installer on the desktop. Then click through the first few steps until you get to the one shown in Figure 5. The Linux Mint installer will always say that This computer currently has no detected operating systems. What would you like to do? But you know that’s not true, because Windows 10 in installed on the same hard drive.
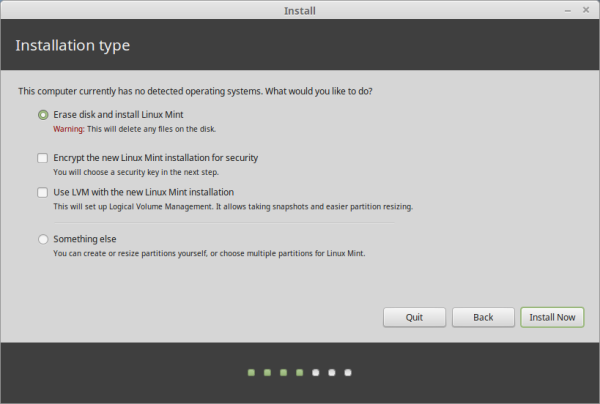
Figure 5: Install methods of Linux Mint 17.2 installer on a Windows 8/10 computers.
To get around that, click on the Something else option, then on the Continue button to access the installer’s manual disk partitioning tool.

Figure 6: Selecting the manual partitioning method on the installer of Linux Mint 17.2.
If your system is self-installed, Figure 7 shows the partitions on the target hard drive as they would appear on the manual disk partitioning tool. That “free space” will be used to create partitions for Linux Mint 17.2. If this is your setup, select the free space by clicking on it, then click on the + button to start creating partitions.
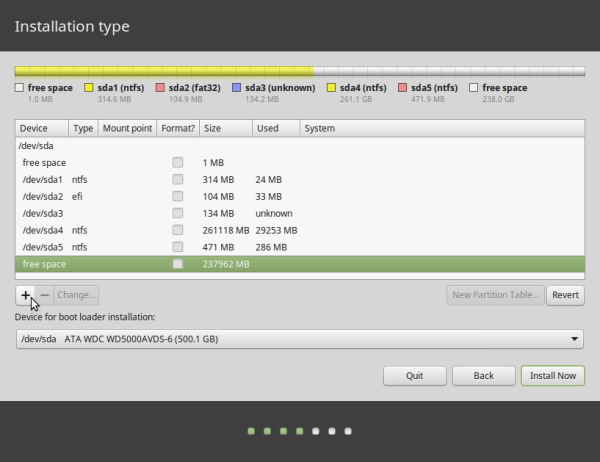
Figure 7: Existing Windows 8/10 partitions as seen from the manual partitioning tool of Linux Mint 17.2 installer. This was taken from a self-installed computer.
If using an OEM computer, Figure 8 shows how the partitions would be displayed on the installer’s manual disk partitioning tool. And as on Figure 7, the “free space”, freed up from the C drive, will be used to create partitions for Linux Mint 17.2. If this is your setup, select the free space by clicking on it, then click on the + button to start creating partitions.
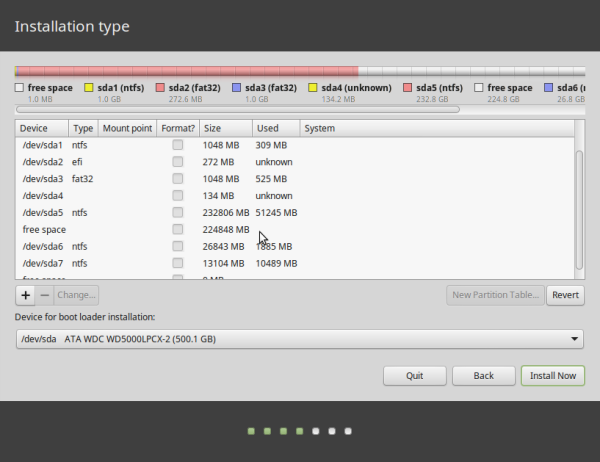
Figure 8: Existing Windows 8/10 partitions as seen from the manual partitioning tool of Linux Mint 17.2 installer. This was taken from an OEM computer.
This is the installer’s disk editor’s window. All you’ll have to specify here, is the size of the partition, the file system to use, and the mount point. For all the partitions except the one that will be used for Swap, stick with the default file system, which is Ext4 journaling file system.
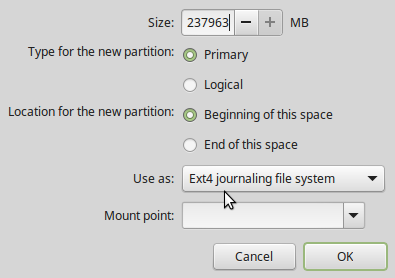
Figure 9: Partition editor of Linux Mint 17.2.
The first partition we’ll be creating will be for root. The recommended disk space for installing Linux Mint 17.2 is about 9.5 GB, so be sure to allocate at least that amount. If you’re installing a system that you’ll be using for some time, the more disk space allocated to root, the better. In this example, 50 GB (50,000 MB) was allocated to it. After specifying the size, select the mount point as shown in Figure 10, then click OK.

Figure 10: Creating root partition on Linux Mint 17.2.
If you have enough disk space to create a separate partition for /home, allocate most of the available disk space to it, and select /home as the mount point. OK.
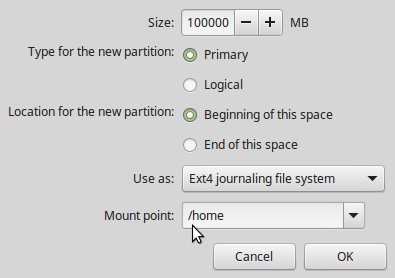
Figure 11: Creating home partition on Linux Mint 17.2.
The last partition will be for Swap. On a 64-bit system, 4 GB should do, if you have disk space to spare. Be sure to select swap area from the “use as” menu, then click OK.
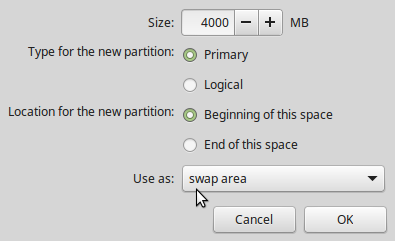
Figure 12: Creating Swap partition on Linux Mint 17.2.
With all the partitions created, they should all be listed as shown in Figure 13.
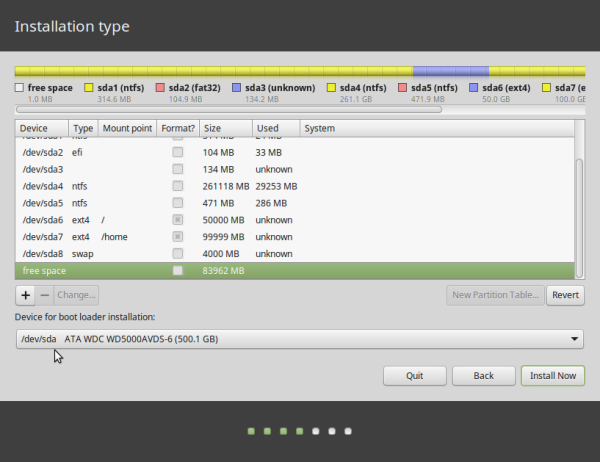
Figure 13: Newly created Linux Mint 17.2 and Windows partitions on a self-installed computer.
This is how they will be listed on an OEM computer.
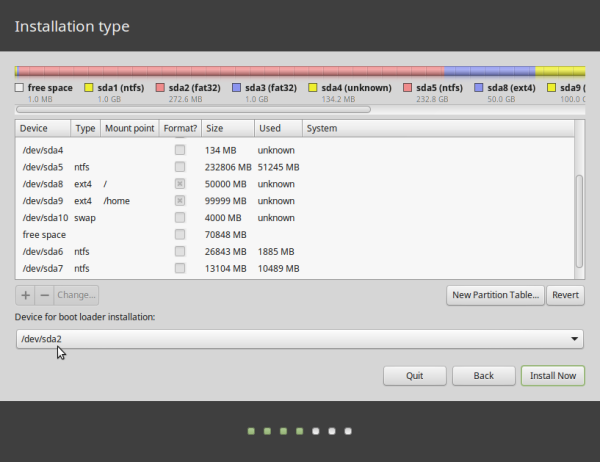
Figure 14: Newly created Linux Mint 17.2 and Windows partitions on an OEM computer.
Whether on a self-installed or OEM computer, the last task to accomplish before clicking Install Now, is to select the Device for boot loader installation. That device is your Boot EFI Partition. In most cases, it’s /dev/sda2. If in doubt, look for the partition of Type efi. That’s the Boot EFI Partition
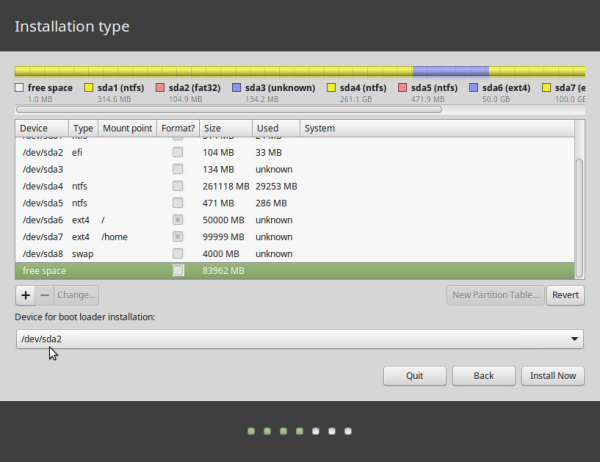
Figure 15: Selecting the EFI boot partition as the device for boot loader installation on Linux Mint 17.2.
After installation and reboot, the computer should boot into Linux Mint 17.2. And you should be able to boot into Windows by selecting the entry for its boot manager on the GRUB menu.


Nice tutorial. I have an issue though. I shrinked down the volume of drive so i could install linux on it. I created a bootable usb with the linux 18.iso on it and i can boot from the usb, so far so good. When i try to install it i am comfronted with the options to erase all data from my computer (win with all my data) and isntall linux onit or “something else” so naturally i chose “something else” where i can choose on which partition i want to install mint. It recognizes that there is a free partition (the one i created) but it states that its “unusable”. What can i do ?
What version of Windows do you have on the disk?
I think it said that partition is unusable likely because you installed Windows using an MBR partitioning scheme, and you’ve exceeded the maximum number of primary partitions MBR can support, which is 4.
See Guide to disks and disk partitions in Linux.
@finid yes that was exactly the case. I merged two partitions to one so that i had 3 partitions in total and then made room for a linux partition. Not extending the limit of 4 partitions in total and it worked fine.
OK, I have a custom built desktop. MSI gaming M7 motherboard, Core i5 6600 k, 16 Gb of DDR4 and a bunch of other high end shit. I can not get Mint 17 to start, even from a live boot USB stick. I built this system myself and I just don’t get why linux refuses to start. I have tried disabling secure boot. I have tried booting linux in UEFI and in legacy mode..nothing works…any ideas?
Do you get any message on the screen that gives yo a clue why it’s refusing to start? Might be an issue with how the image was transfered to the USB stick. HAve you tried other Linux distros?
great article, useful for me. thanks
Trying to try out Linux Mint on my Windows 10 computer (factory installed). I downloaded 17.3 but it shows as a virtual drive (silver circular icon labeled as drive H) and not an ISO image in my downloads folder. If I try to select it in ImgBurn it opens the “drive” and lists the folders in it. I tried selecting all folders but it always picks only 1. Clicking on the virtual drive icon only opens it to show the folders. I don’t see a setup or exe file in any of the folders so which one do I burn? Been googling this for a couple of hours now and haven’t found anything to help.
Is the image you downloaded listed as an ISO file, that is, is the file extension .iso?
Hi,
I have the problem that there is no efi file type presentit, it self installed version of windows 10.
I have loaded mint installer from the CD but not from the eufi option for the CD in the BIOS, I can only get the installer to work by loading compatability mode from the cd, normal mode I get a black screen.
For the eufi option I get a blank screen for both normal and compatability mode. I have disabled secure boot. I have tried deleting quiet splash and adding nomodset to the boot argument.
Any help would be greatly appreciated I have been messing with this for a long times now.
Cheers
Also system spec is Intel i7, Asus z97, graphics nvidia gtx970 I have created a partition for Linux on my ssd.
Log into Windows, open the partition manager, and see if the system partition is UEFI or standard MBR. Find that out, so Iknow what step to suggest next.
Thanks, Please see attached image for the partition manager
http://postimg.org/image/5sxsyl8yz/
That’s good.
So you have at least 3 Windows partitions – a recovery partition, the EFI System Partition, and your C drive. I’m assuming that the other 2 partitions were used for Linux.
The most important point is you have an EFI System Partition. Now, what edition of Mint are you trying to install?
If you’re using the latest edition, boot into the computer’s boot menu, then select the UEFI option of the installer. That should work. The F12 or F11 key should bring up the computer’s boot menu.
Yes exactly the other two partitions were used for Linux. I managed to install it but not from the uefi option so I couldn’t choose correct bootloader so it always just boots straight to windows.
If I try to load the installer using the uefi option then I get as far as the menu to select, Linux, Linux compatability mode etc but when I try and boot either option I just get a black screen.
I’ve tried various things like adding nomodset and deleting quiet splash from boot argument but still doesn’t work…. ????
Also am trying to install cinnamon 17.3
You meant Linux Mint 17.3 Cinnamon edition.
If you have Secure Boot disabled, I’m not sure why you’re having this issue. Have you tried installing another distribution, like Ubuntu, Fedora or Antergos to see if those work?
Thanks for your help, no haven’t tried another distro I’ll have to give it a go. I’m not sure if it is something to do with graphics drivers…
I have windows 10 on my Lenovo G5070.I wanted to install linux mint 17.3 alongside the windows.
So I downloaded an .iso file and burned to a DVD.
I restart the computer select the cd/DVd drive to boot from,but it still starts windows 10.I checked the system Information,it shows secure boot not supported….
And
Legacy bios
Windows 10 is installed on Drive C
And I have empty Drive Won which I want to install linux.
What should I do ?
With or without Secure Boot, you should at least still be able to boot from the DVD. Try changing the default boot device to the optical drive in the UEFI setup utility and try booting again.
I have two Windows XP partitions,
C: , which I’ve been using for some time, but which has a problem and crashes during shutdown and for other reasons, but which has many applications on it that I’m using.
X: , which I recently created with a clean XP install and I’m gradually building up by installing the apps I need.
How can I tell whether Windows is using C: or X: to boot from ?
More to the point, which one should I use for bootloader for Linux Mint ?
Is it possible to change the bootloader partition from C: to X: after Mint has been installed, or do I have to get it right first time ?
I’ve read some articles, and they suggest that /dev/sda2 would normally be used as bootloader for Linux, however, the Mint installer has marked my /dev/sda1 as boot loader – it has (loader) next to it on the partition table that’s displayed when I opt to alter partitions.
I imagine in this case, that I’d be better ignoring what the installer suggests, and instead use /dev/sda2 , which is my newly created XP installation on X: and will likely be better for long term stability. It’s possible I might delete the XP installation on C: eventually, once I get the one on X: up and running – I wouldn’t want to cause possible repercussions on my Linux installation if I do that. Could the Grub system cope with that, or can I configure it in preparation before I delete XP on C: ?
Sorry I’m making this a little complicated. Such is life living under the unreliability of Microsoft operating systems, that I find myself having to keep creating new clean installations that I can gradually move to. This is why I’ve had enough, and I want to get off the Microsoft Merry-go-round and use Linux Mint instead.
Many thanks for any help you can offer.
Regards, Colin
I’m not a Windows expert, but I think from Windows Explorer, you can see the drive letter of your drive.
The partition that a Linux installation uses for the bootloader can be /dev/sda1, /dev/sda2, /dev/sda5 or anything. The device number is ot set in stone. It just depends on how the disk was partitioned.
You’ve made things far too complicated than is necessary. The simple solution is to backup your Windows file to a USB stick, then reinstall Windows. That way you have a single Windows installation. Now you can reinstall Linux Mint or any other Linux distribution.
I currently have Windows 7 Home Premium edition and Mint 17.2. Would it be possible to upgrade to Windows 10 if I have a dual boot system?
If it’s on a UEFI system, upgrade should work, no issues.
If it’s Legacy BIOS, it depends on where you installed GRUB.
Oh it was so easy when the installer recognised an existing Windows operating system and installed alongside it. when (if) that feature appears again I’ll install Linux Mint again, until then I won’t bother.
Hi, the first part I have been able to follow, however I am not showing any EFI portions available for boot loader installation? Suggestions?
What image are you referring to?
lol… you created 3 partitions and never tell me on which partition i have to install linux mint….???
By creating the partitions manually, you’re telling the installer those new partitions are for Mint. After creating them, they’re the partitions marked to be formatted, so you don’t have to do anything other than create them.
With most newer HP Laptops you have to press a key at boot up in order to select the Boot Order menu and then choose Ubuntu in order to boot mint. The boot order will revert back to Windows on the next boot. You then have to reboot and press the same key again to get the boot order menu. If you don’t do this when you reboot after the install it will boot into windows instead. This is done by HP’s Uefi and by design. without a firmware change you will have to press that key. There are work arounds so that you can use the grub menu to boot a windows / Linux dual boot uefi machine. this only applies to HP Laptops.
Mel
Thanks for sharing.
On non-OEM machines, like the desktop I built a few years ago, the last OS booted becomes the default. regardless of the settings in the UEFI utility. I think it’s the same on my Lenovo G50 laptop.
Hi Mel…
Your tip helped a lot. I was wondering why my HP pavilion x360 would boot straight into Win 10. I had to press ESc and then after the next screen shows up…pressed F9 and booted into Ubuntu.
Note I did NOT have to disable UEFI.
Thanks a lot.
Good tutorial. But apparently one of the ads is using Shockwave flash – which crashes my Firefox browser. I can use Chrome – which at least tells me that Flash crashed.