The Toshiba Satellite C55-A is a Toshiba laptop with Intel Core i3 processor inside, a 750 GB hard disk drive (HDD) and Windows 8 factory installed. That means UEFI firmware and Windows 8 installed using a GPT partitioning scheme. Also, Restricted Boot (or Secure Boot) is enabled.
This article offers guidance on how to install Ubuntu 14.10 alongside Windows 8 on that Toshiba laptop. In other words, how to dual-boot Ubuntu 14.10 and Window 8 on a Toshiba Satellite C55-A. Ubuntu 14.10 is the latest edition of Ubuntu.
Because the Toshiba Satellite C55-A is a loaner from a friend, I was not able to perform the actual installation, so the best I can do is provide guidance on what to do, given the number and type of existing partitions on the laptop’s HDD.
If you have the same or a similar Toshiba laptop, or any other computer with UEFI firmware and Windows 8 installed, and you wish to install Ubuntu 14.10 alongside Windows 8, you’ll have to download an installation ISO image of Ubuntu 14.10 from here. Then burn it to a blank DVD or transfer it to a USB stick.
This screenshot shows the default partitions on the Toshiba Satellite C55-A as seen from the Windows 8 partition manager. It shows a total of six partitions. Because GPT partitioning is used, they’re all primary partitions. Two partitions that are important to a dual-boot operation between Windows and a Linux distribution on a computer with UEFI firmware are highlighted. They are the 260 MB partition labeled EFI System Partition and the C drive, which, in this screenshot, is the 685.91 NTFS partition.
To install Ubuntu 14.10 alongside Windows 8 on the Toshiba Satellite C55-A, some space will have to be recovered from the C drive. That is, for Ubuntu 14.10 to be installed on the laptop, the size of the C drive will have to be reduced. If you haven’t done anything like that before, don’t worry, it’s a very simple operation. See How to resize or shrink a GPT-partitioned C drive in Windows 8 for help on this subject.

Now, let’s see how Ubuntu’s installer sees those partitions. That entails booting the computer from the installation DVD or USB stick that you created. Boot into the Ubuntu 14.10 Live desktop, then launch the installer by clicking on its icon on the launcher or on the desktop. Click through the first few steps until you get to the step shown in the screenshot below.
Notice that the installer detected the presence of a Windows Boot Manager, not Windows 8. In versions of Ubuntu before Ubuntu 14.10, the message would have been, “This computer currently has no detected operating system. What would you like to do?” or “This computer currently has Windows X installed on it. What would you like to do?”

So, what would I like to do? What would you like to do? Simple – install Ubuntu 14.10 alongside Windows 8 on the computer. There are two methods that could be used to get that done. One, let the installer take care of business, using its automated partitioning scheme. Two, manually partition the part of the HDD that will be used to install Ubuntu 14.10.
Either method will produce the same result. If you opt for the first method, there’s very little that you’ll have to do. Just stick with the default option, click Continue and make two or three more clicks on the steps after that and you should be good to go.
If you opt for the second method, you’ll have to select the Something else option so that you can access the installer’s advanced partitioning tool. That will enable you to create the partitions yourself. The rest of this tutorial assumes that you’re taking this route.

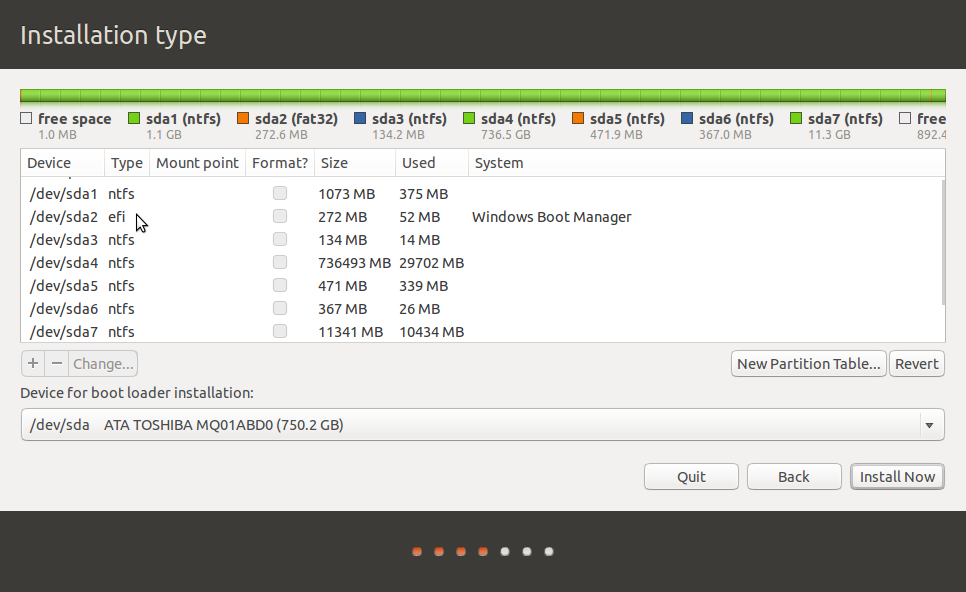
This is what the installer’s advanced partitioning tool looks like. You get here by selecting Something else and clicking Continue on the previous step. The partitions you see in this screenshot are the same ones you saw in the Windows 8 partition manager. However, this is just a partial view of the partitions.

This screenshot shows all the major partitions. Notice that they go unbroken from sda1 to sda7. That’s a sure sign that you’re dealing with GPT partitions. The ones that will factor in this tutorial are sda2 and sda4. sda2 is the same partition that’s labeled EFI System Partition in Windows 8, while sda4 is the C drive.
To start creating partitions manually, you should have reduced the size of the C drive from inside Windows 8. If you did, the recovered space should be listed as free space at the bottom of the list of partitions. Using that free space, create the partitions that will be used for installing Ubuntu 14.10. Ideally, you’ll want to create two or three partitions. If you opt to create just two partitions, the same number as on a default installation of Ubuntu 14.10, they should be for the root partition and Swap. If you go for three, they should be for root, Swap and home partitions.
When you are done creating the partitions, be sure to select sda2 as the Device for boot loader installation before clicking Install Now.

The foregoing should be enough to help you install Ubuntu 14.10 alongside Windows 8 on the Toshiba C55-A. A comment about Ubuntu 14.110 on the Toshiba C55-A: With just 4 GB of RAM, Ubuntu 14.10 looked awesome on it, much better than Windows 8.


I have a 2011 Toshiba satellite Zorn OS Ubuntu software and its new but its exciting> I don’t know how to free up space afaraid really but I just completed my first developer job on a bricked Nexus, I also have hp I bought 2019 with Windows 10 I want to download Zorin and Ubuntu I dont know where to find how?