Linux Mint 13 Cinnamon and Linux Mint 13 MATE are the latest editions of the popular Linux desktop distribution based on Ubuntu Desktop. This tutorial presents a step-by-step guide on how to dual-boot either one with Windows 7 on a computer with a single hard drive.
Because the Cinnamon and MATE editions of Linux Mint 13 share the same installation program, the steps involved are the same regardless of the edition you use. For this tutorial, a 32-bit installation image of the Cinnamon edition was used.
If your computer is running a self-installed copy of Windows 7, the default number of partitions will be just like the ones shown in the image below. Keep in mind that the partitions on an OEM (Original Equipment Manufacturer) installation could be different. For this tutorial, the operating assumption is that you computer is running a self-installed copy of Windows 7. Note: On your computer, make a mental note of the amount of free space on the C drive listed on this image. You will need the information during the installation of Linux Mint 13.

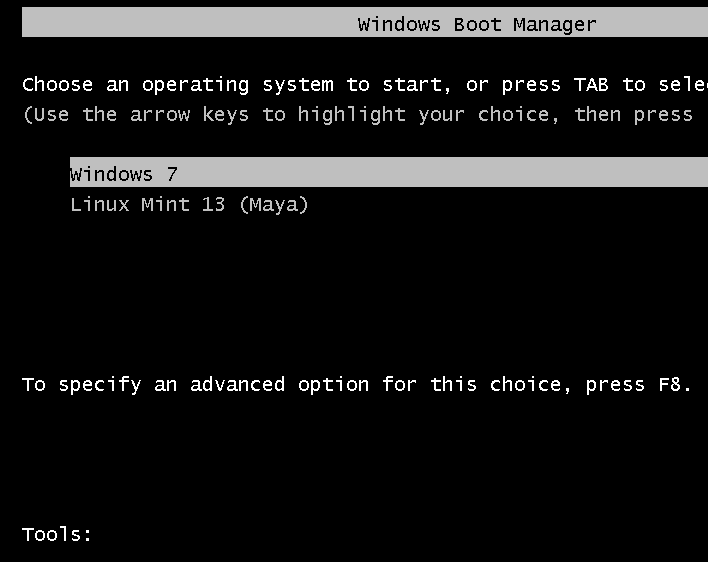
The objective here is to install Linux Mint 13 on the same hard drive, with GRUB, Linux Mint’s boot loader, installed in the boot partition (of Linux Mint), leaving Windows 7’s boot programs in the hard drive’s Master Boot Record (MBR) untouched. Then using another application to add an entry for Linux Mint 13 in Windows 7’s boot menu, so that at boot time, you will be able to choose which operating system to boot into. Selecting Windows 7 will cause the computer to boot into Windows 7 and selecting Linux Mint 13 will boot the system into your newly installed copy of Linux Mint 13, but not after a brief stop at Linux Mint’s boot menu.

After creating partitions for and installing Linux Mint 13, the new partitions as seen from inside Windows 7 will look a lot different. This image shows the partitions from the computer used for this tutorial after the dual-boot operating has completed.

For this tutorial, the partitions that will be created for Linux Mint 13 are: a partition mounted at /boot; root partition mounted at /; a partition mounted at /home; and a Swap partition. You do not need to create all four, but that is what will be done for this tutorial.
What do you need to complete this tutorial? Just five items:
- This tutorial
- You, and an Internet-connected computer, needed to read this tutorial.
- An installation image of Linux Mint 13 (MATE or Cinnamon edition). You may download it from here. Burn the downloaded image to a DVD, or transfer it to a USB flash drive.
- The target computer running Windows 7 (Note: you may opt to reinstall Windows 7 anew)
- EasyBCD – a free software from NeoSmart Technologies that will be used to add an entry for Linux Mint 13 in Windows 7’s boot menu
Note: If you are not familiar with disk partitioning in Linux and how to dual-boot operating systems, it is highly recommended that you read guide to disks and disk partitions in Linux and tips for dual-booting Windows and Linux before continuing with the rest of this tutorial.
Now that we have a pretty good idea of what we need to accomplish, time to get it done. To start, boot the computer from the Linux Mint 13 DVD installation image that you made. Linux Mint 13 DVD is a Live DVD and by default, will boot into a Live desktop environment. Click on the installer’s icon on the desktop to start the installation process. When the installer starts, click through the first steps until you get to the one shown below. You definitely do not want to select the second option. Like the second option, selecting the first option will lead to an automatic partitioning of the free space needed to install Linux Mint 13.

Selecting the first option will actually bring you to this step, where you can see how the installer will resize the main Windows 7 partition (the C drive). The problem with selecting the first option, is that GRUB will be installed in the MBR of the hard drive, where it will overwrite Windows 7’s boot files. Since this is not what we want to do, the only option left, is the last option (Something else). So, if you are at this step, click the Back button.

Selecting Something else and clicking Continue will bring you to the Advanced Partitioning Tool. “Advanced” does not mean that the tool is really advanced, it just means that it is for people who know how to partition disks in Linux. If you read and understood the material discussed in guide to disks and disk partitions in Linux, consider yourself an advanced user.
The main window of Advanced Partitioning Tool is shown below. By default, the partitions listed at this step – sda1 and sda2, are the two Windows 7 partition that we saw on the first image on this page. In Windows’ parlance, sda2 is the C drive, while sda1 is the System Reserved partition.

The task here is to resize sda2, freeing up enough space that will be used to create the partitions for installing Linux Mint 13. To begin, select sda2 and click Change.

This is the resize window, also known as the Edit Partition window. The sda2 on the computer used for this tutorial has about 320 GB of disk space. How much of that disk space we can free up depends, of course, on what is available. This is where you have to be very careful.

The system used for this tutorial was a recent installation, so Windows 7 has only used about 7 GB. With that, I decided to allocate 100 GB to Windows. That amount is what should be shown in the New partition size field. And that is all you need to do here. Click OK.


I have an Dell XPS 8500, I didn’t like Win 8 so I disabled UEFI and used the legacy boot. I installed Windows 7, allocated 100gb of free space to prep for the Linux Mint 14 install, and proceeded to install Mint. I got in the LiveCD and proceeded through installing Linux and I don’t see the same screen that says ‘This computer currently has Windows 7 installed on it.’ It just gives me two options, erase everything and install or something else. So when I selected something else, I see /dev/sda with the full ~900GB(1TB drive) ‘free’. This made no sense to me, because I still had Windows 7 installed on it. I did some research a while ago and it seems that it might have something to do with my UEFI motherboard(already disabled and in legacy mode though) or that I have a GPT partition table. Seems like the GPT is the one causing most of my problems, but I’m not sure. I couldn’t even get Windows 7 to install without deleting all of my partitions at first in the installer, allocating a new one, then installing it there. Does anyone know why Linux mint isn’t detecting my partitions so I can install it?
I had the same problem, but with an SSD drive and Windows 8. Wrote about it at why is Windows 8 on SSD invisible to Ubuntu 12.10’s installer?. And the problem was on a UEFI PC, but in legacy mode.
The thing with mine is on a regular HDD, I did not have the same problem, just with an SSD.
And it does go back to GPT. One thing you might want to do is recreate the partition table. You can do that from the Advanced Partitioning Tool’s window.
Got it, changing the partition table really did the trick, though I used gparted to help me change to msdos (default) from GPT. Word of warning to everyone, this does wipe your drive. Followed through your guide and successfully dual booted Win 7 and Linux Mint, thanks!
I almost wiped out my entire C partition by not knowing what I was doing, this tutorial helped me install the OS correctly.
FOR HP USERS: i shall note that hp installs its recovery manager on a primary partition by default, thus making it impossible to create another primary (there’s a maximum of 4 primaries on any hd and windows takes up 3). To install this os you should make te hp partition logical and create the new partitions immediatly next to the logical one.
Refer to this site: http://www.partitionwizard.com/faqvideo/mbr-faq.html
Thanks for the tutorial!!!
Many thanks – just installed Linux Mint 14 on the x220. Instructions worked perfectly!
Great tutorial!! Worked great – using Windows 7 and Linux Mint 13.
But facing a problem like the partition you formatted with /home of size 100GB for mass storage. Is not showing in Win7 and Mint13 too.
So, what I did, from Win7 went to computer management/Disk Management delete that 100GB partition, and reformatted. Now that partition was showing in Win7, but while booting with Mint13 it was showing some error.
Now Please tell me–
1. What to check for 100GB /home partition “Type of new Partition”- is it Primary or Logical
2. Tell me such trick so that I can store and access data on 100GB space from both the OS’s.
I am a beginner so tell me in simple language 🙂
How many existing Windows partitions do you have?
Once again I freshly installed win7, and have got only C with 160GB.[Full Capacity]
What error was it showing?
Note that a new installation of Win 7 has 2 primary partitions, so if you are installing Mint, you can create a /boot partition as primary and the others as logical partitions.
If you deleted that 100 GB partition, you should see it as “free space” during the installation of Mint, and it should not give any errors.
Windows will not see the Mint partitions as Linux partitions, but as generic partitions. And after installation, you can copy files to and from Linux to the Windows partitions, but you cannot copy files from Windows to the Linux partitions.
Suggested reading;
1. Guide to disks and disk partitions in Linux
2. How to access Microsoft files and folders from Linux
Thank you Sir, I got successfully installed..
Thanks a ton!
Worked on my Windows 7 64 bit machine on getting Linux Mint 14 up and running.
Very well laid out compared to other guides I have read on Linux stuff (I’m a linux beginner) – and the clarity undoubtedly saved me a headache or two
Amazing!!! Found this site and followed the perfect instructions. Everything seems to be running great. One thing I noticed is even with the Win 7 or Mint selection at boot up (easy BCD0 it still goes to a secont screen which included Win 7, Mint and a couple of other things. It seem to sit there for a very short time then boot into Mint, which I selected at boot up. This is no big deal. I just did not realize I would see this addition acreen. Again thanks. Could not have done it this with out this info.
John
That second boot screen is GRUB’s boot menu. If you don;t want to see it, just edit /etc/default/grub and change GRUB_TIMEOUT=10 to GRUB_TIMEOUT=0
Hi!
I followed your tutorial which was very well explained, thanks!
When I restart my computer, I have the menu to choose between my OS (Windows 8 and Mint 14). Windows 8 works fine, but when I want to load Mint, I get a screen that says something like
“Windows couldn’t load properly. A recent modification of the software could have caused this. To correct this problem :
1.Insert Windows Installation disk and restart the computer.
2.Choose the language parameters.
3.Click on “Repair your computer”
If you don’t have this disk blah blah…
File : \NST\AutoNeoGrub1.mbr
State : 0xc000007b
Infos : app or OS coulnd’t load because a needed file is missing or contains errors.”
Can you help me out?
Is the PC is store-bought Windows 8 PC, and is installed on UEFI/Secure Boot hardware?
Yes, it is!
I found out how to launch Mint, through the boot options. Then I installed rEFInd as a boot manager, and it works fine. Thanks for the tutorial!
Glad you figured it out, and sorry couldn’t help, but could you share how you did it with us?
TIA
From the menu to launch Windows or Mint, I hit Esc (or Tab, I can’t remember) then selected ‘boot options’. There, I had ‘boot manager’ as a first choice (which started Windows), then linuxmint, which started Mint 14. To avoid having to do this everytime I wanted to start Mint, I installed rEFInd, an EFI-compatible boot manager (thanks to this page : http://www.rodsbooks.com/refind/). I kind of messed up the installation though, so it is not entirely functionnal, but I am working on it!
Thank you.
Worked great – using Windows 7 and Linux Mint 14.
Thanks!!!
Perfect! It worked right off the bat, many thanks 😀
Windows7 / Linux Mint 14
I have a question, I’ve been playing around with Puppy Linux and already have made a partition for a Gnu/Linux install, how would I install this in an existing ext4 Partition? I had planned to use Mint as my Linux of Choice (Specifically the KDE flavor.)
You can’t install another distro in an existing ext4 partition, unless you want to wipe that existing installation and reuse the freed up space for the new install.
Thank you very much for this tutorial. Very well explained and most important… it worked 100%!!
(you saved my hard disk ;D)
Question: At the “Installation Type” screen I get the following-
Size Used
/dev/sda1 ntfs 111797MB unknown
Consequently when I select sda1, and click “change” I do not have an “New Partition Size” option – Only “Use as:” and “Mount Point”
Any ideas how I can get the system to report the “Used” value?
Thanks.
If the installer is not reporting usage value for an ntfs partition, it is better to resize it from Windows. Viewing it from Windows will give you a better idea of how much free space is left on it.
Use Windows’ partition manager (type “partitions” into the search box to find it).
Thank you or this guide. Because of it, I found out what I did wrong on my previous attempt to dual boot with Linux Mint 14 (realizing the interaction between the GRUB loader and Windows 7’s BootMGR).
You are awesome for taking the time to do this. Thank you again.
Great tutorial. Thanks so much. I now have a dual-boot netbook.
Already tried this with Maya 14 and Windows 8. Windows 8 has taken some steps towards securing the system boot record, but it works fine. Windows 8 will show the options on its signature style, then will reboot the machine to start from Maya partition. This made me think at first I had failed, but as said before, it worked fine.
I modified this process to build a machine that uses full-disk encryption but still dual-boots Windows and Linux. I’m now on Mint 14, but it works with Ubuntu and Mac OS, as well. Thanks much.