One tool that has seen very little or no change over the past several releases in Ubuntu Desktop is the installation program. So it is somewhat surprising that some users are having a hard time dual-booting Windows 7 and Ubuntu 12.04 using a tutorial written for Ubuntu 11.04.
Stemming from comments in that article, and email from readers, I decided to revisit that tutorial using Ubuntu 12.04. So the purpose of this article is to show how to dual-boot Windows 7 and Ubuntu 12.04 on a computer with one hard drive. And it will be on a computer with an existing installation of Windows 7. If there is a need to, you may reinstall your copy of Windows 7.
If you want to attempt this on a computer with two hard drives, see how to Dual-boot Ubuntu 12.04 and Windows 7 on a computer with 2 hard drives.
To get started, download an installation image of Ubuntu 12.04 from here. Depending on your platform, you may download the 32- or 64-bit image. Screenshosts used in this tutorial were taken from test installations using a 32-bit installation image in both a virtual environment using VirtualBox, and on real hardware. In either case, I did not encounter any errors that others have reported, so I am certain that if you follow this guide, you should have a computer with both Windows 7 and Ubuntu 12.04 installed in a dual-boot configuration.
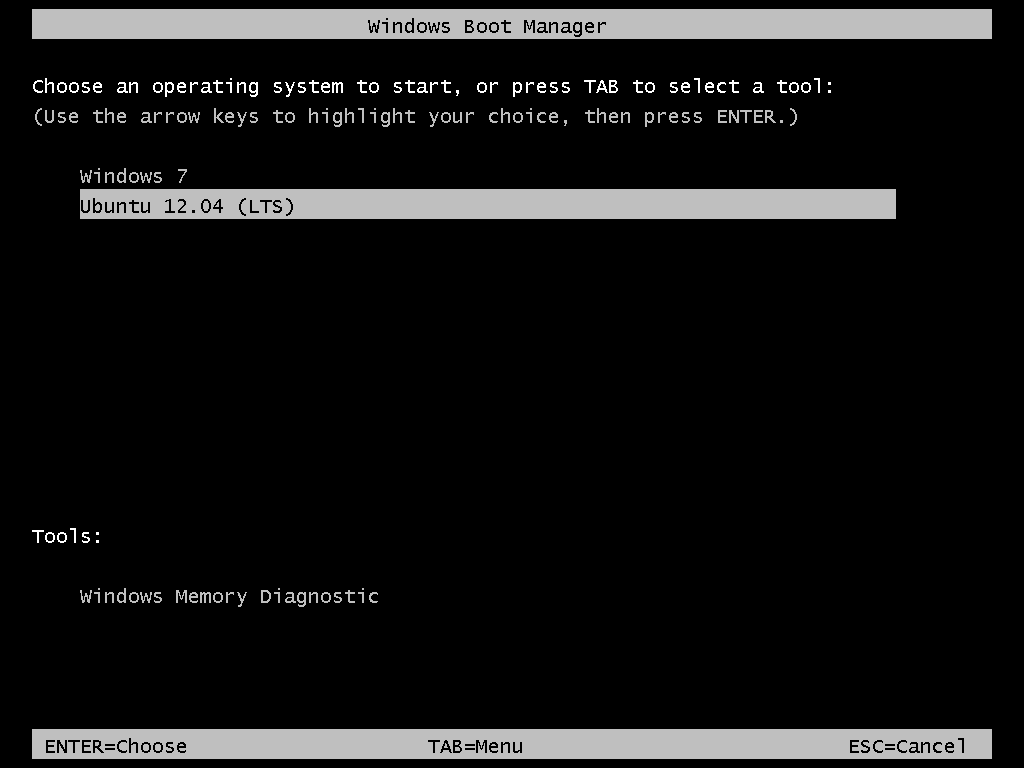
So that anytime you reboot the computer, you should see Windows 7’s boot menu with two entries listed – Windows 7 and Ubuntu 12.04 (LTS). Then you may choose to boot into Windows 7 or Ubuntu 12.04.

Now that you know what the overall goal is, how do you get from here to there? First, understand that if you have a computer running Windows 7, that Windows 7’s boot manager is responsible for making sure that the system boots. Installing Ubuntu on the same hard drive throws another boot manager into the mix. So the most important decision you are going to make about this, is which boot manager (Windows 7’s boot manager or Ubuntu’s) do you want to be responsible for primary boot operations?
When dual-booting Windows 7 and a Linux distribution on a computer with one hard drive, the best option is to have Windows 7’s boot manager be the primary boot manager. Why? Because whenever you reinstall or update Windows 7, its installer will overwrite anything it finds in the portion of the hard drive where critical boot-related programs are installed. That portion of the hard drive is known as the Master Boot Record (MBR). Also, certain anti-virus programs have been known to mess with the contents of the MBR, so installing GRUB in another location will ease the maintenance headache associated with your system. This point determines where GRUB will be installed.
If you are not familiar with disk partitioning (in Linux) and dual-booting, it is highly recommended that you read guide to disks and disk partitions in Linux and tips for dual-booting Windows and Linux.
By default, a new installation of Ubuntu 12.04 is installed on two partitions – a main partition, and Swap. The main partition is usually a primary partition and the Swap, a logical partition. And if Ubuntu is the only operating system on the hard drive, you will see both partitions labeled /dev/sda1 and /dev/sda5. Because you are going to install it on a computer with another operating system on it, the partitioning scheme will have to change.
The recommended partition scheme that will work better with the system you are about to install will have at least three partitions. They are the:
- Boot partition – This is where GRUB will be installed, instead of in the MBR. Installing GRUB in the boot partition is where users have encountered errors, so pay particular attention to what you do with this partition
- Root partition – This is where all the programs will be installed
- Home partition – This is optional, but it helps to have your files and folders on a separate partition
- Swap space
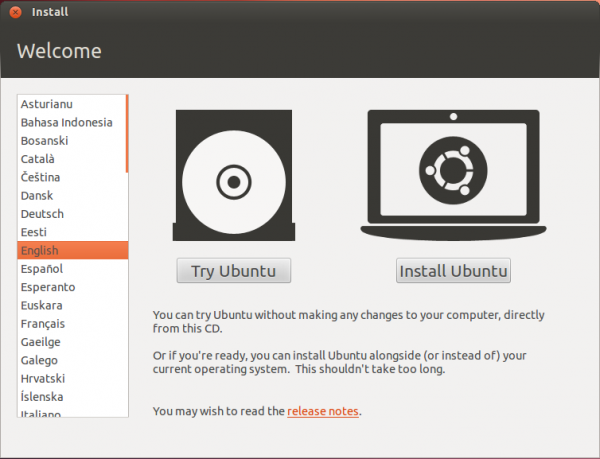
I think what you need to do should be pretty clear now. Time to begin the process! If you have not done so already, burn the installation image (of Ubuntu 12.04) you downloaded to a CD or transfer it to a USB stick, and boot the computer from it. When booted from the CD, you will be given the option to boot into a Live Desktop or start the installation without visiting the Live Desktop. It does not matter which option you choose, but booting into the Live Desktop and starting the installation from there seems to be a very good choice.
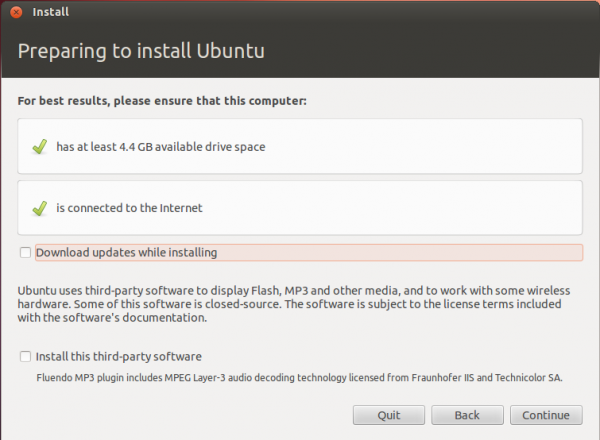
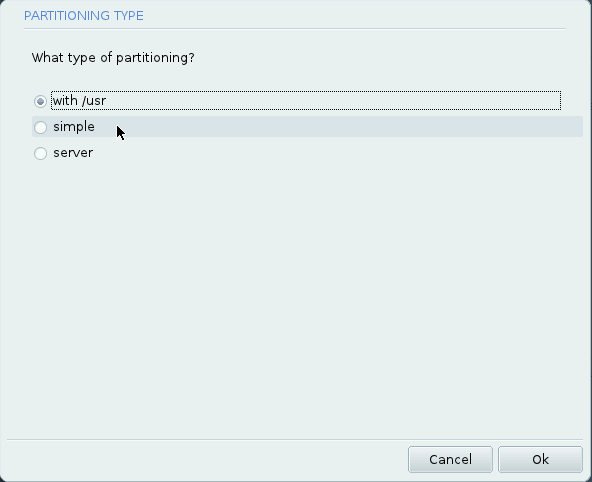
Whether the installation process is started from the Live Desktop or not, clicking through the installer gets you to the step shown in the image below. The most important information here is the minimum disk space (4.4 GB) recommended for a successful installation of Ubuntu 12.04. That piece of information will help you determine how much disk space to allocate to the root partition.
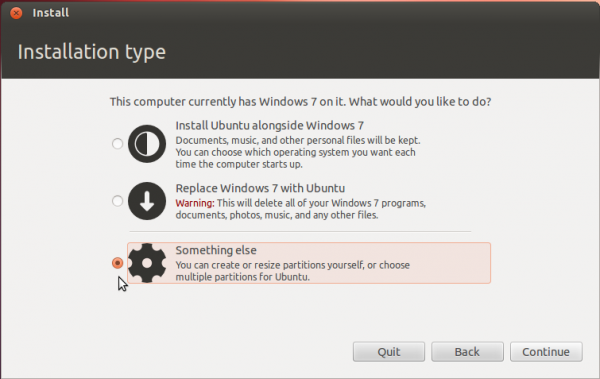
Clicking Continue from the previous step will land you here. If, as in this example, you have Windows 7 installed on the target hard drive, you should see the same three options shown here. Because you will be creating partitions manually, the option you want to select is Something else.
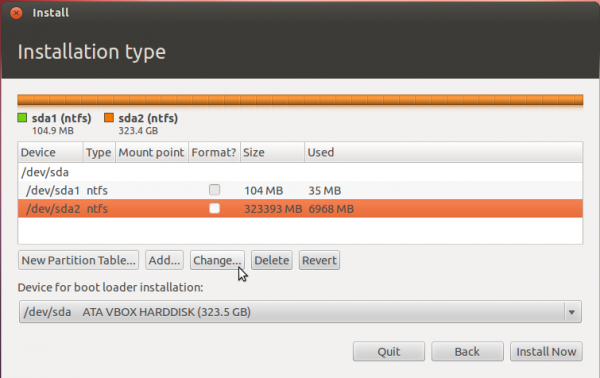
That should bring you to the Advanced disk partitioning tool. Again, if we are operating from the same point, that is, if you have a default installation of Windows 7 on the target hard drive, you should see two ntfs partitions (/dev/sda1 and /dev/sda2) listed. The main Windows 7 partitions, also popularly known as the C drive, is your sda2. To install Ubuntu, you will have to resize that partition. Note: If have free unallocated space on the hard drive, you do not have to go through this partition resizing process. To resize the partition, select it and click the Change button.
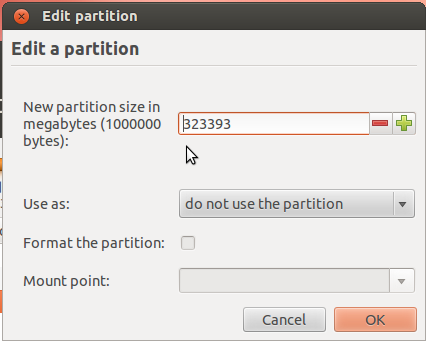
That should open this window. The only thing to do here is tell the installer how much disk space you want to keep for Windows 7. The rest will be used for Ubuntu. The system used for this tutorial has about 324 GB of disk space. I chose to keep 100 GB for Windows.
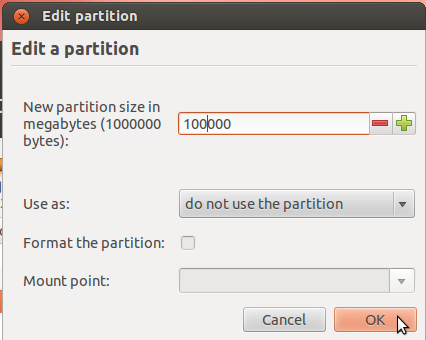
So the window now looks like this. Click OK.
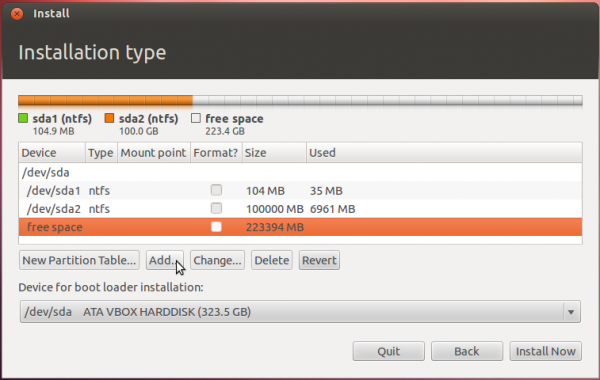
After the partition has been resized successfully, you should see the freed space marked as free space. Select it and click Add to start creating partitions for Ubuntu 12.04.


Another THANK YOU for a great how-to.
I just wanted to mention that my HP G6 had to be plugged in, or the LiveCD wouldn’t even load correctly (on battery power.
Hey there,
thanks so much for your work! Got a problem thou:
I followed all steps and I restarted after the EasyBCD step, everything looked fine and I ended up at the windows boot manager. When I click on Ubuntu following error occurs:
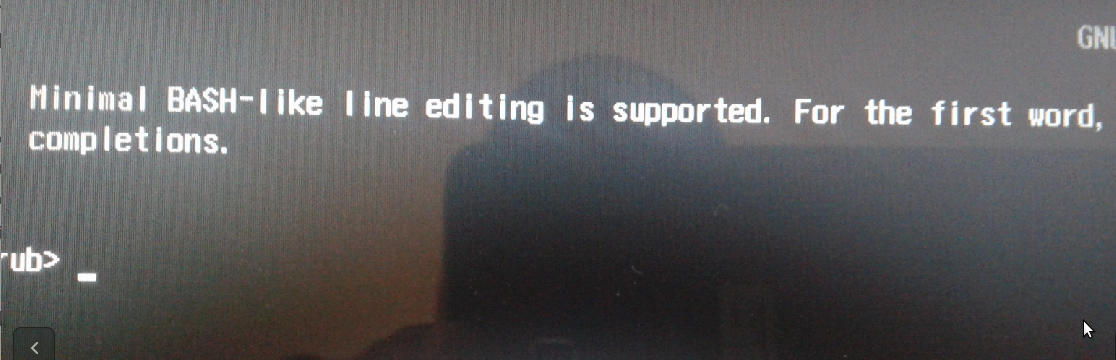
!! number of heads for drive 80 restored from 255 to 224. (hd0,4) [Multiboot-kludge, loadaddr=0x100000, text-and-data=0x65c2, bss=0x0, entry=0x100950]
Error: no such partition
grub rescue>
When I shut down pc and retry, it works; everytime I restart system, same error.
Any ideas?
That’s a new one on me. What’s the size of the drive and the partitions, including the Windows partitions?
180 GB SSD
sda1 Windows (System) 44GB
sda2 Windows 75GB
sda5 /boot 461MB
sda6 / 19GB
sda7 home 33GB
swap 4G
if thats of any help:
http://paste.ubuntu.com/1519234/
(boot repair protocoll)
I currently have my iMac set up with a dual boot for Mac OS-X Leopard and 64-bit Windows 7, and I’d like to install Ubuntu 12.04 so that the system keeps Windows 7 but replaces the Mac OS-X. Other than the fact that I wouldn’t be shrinking the Windows partition to create a new space for Ubuntu, how would the steps in your tutorial be different? That is, will the Ubuntu installer allow me to install the Linux OS on the Mac partitions in the same way you describe it happening on a freshly created partitions?
Aside form any iMac-specific issues that I may not be aware of, it should not be a problem.
If Windows is the first OS on the disk and you want to replace Mac, then you can just delete the Mac partitions and install Ubuntu. If Mac is the first OS, it is still possible to delete its partitions and install Ubuntu, but you’ll have to be a lot more careful in messing with the partitions.
I’ll like to know the specific here, so keep me posted on your progress.
Thanks for the prompt reply!
Well, the Mac OS was the first installed, though I initially had the iMac OS set up to dual boot with Win XP. Without first changing anything about that setup, I upgraded Win XP to the 64-bit Win 7 a little while back, and when I did, I lost the Bootcamp application in Windows and Win 7 now thinks its the only OS on the machine. When I use the Windows 7 disk management, I can see the Mac partition is still there and “healthy,” and imagine that I could still load the Mac OS if I held down the option key on boot up (though I haven’t tried that, to be honest, as I haven’t needed or wanted to boot to the Mac OS in the months since installing Win 7). So given that, what sort of potential headaches might I be facing if I try to install Ubuntu on the Mac OS partition? I have a MacBook on which I’ve installed Ubuntu as the sole OS, and I love it so much that I’d like to have it on the iMac, too, but for business and professional purposes, I have to keep the Windows install and don’t really want to go through the headache of reinstalling just to get it to play nice with Ubuntu.
BTW, thanks for all your invaluable info!
With Mac OS first, and you not wanting to reinstall Win 7, boot into the latter and delete the Mac partitions. Just be careful that you do not delete a Win 7 partition in error.
Install Ubuntu on the free space. The only headache, a minor one, is that the partitions for Ubuntu will have to be created manually. The automatic method will not work in this case.
Also, that freed space recovered from Mac will have to be created as an extended partition.
But all that is the easy part. The tough part comes after the installation: By design, Windows will not respect the presence of another OS on the same system, so you will have to babysit this dual-boot system. For example, if you decide to upgrade Win 7, it will overwrite anything it finds in the MBR.
Okay, so by upgrade Win 7, you mean if I wanted to change to a different flavor of Win 7 or even move on to Win 8, right? And when you say create the Ubuntu partitions manually, you mean before running the Ubuntu install and not creating them, as you describe in your tutorial, via the Ubuntu install “Something Else” option?
Thanks for your help! I definitely appreciate it.
Either upgrade Win 7 or, for any reason, reinstall it.
Yes, you’ll have to use the Something else option to create the partitions for Ubuntu.
How useful information! Really appreciate it!
This worked perfectly. I’m another Windows Power User becoming a Linux newbie. I appreciate the great instructions.
Thanks.
I stumbled across this just before installing Ubuntu 12.04 on a Windows 7 machine. It worked perfectly.
Thanks
Hi, great tutoria, I tried several times to insall the Studio 12.04 using the method you described. I have a Win7, a WinXP and had a MINT install and all worked fine. No I decided to replace the Linux MINT (Lisa) with the new ubuntu Studio 12.04 .
While intalling all works fine, till at the very end I get an error called GRUB cannot be installed on de/mapper/isw_bdfdibagjp_Voluime0p5
I have a raid system, so need to work on that, cannot use dev/sda5.
You have an idea how to solve that?
Thanks a lot,
maybe I got it answered here http://ubuntuforums.org/showthread.php?t=2028699
Hi
Great tutorial – very straightforward. Only frustration was having to go into the windows partition.
However, for me, it goes to the Windows/Ubuntu choice, and when I select Ubuntu, it goes to the Grub selection where I again must choose between Ubuntu or Windows. Surely there’s a way to go straight to Ubuntu? I suppose you could set that up in EasyBCD quite easily, but this seems a bit round about: go to windows to default into Ubuntu to use the Ubuntu selection menu to choose windows or ubuntu
If you do not want to see GRUB’s menu after selecting Ubuntu from the Windows boot menu, edit /etc/default/grub and change GRUB_TIMEOUT=10 to GRUB_TIMEOUT=0.
See this article.
i did everything according to the tutorial. However the boot menu is totally frozen in windows7. Mouse or keyboard don’t work at all.Any solutions?
hmm… frozen boot menu. That’s a new one. Try rebooting.
still nothing ! i am waiting 30 secs until the system boot from windows 7 entry! i m frustrated !
I have win7 on a 64-bit machine. Can I install a 32-bit
Lbuntu system?
I have a wired LAN with an machine ip number and gateway ip number (= a router’s ip number)
that i want to use. What do I say to the installer about
my internet connection during installing, and how do I say it? (I recall it may not ask me anything and assume,
incorrectly that it can use dhcp.)
Yes, you can install a 32-bit Ubuntu alongside a 64-bit Windows 7.
The installer does need an Internet connection to work, so this is not something you need to worry about.
Installed 12.10 on a new Fujitsu Lifebook with Win 7.
Used EasyBCD 2.2.
Get taken through to Grub2 prompt rather than Ubuntu start menu each time.
Tried Boot-Repair, but that didn’t work.
Now going to look for another tutorial!
Mmmm, my problem could be related to UEFI (the Fujitsu is an UEFI m/c),
http://neosmart.net/forums/showthread.php?t=11135
“Microsoft blocks 3rd party chainloaders from the BCD menu for UEFI machines. We are researching workarounds, none have presented themselves as of yet.”
Oh my, looks like a massive can of worms!
http://www.linlap.com/fujitsu_lifebook_ah532
http://ubuntuforums.org/showthread.php?t=2086602
f12 wasn’t working from the start with this m/c. Think I’ve now lost f2 too.
Win7 still boots fine, but I would only use this for <5% time, if I could get Ubuntu to work.
I might send the Laptop back for a refund.
What a beautiful mess!
Dude nice tut! However, is there a way to use grub 2 as default startup manager. Whenever I start the computer wp, the normal windows system for choosing which OS to run pops up. After I choose Ubuntu, Grub 2 also pops up and I have to do it again. Is there a way to change this?
To use GRUB as the default startup manager, you will have to install it in the MBR, which is not recommended.
If you do not want to see the GRUB menu after selecting Ubuntu from the Windows boot menu, just edit /etc/default/grub, and change GRUB_TIMEOUT=10 to GRUB_TIMEOUT=0.
Wow nice prompt reply! Thanks for the info. Also noticed that your tut looks similar to the one for mint. Is there any difference b/w the two?
No major difference. Mint uses the same installer as Ubuntu.
Hey I tried changing the grub file just like you said, but it looks like I don’t have permissions to do that. I navigated to it using terminal and tried ‘sudo chmod u+w grub’ and that still did not work. How do I edit it?
You do not need to chmod it. Just do sudo nano -w /etc/grub/default . See a step-step guide
I am an Ubuntu user!
What would be a good reason to have both operating systems in a Laptop?
Assuming one has all the resources for installation, does the computer become inefficient in anyway having both systems?
Some users have applications that they run on Windows that may not be available in Linux. And dual-booting gives you the option of testing Linux on your hardware.
I have found that when new users run Linux in this way for a few weeks, they tend to use Windows less often, as most or all of their computing needs are met in Linux.
Since the computer will be running 1 OS at a time, the performance is not affected. The beauty of this is that you can read and write to your Windows account while using Linux. See this article.
Another good reason is performance: If you are running compute intensive tasks which need to use the latest vector libraries (Intel’s SSE4/AVX for example), it wont work on most virtual machines.
Hi, firstly, great tutorial! I reached a dead end when I tried to download EasyBCD, is there any other sites which offer the download?
Just went there, no dead end. http://neosmart.net/EasyBCD/
thank you very much… helping me a lot.. simple and great