One tool that has seen very little or no change over the past several releases in Ubuntu Desktop is the installation program. So it is somewhat surprising that some users are having a hard time dual-booting Windows 7 and Ubuntu 12.04 using a tutorial written for Ubuntu 11.04.
Stemming from comments in that article, and email from readers, I decided to revisit that tutorial using Ubuntu 12.04. So the purpose of this article is to show how to dual-boot Windows 7 and Ubuntu 12.04 on a computer with one hard drive. And it will be on a computer with an existing installation of Windows 7. If there is a need to, you may reinstall your copy of Windows 7.
If you want to attempt this on a computer with two hard drives, see how to Dual-boot Ubuntu 12.04 and Windows 7 on a computer with 2 hard drives.
To get started, download an installation image of Ubuntu 12.04 from here. Depending on your platform, you may download the 32- or 64-bit image. Screenshosts used in this tutorial were taken from test installations using a 32-bit installation image in both a virtual environment using VirtualBox, and on real hardware. In either case, I did not encounter any errors that others have reported, so I am certain that if you follow this guide, you should have a computer with both Windows 7 and Ubuntu 12.04 installed in a dual-boot configuration.
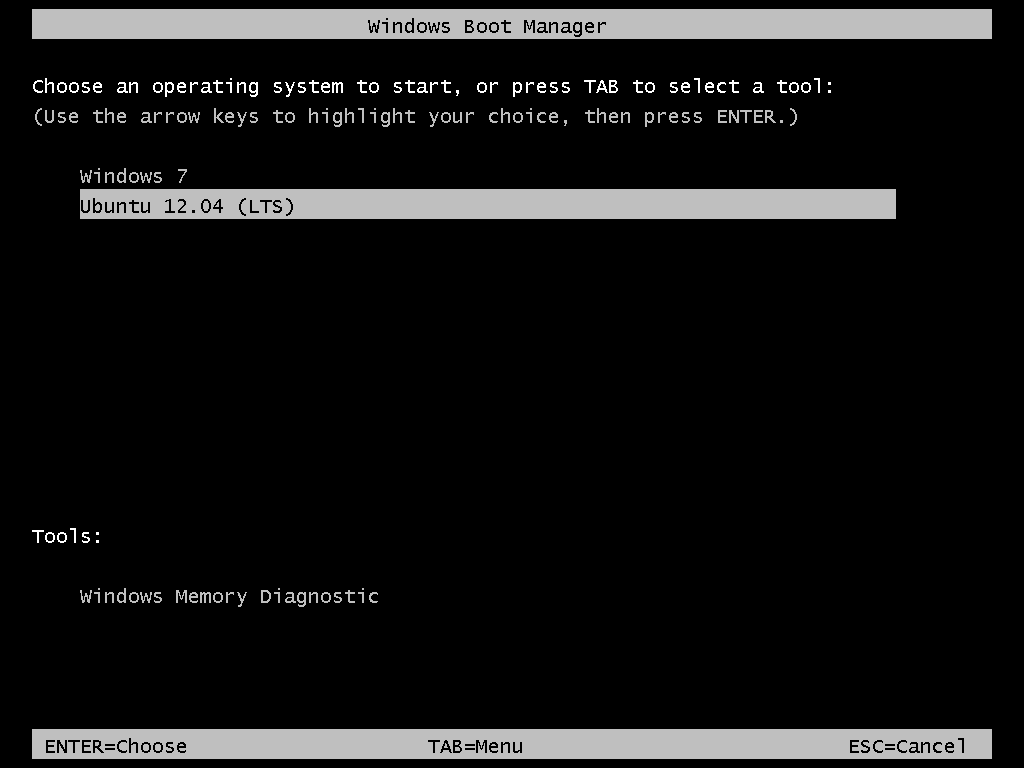
So that anytime you reboot the computer, you should see Windows 7’s boot menu with two entries listed – Windows 7 and Ubuntu 12.04 (LTS). Then you may choose to boot into Windows 7 or Ubuntu 12.04.

Now that you know what the overall goal is, how do you get from here to there? First, understand that if you have a computer running Windows 7, that Windows 7’s boot manager is responsible for making sure that the system boots. Installing Ubuntu on the same hard drive throws another boot manager into the mix. So the most important decision you are going to make about this, is which boot manager (Windows 7’s boot manager or Ubuntu’s) do you want to be responsible for primary boot operations?
When dual-booting Windows 7 and a Linux distribution on a computer with one hard drive, the best option is to have Windows 7’s boot manager be the primary boot manager. Why? Because whenever you reinstall or update Windows 7, its installer will overwrite anything it finds in the portion of the hard drive where critical boot-related programs are installed. That portion of the hard drive is known as the Master Boot Record (MBR). Also, certain anti-virus programs have been known to mess with the contents of the MBR, so installing GRUB in another location will ease the maintenance headache associated with your system. This point determines where GRUB will be installed.
If you are not familiar with disk partitioning (in Linux) and dual-booting, it is highly recommended that you read guide to disks and disk partitions in Linux and tips for dual-booting Windows and Linux.
By default, a new installation of Ubuntu 12.04 is installed on two partitions – a main partition, and Swap. The main partition is usually a primary partition and the Swap, a logical partition. And if Ubuntu is the only operating system on the hard drive, you will see both partitions labeled /dev/sda1 and /dev/sda5. Because you are going to install it on a computer with another operating system on it, the partitioning scheme will have to change.
The recommended partition scheme that will work better with the system you are about to install will have at least three partitions. They are the:
- Boot partition – This is where GRUB will be installed, instead of in the MBR. Installing GRUB in the boot partition is where users have encountered errors, so pay particular attention to what you do with this partition
- Root partition – This is where all the programs will be installed
- Home partition – This is optional, but it helps to have your files and folders on a separate partition
- Swap space
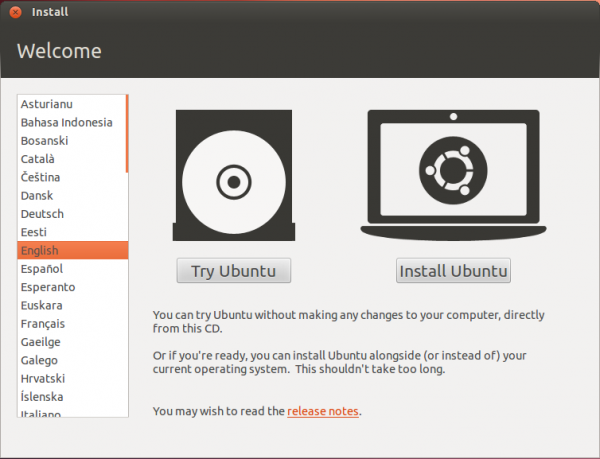
I think what you need to do should be pretty clear now. Time to begin the process! If you have not done so already, burn the installation image (of Ubuntu 12.04) you downloaded to a CD or transfer it to a USB stick, and boot the computer from it. When booted from the CD, you will be given the option to boot into a Live Desktop or start the installation without visiting the Live Desktop. It does not matter which option you choose, but booting into the Live Desktop and starting the installation from there seems to be a very good choice.
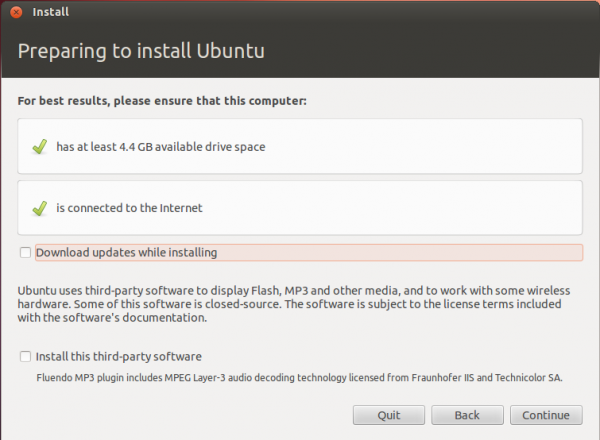
Whether the installation process is started from the Live Desktop or not, clicking through the installer gets you to the step shown in the image below. The most important information here is the minimum disk space (4.4 GB) recommended for a successful installation of Ubuntu 12.04. That piece of information will help you determine how much disk space to allocate to the root partition.
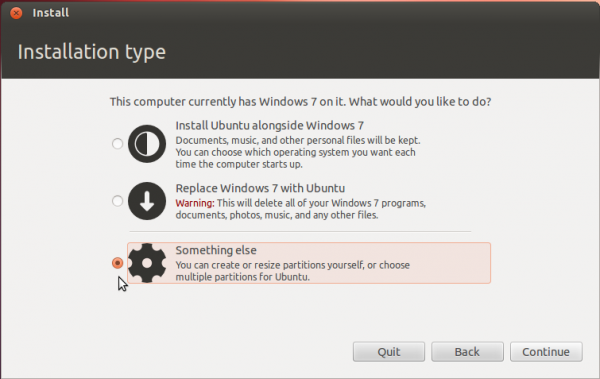
Clicking Continue from the previous step will land you here. If, as in this example, you have Windows 7 installed on the target hard drive, you should see the same three options shown here. Because you will be creating partitions manually, the option you want to select is Something else.
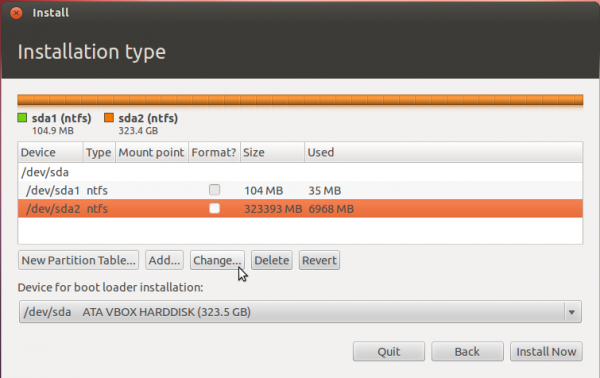
That should bring you to the Advanced disk partitioning tool. Again, if we are operating from the same point, that is, if you have a default installation of Windows 7 on the target hard drive, you should see two ntfs partitions (/dev/sda1 and /dev/sda2) listed. The main Windows 7 partitions, also popularly known as the C drive, is your sda2. To install Ubuntu, you will have to resize that partition. Note: If have free unallocated space on the hard drive, you do not have to go through this partition resizing process. To resize the partition, select it and click the Change button.
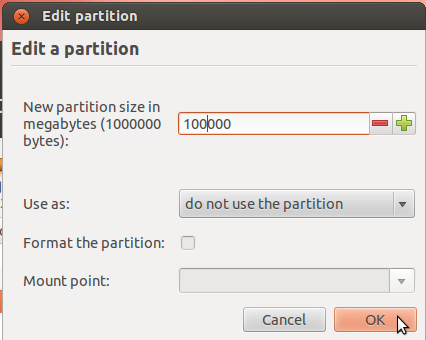
That should open this window. The only thing to do here is tell the installer how much disk space you want to keep for Windows 7. The rest will be used for Ubuntu. The system used for this tutorial has about 324 GB of disk space. I chose to keep 100 GB for Windows.
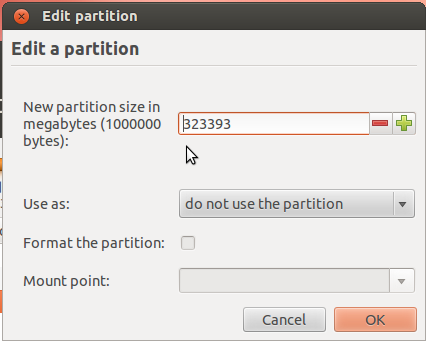
So the window now looks like this. Click OK.
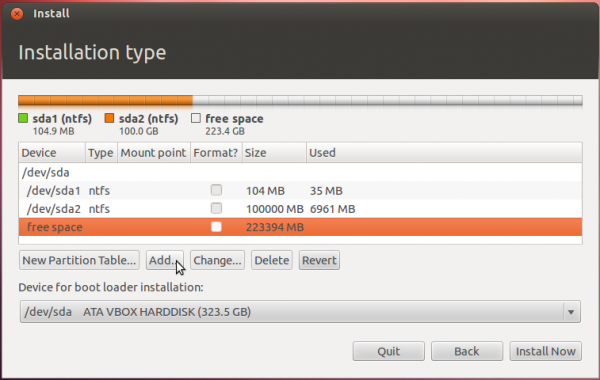
After the partition has been resized successfully, you should see the freed space marked as free space. Select it and click Add to start creating partitions for Ubuntu 12.04.


Thanks for the post, but i have one question. Is it possible to access the remaining c drive(here i.e.. 100GB) from ubuntu and vice versa ? If not possible how it can be achieved ?
You can access your C drive from Ubuntu, move files to and fro. See this article.
But you cannot write from Windows to Linux.
Dear Finid,
Indeed it is a very helpful tutorial. But, I have one problem. I followed these instructions (steps) up till the restart. When it restarted though, it loaded direct to windows 7, not to Windows 7′s boot menu with two entries. So, how could I get the windows boot menu so that I can get the access to ubuntu.
Btw, I installed 12.04.1 desktop-amd64.
thank you
Loading directly to Windows 7 is what’s expected after installation. so that is not a problem. The second part of the tutorial gives the last step to take.
Dear Finid,
Works perfectly!! Thank you
Hello,
Indeed a very helpful tutorial but my problem is still pending. Would be grateful if anyone could help me on it. Here it goes:
I had Ubuntu 12.04 installed (with a very similar organization of partitions as described on this page). In addition to this big partition of ubuntu (including boot, root, home and swap partitions) there were several others i was using to store various non-systemic data. I decided install Windows 7 to one of those partitions.
Of course, after the instalation, the windows were loaded automatically as if there was no other OS. Then I used this EasyBCD 2.2 to add a boot manager entry for the ubuntu. I selected “automatically locate and load” and saved the changes.
After rebooting, the manager lets me choose to boot ubuntu, but after clicked, i get a black window giving me a bash for the grub. The line starts with grub>. And then I feel lost and don’t know what to do.
Would be great if you could help me make the window boot manager working properly.
thank you very much….it was very useful….step by step deep explanation with its working helped me lot….thanks again
thumbs up….:)
thank you very much….it was very useful….step by step deep explanation with its working helped me lot….thanks again
thumbs up….:)
I think I have a small problem.
I installed Ubuntu 12.04 LTS and later installed Windows 7. Of course I was so overconfident that I did NOT RTFM (Read The F*cking Manual). So, as predicted windows overrides the MBR and my Ubuntu was not reachable anymore. I then used easyBCD in windows 7 and my problem was fixed.
But…
After a week of 2 I all of the sudden get the boot selector 2 times. First is of course Windows boot selector. And when it continues to Linux, Ubuntu comes up with another boot selector.
As I explained before only Windows boot selector came up in the beginning. And I did not make any changes to either Ubuntu of Windows 7. At least not that I know of.
Is there a way to fix this? I would like to only use the Windows boot selector.
thanks in advance
The only way to fix your problem, is to do it right. Install Windows first, followed by Ubuntu. Use EasyBCD, then sleep happy.
Hi, I need help! I’m in the middle of tinkering with the partitions and wanted to create my home partition as NTFS. But the installer doesn’t provide me with that option! Should I just create boot, root and swap, leave the rest of the space unallocated, and create the NTFS partition for my data later, from Windows 7? Hope someone can help, as I created half of the partitions already… :/
If you do not create a separate home partition during installation, your home directory will be under the root partition. so you will still have a home directory in Ubuntu. If you are looking to create an NTFS partition to be shared between Ubuntu and Windows, you can do that from Windows and still create a separate home partition during installation.
See this article. You may also want to take a look at other articles in the Ubuntu category page. There is at least one on how to share an NTFS partition between it and Windows 7.
Thank you, Finid.
Ok, I’m fine with my home directory being under the root partition. I won’t create a partition just for it. And I want to create an NTFS partition to be shared between Ubuntu and Windows, yes.
Just to be clear about the order in which to do this: within the installer, I should create boot, root and swap, leave the rest of the space unallocated, and later, from Windows 7, create the NTFS partition for the data, which will then be located at the end of the disk? Is that correct?
Yes.
Thanks!! Off to try this now.
Hi Finid, . Six primary partitions?! It’s obviously not the case, but Windows is not displaying the extended partition that must contain the 3 new logical partitions.
Ok, partitioning and install done, and it all went great! 🙂
I still have a question about the NTFS partition I’m going to create to share my data between Windows and Ubuntu.
See, now from Windows, the 6 partitions look a bit funny:
In this context, I’m wondering what will happen when I create the NTFS partition. Will Windows try to create a new extended partition? It can’t, there’s no space left. Will it treat it as a primary partition? Same answer! Will it call it a primary partition, but really make it a logical one inside the “invisible” extended partition? Hmmm…
So… I think I would feel more comfortable creating the NTFS partition from Ubuntu. I guess in that case, from Windows, it would end up looking just like boot, / and swap. A “fake” primary partition.
Is it possible to do that from Ubuntu? Are there any traps to avoid? What tool would you recommend? And would there be anything special to do in Windows afterwards, other than assigning a letter to the newly created partition?
Thanks a lot for your help!
Does “Partition principale” translates literally to “Primary partition”. Whatever the translation, the system cannot create more than 4 primary partitions under an MBR partitioning scheme.
And I’m not sure if Windows not displaying the extended partition is a big deal because even Ubuntu’s installer does not display the extended partition, though the disk management utility in Ubuntu does. In any case, you should be able to create the NTFS partition from Windows.
You can also create it from Ubuntu, but Windows will not be able to save data to it. That’s why it is recommended that you create it form Windows.
Thanks for your answer. Yes, “partition principale” = “primary partition”.
Here’s what it looks like in GParted: . So I suppose I have to make the extended partition much bigger before trying to create anything else inside of it. Can I do that from the install live-CD?
That is showing 4 primary partitions (the extended is also a primary partition). The size of the extended partition is about 41 GB, but there is also 350 GB of unallocated space. That unallocated space does not seem to be part of the extended partition. It could not be because of the size difference.
I think if you try to create the NTFS partition from that, the installer will indicate that it is unusable space. If it does that, which I think it will, the solution is to delete the Linux logical partitions and the extended partition, so that they are merged with the 350 GB of unallocated space. That should give you about 364 GB of free space.
Then create the extended partition and allocate the free space to it (all of it). You may then carve out the Linux and NTFS partitions from that.
Ummmm…. I followed these instructions up till the “restart” (With a couple key differences in that I had already shrunk my partition in Windows and in GParted created a decent sized Fat32 partition to put files I wanted access to on both OSes.) Other than that though I just hit Install Xubuntu and follow the directions from there. When it restarted though, it loaded Xubuntu, not Windows. All the windows files are still there in their untouched partitions….. but they aren’t doing anything. Please, I really need this dual-boot for school. (Windows for the Adobe Suite, and Linux to communicate with the school’s computers.) How do I get a boot loader that will allow me to select my partition/OS when I start the computer?
If it loaded Xubuntu and not Windows on reboot, then you did not follow the instructions. Which means that GRUB was installed in the MBR, instead of in Xubuntu’s boot partition. But even at that, you should have seen a GRUB menu with both OSs listed. Did you see a GRUB menu on reboot?
In any case, try this: Launch a shell terminal (see this article if you have not used one before). Then type these commands:
1. sudo grub-install /dev/sda
Followed by:
2. sudo update-grub
Reboot and tell us what happened.
I told it to install it to sda5, and I checked and sda5 is the boot partition.
No, I do not in fact see grub at all when I turn on the computer, it automatically loads xubuntu.
However, I found out that if I press excape when it shows the computer’s brand name, and navigate to the “boot menu” I have options for both Windows and ubuntu (although I have xubuntu, but I don’t think that matters).
I’ll assume a shell terminal is not a special kind of terminal or anything.
I have installed and updated grub via the terminal. I will be back with an update momentarily.
Went right back to xubuntu upon reboot, no visual sign of grub.
I’ve not attempted to dual-boot Xubuntu with anything else, but what you re reporting is highly unusual. Check to see what the default timeout of GRUB is. Open /etc/default/grub and check if there is a line that says, GRUB_TIMEOUT=10. The time is in seconds.
That setting determines how long the GRUB menu remains on screen before booting into the default OS.
The thing is, If you installed it to sda5, then Xubuntu should not be loaded first. So something must have gone wrong somewhere.
There was no reply button to your other comment, so posting this here:
GRUB_DEFAULT=0
GRUB_HIDDEN_TIMEOUT=0
GRUB_HIDDEN_TIMEOUT_QUIET=true
GRUB_TIMEOUT=10
GRUB_DISTRIBUTOR=`lsb_release -i -s 2> /dev/null || echo Debian`
GRUB_CMDLINE_LINUX_DEFAULT=”quiet splash”
GRUB_CMDLINE_LINUX=””
I see the grub timeout says 10, but there is a “hidden timeout” entry as well.
That’s good, so the GRUB menu should stay on for 10 seconds before it boots into the default. Don’t know why yours is not. Perhaps the system is booting up too slow and by the time you see the screen, the 10 seconds is over. That’s not a really good explanation, but can’t thing of any other.
Try changing GRUB_TIMEOUT=10 to GRUB_TIMEOUT=30 and reboot to see if it makes any difference. After making the change, run update-grub before rebooting.
Actually, I might add, if I enter the Boot Menu (I access it by pressing ESC during startup and selecting Boot Menu from a menu) then I can select either xubuntu or Windows 7 from there. Just discovered that this morning. I still want the ability to select a patition on startup though rather than be funneled into xubuntu automatically.
I got the partitions sorted out and the rest of the install seemed to go without a hitch.
Almost.
Now when I select Ubuntu from the boot menu, I get booted into DOS4GRUB. Now what?
Oops, just saw Conrad’s query. Sorry about that.
I downloaded EasyBCD, went through the simple process. One simple problem. In the version I have, under “Add New ENtry”, when I select Linux/BSD. and then under type choose “GRUB2”, it doesn’t give me any option that says “Ubuntu 12.04 (LST)”. Instead, it only offers me “Neosmart Linus”, which I assume is their house version. I changed the name to Ubuntu, but when I boot into it, it only gives me a DOS line command, it doesn’t boot to Ubuntu. Is there a solution to this, or am I using the wrong software?
If your are not using UEFI hardware, try the GRUB Legacy option instead of GRUB 2 and see if that works. Usually, it will, if your mobo is not UEFI.
I had the same problem and tried that without success. Using GRUB Legacy gets me to a black screen with a flashing flat cursor in the upper left corner.
GRUB Legacy lacks an “auto locate” option. I selected my Linux boot partition one time, and my Linux home partition the next time. Neither worked.
I tried using EasyBCD’s copy of GRUB but I got “unknown device string” errors.
Are you using UEFI hardware? EasyBCD has been reported to not work with UEFI hardware.
Probably not. Gateway is not on the list of members.
As of this morning (9/26) I understand there’s a new version of EasyBCD available, that does work with UEFI. I haven’t tested it yet, though.
Yes, EasyBCD 2.2 with EFI support has been released. However, the author cautions that ‘Not all EasyBCD features will work perfectly on EFI as each will need to be heavily tested and verified under the most severe circumstances before we can make that claim,…”
I will be buying a UEFI mobo tomorrow, so I should be able to test this early next week.
BTW above results were with EasyBCD v2.2.
WHYDONT YOU PUT AN INSTALLATION GUIDE WITH ONLY 2 PARTITIONS ??????
And why must you YELL?
Naturally, my computer screens look different from the ones in this tutorial. So far, my score on that is 100% over 30+ years of operating PCs. I have NEVER been able to follow a tutorial on anything without running into some important difference that brings the whole process to a dead stop.
Anyway, when I get to the list of partitions in the installer (via live desktop from CD-ROM), I have 3 partitions already, not two.
sda1 ntfs size= 13958MB used=12912MB
sda2 ntfs size= 104MB used= 35MB
sda3 ntfs size=986139MB used=45483MB
Assuming I can get around this without reinstalling Windows, how do you recommend allocating a 1TB hard drive?
I’m assuming that sda1 is your C drive, sda2 is your system partition and sda3 is a data partition, right?
How much space do you want to allocate to Windows, and how much for Ubuntu? Are you willing to reinstall Windows or just resize existing partitions?
I don’t know what sda3 is. I was not expecting to see one based on the tutorial.
I do not want to reinstall Windows 7. It should not be necessary.
Can I safely treat sda3 as a partition I can shrink so as to make room for Ubuntu? Will Ubuntu care whether sda3 is its first partition or not?
The number of existing partitions on a system will never be the same for all users, unless we are talking about those on OEM machines.
Re-installation of Windows should not be necessary. Before you start messing with sda3, you need to determine what’s in it and how much free space is available. You want to do that from Windows itself. It’s your computer , so you know better than anybody else what’s in it.
Ubuntu’s installer does not care what partition you tell it to shrink, provided there is enough space to work with. Just don’t tell it to shrink sda1, which I suspect is your C drive.
But save yourself a load of trouble and log into Windows, open the partition manager and see what’s up with sda3. Typing partition into the Windows menu search box should launch the partition manager.
Keep in mind that because of the size of the hard drive, there is a limit to how far you can locate the boot partition from the first sector.
Windows 7 Disk Management tells me this:
[no name] Recovery partition size=13GB free=13GB
[Gateway (C:)] Boot, Page FIle, Crash dump, Primary Partition size=918.41GB free=876.04GB
[SYSTEM RESERVED] System, Active, Primary Partition size=100MB free=70MB
These appear to match up with sda1, sda3, and sda2, respectively. What worries me a bit is that Windows labels sda2 as “C:”
From this, actually, sda3 is your C drive. Just match the size to what you posted in your first comment. Your C drive is 918 GB, with 876 GB of that free. So, you can shrink it and install Ubuntu.
When you shrink it, the freed space will automatically be an extended partition, which you can use to create logical partitions for installing Ubuntu.
My laptop has C,E and F(each a 100GB) drives on a 320Gb hdd.Now, C and E are primary partitions, with another system reserved space under primary partition. F is a logical drive. Now, what I did was, instead of shrinking my C drive, I shrunk my F drive by 25GB. I partitioned the 25Gb as follows. I then followed the instructions above to have a 400MB /boot partition, 10GB root, 14Gb /home and a bit less than 2GB of swap. Everything installed fine. I rebooted and installed EasyBCD and added the entry. On rebooting now, I’m getting both options. When I’m selecting the Ubuntu entry, its leading to a Grub4Dos command prompt. Please help me out.
On being led to your brilliantly instructive tutorial, I installed Ubuntu on my system. Previously, it had 4 partitions – C (Primary p-containing Win XP), D, E, F( all three-logical p; understood by the HD-nomenclature of Linux installer). Now, for the purpose of installing Ubuntu 12.04, I deleted partition E, and re-partitioned it as instructed in the tutorial. All went well, except when I tried to use Easy BCD, the message was:
” The boot configuration data source could not be opened. The system cannot find the file specified.
Would you like to manually load a BCD registry for EasyBCD to manage? Please note that EasyBCD requires the Windows Vista/7 bootloader, and will not work in XP-only environments.”.
So, what are the possible steps I can take to rectify this?
– I can use a pen-drive to boot Linux every time I use it. But, is it possible to do so simply using the Linux USB Stick I created for the installation, and making USB Booting the first priority?
– I had a look at this post (http://ubuntuforums.org/showthread.php?t=1806831), where the following instruction was typed – “It seems that you did not install the GRUB loader on the MBR of the hard drive /dev/sda. The loader was installed on the partition /dev/sda6. I think that this is wrong.
Try to reinstall GRUB ( https://help.ubuntu.com/community/Grub2#ChRoot ). Boot into an Ubuntu Live CD / USB, open a terminal and type these commands:
Code:
sudo mount /dev/sda8 /mnt
sudo mount /dev/sda6 /mnt/boot
for i in /dev /dev/pts /proc /sys; do sudo mount -B $i /mnt$i; done
sudo chroot /mnt
update-grub
grub-install /dev/sda
grub-install –recheck /dev/sda
exit
for i in /sys /proc /dev/pts /dev; do sudo umount /mnt$i; done
sudo umount /mnt/boot
sudo umount /mnt/usr
sudo umount /mnt
sudo reboot
”
Is this safe in terms of not interfering with my XP-bootloader? What exactly will I be doing if I follow these steps?
If there’s any non-risky alternative, I would be grateful for your help.
Thank You very much for your time and effort.
By going through those steps, you will be installing GRUB in the MBR, which will overwrite XP’s boot loader. It will allow to boot into both Oss, but just hope that you do not ever need to reinstall XP, because that will then overwrite GRUB. It’s a circle,
Hello,
Thanks a lot for this guide … but I have one question: I didn’t knew this guide when I installed Ubuntu the first time, so I ended with the default settings, i.e, something like this:
/dev/sda1 Windows System 100MB
/dev/sda2 My C: partition 80GB
/dev/sda3 My D: partition (for media) 300GB
And then it says: 38GB : “Container for Logical Partitions” (/dev/sda4) but in the list (when I do “blkid”) it appears:
/dev/sda5 swap
/dev/sda6 Filesystem (contains data from home and also the remaining system directories).
My problem is the following: I know this is bad and I didn’t anticipate I would be using Ubuntu a lot … and I want to reinstall Ubuntu (I have Ubuntu 12.04) and create the partitions as you say, BUT, I don’t want to reinstall Windows, because I also invested a lot of effor configuring it.
I want:
– To shrink my D partition in order to allow more space for Linux in my new install (I don’t know how to do this, because I I triy to do this from Windows, it would make the systems unbootable for next reboot, because currently my GRUB menu is from Ubuntu)
– Reinstall Ubuntu in the way you recommend without having to reinstall Windows.
I would be grateful if you can help me. Please help!!!!!
Thanks for your attention
You do not have to reinstall Windows, and since D is a data partition, shrinking it should not affect Windows. Note that I said should, because this is Windows, and you never know, but shrinking D should (that word again) be fine.
Shrinking D from Windows has nothing to do with the GRUB menu, since GRUB is installed in the MBR. I have resized even a C partition from Windows without any issues at all. Windows will tell you by how much the partition can be shrunk. See this article for an example of how a Windows C drive was shrunk resized from inside Windows.
You can do the same with your D drive. After that has been completed successfully, then you can reinstall Ubuntu. Be sure to reboot Windows after shrinking D, just to be sure that everything is A-ok before reinstalling Windows.
Thanks … what I am afraid is the following:
– Lets suppose I enter into the GRUB menu (which is Linux Grub menu, not Windows), I select Windows and shrink D partition inside Windows.
(a) Then, I leave Windows, restart the computer and again … it is Linux GRUB menu that appears. If I select Windows again, everything is expected to work well inside Windows?
(b) If I select Ubuntu in the grub menu … is everything going to work? Or there would be problems inside Linux and then I would need to reinstall Linux right away?
I will be grateful for your answers to questions (a) and (b). The main reason I want to shrink D partition is because I separated very little space for Linux and after installing programs I was left with almost zero space.
I have to say that D partition (NTFS) is used commonly between Windows and Linux, because I store multimedia and Document files. I edited fstab file in /etc so that partition D would be mounted automatically in Linux at startup, so I work with my documents there. So my filesystem partition in Linux only stores programs and all the configuration files, but not Documents.
Thanks for your attention
If all you did is shrink D, the answer to question “a” is yes.
For “b”, you might have some issues because of how you messed with fstab. Not sure what those issues might be, but they wont be life-threatening.
Since D is a shared data partition between Windows and Ubuntu, and the space used for Ubuntu is 38 GB, how did you run out of space in Ubuntu. since D is now your home directory (based on what you did to fstab). What did you install in Ubuntu that used up that much space?