![]() Like all Linux distributions, Ubuntu 10.10, aka, Maverick Meerkat, the latest version of the popular Linux distribution, ships with a firewall installed. The firewall is actually embedded in the kernel. In Ubuntu, the firewall’s original command line interface has been replaced by ufw, a more user-friendly command line script. Ufw, the Uncomplicated FireWall, has a graphical interface that is also a lot simpler to use than other graphical firewall interfaces in Linux.
Like all Linux distributions, Ubuntu 10.10, aka, Maverick Meerkat, the latest version of the popular Linux distribution, ships with a firewall installed. The firewall is actually embedded in the kernel. In Ubuntu, the firewall’s original command line interface has been replaced by ufw, a more user-friendly command line script. Ufw, the Uncomplicated FireWall, has a graphical interface that is also a lot simpler to use than other graphical firewall interfaces in Linux.
This article will present a step by step guide on how to install and configure Gufw, the graphical interface to ufw.
Before installing and configuring Gufw, take a few moments to check the status of ufw. To do that, launch a shell terminal and type sudo ufw status. The output should read Status: inactive. That is the default state of ufw on a new installation of Ubuntu (10.10).
Ok, time to install Gufw, which is one of the featured applications in the Ubuntu Software Center. If you still have the terminal open, you can just type sudo apt-get install gufw to install it, or start the Software Center from Applications > Software Center, and install it from there.
Installing Gufw from the Software Center
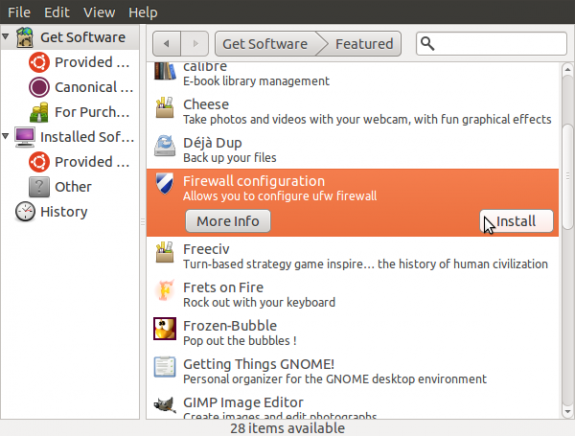
Installing Gufw
Once installed, there will be an entry for it in the menu at System > Administration > Firewall configuration. This is the default Gufw interface. It is disabled.
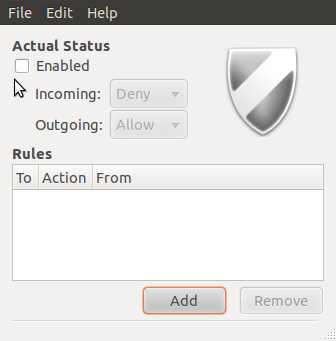
Gufw disabled
This is Gufw’s interface in enabled status.
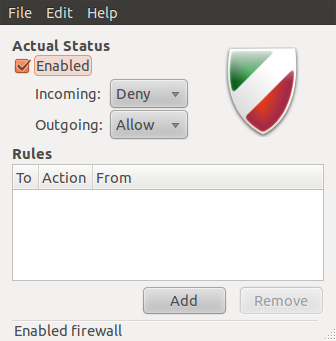
Gufw enabled
By default, ufw operates in an inactive stateful tracking mode: All outgoing connections are allowed, and all incoming connections that are not related to an entry in the state table, that is, that are not related to an outgoing connection, are disallowed. The default incoming policy is DROP. All default policies are set out in the /etc/default/ufw file. By default, IPv6 traffic is blocked. To enable IPv6 traffic, edit /etc/default/ufw and change IPV6=no to IPV6=yes. Let us take a look at other files that are involved in the configuration of ufw/Gufw.
Ufw’s main configuration file is /etc/ufw/ufw.conf. The state of this file before Gufw is enabled is shown below. Note the highlighted entry.

ufw.conf, default
The state of ufw.conf after Gufw is enabled, If you type sudo ufw status in a shell terminal, the output should read Status: active.
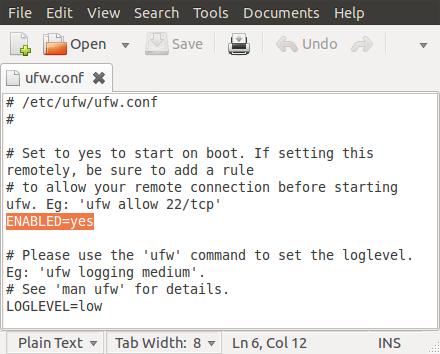
ufw.conf, modified
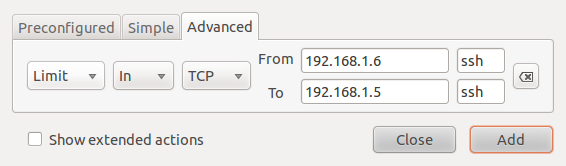
That is all there is to installing and enabling Gufw in Ubuntu 10.10. Most users will not need to do anything beyond this point, but if you want to create custom rules, you can start creating them from Gufw, or from the command line using the ufw utility.
Gufw comes with a default set of rules. You may read those rules in the /etc/default/ufw file. There are also rules defined in some files under the /etc/ufw directory. Those rules are in the before.rules and after.rules files. Equivalent IPv6 rules are in the before6.rules and after6.rules files. The rules in the “before” files are evaluated before any custom rules you create, and the “after” rules are evaluated after your custom rules.


