Linux Mint 12 KDE will be the next stable release of the KDE edition of Linux Mint, a desktop distribution based on Ubuntu Desktop. (A release candidate was made available for download on Wednesday January 11.)
By default, the installer creates just two partitions on which the system is installed. These are for the root and Swap partitions. While those may be good enough for some users, others might want to create a custom set of partitions. If you belong to the latter group, this tutorial provides a guide on how to create your custom set of partitions.
Any number of partitions may be created, however, for this tutorial, only four will be created. They will be for the boot, root, Swap, and home partitions. If you are new to Linux, and are not familiar with the concept of partitions in Linux, it is recommended that you first read guide to disks and disk partitions in Linux. It explains, in very plain language, all the concepts you will encounter in this tutorial.
To start, download an installation image of the distribution from here. Keep in mind that the KDE installation images available on that page are release candidates, not stable versions. However, playing with a release candidate gives you an opportunity to become familiar with the system and disk partitioning before the stable version arrives. Once the download is finished, transfer the downloaded image to a DVD or USB stick, and boot the computer from it.
After booting has completed, you will be looking at a Live desktop of Linux Mint 12 KDE. Click on the “Install Linux Mint” icon on the desktop. The screen shot below is the second step of the installation process. The information here is just to let you know what is required to install this distribution. Take special note of the disk space requirement. Click Continue to move to the next step.

There are two disk partitioning options here. Using the first one, the default, will cause the installer to create just two partitions. Because you want to create more than two, select the second option.

The window should look like this when “Manual” is selected. Continue.

That brings you to the advanced disk partitioning tool. If the target disk has not been initialized, you will have to do so before you can start creating partitions. Select the disk and click New Partition Table.

When that operation is completed, the window should look like this. Select the free space, and click Add to create the first partition.

The first partition will be mounted at /boot. This is where programs required for booting the system will be located. If, like the target disk used for this tutorial, there is no other partition on the disk, the installer will create it as a primary partition. A disk space of 500 MB should be more than enough for the boot partition, and the default file system is good too. OK.

With the boot partition created, select the remaining free space and click Add to create the next partition. This step will have to be repeated for the other partitions too.

The second partition will be for the root partition. Keep in mind that a new installation of Linux Mint 12 KDE takes up about 4.2 GB of disk space and the recommended disk space for installing it, is 6.6 GB. Since this is where the bulk of the programs will be installed, be generous with your disk space allocation – if your have much to spare. Be sure to select ext4 for the file system, and / for the mount point.

Next partition will be for Swap, disk space that the system may use as virtual memory. Most distributions, depending on installed RAM or memory, will allocate between 2 GB to 4 GB to Swap. For guidance on how much disk space to allocate, see recommended disk space for Swap. For this tutorial, I am going with 4 GB. Be sure to select “swap area” from the “Use as” dropdown menu. OK.

The last partition will be mounted at /home, where the home folder of all user accounts on the system will be located. How much you allocate to this partition depends on how much is available, and on your needs. Like for the root and boot partitions, the file system is ext4. Select /home as the mount point. OK.

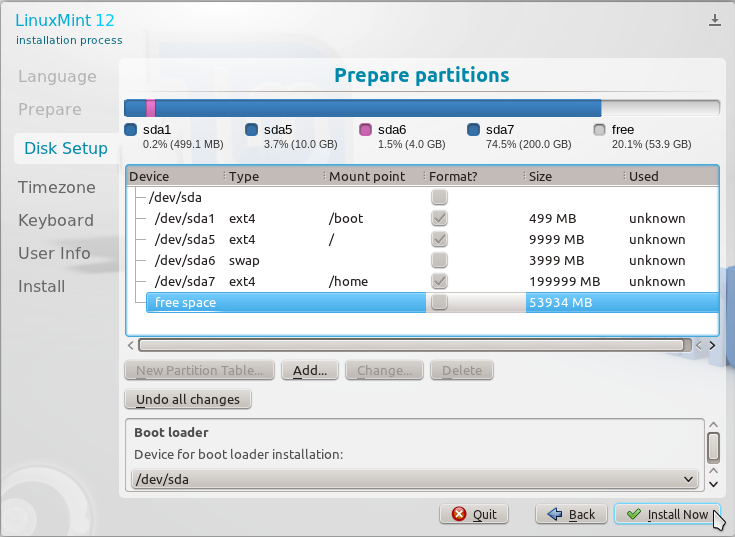
All the partitions that you created are shown here. As you can see, there is some free space at the end of the extended partition. That is intentional. It could come in handy if you need to create an extra partition or two, or extend an existing partition. You may continue with the rest of the installation by clicking Install Now. A future article will show how to use this same partitioning scheme to set up a dual-boot system with Windows 7.




Mint is great in KDE and all, but KDE really needs a makeover. The fonts look cramped, and the stainless steal look, is old. Last time I checked, it wasn’t easy to change that (it was, at one KDE 3 point, kinda). It’s shame really. They were making those activities, when the basics are not (completely) finished, and built out.
Well fonts are distro setting. It has nothing to do with KDE. they just look as they are set on system, regardless of the desktop. And The theme of everything can easily be changed. It’s a lot easier to configure this in KDE than in any other desktop.
format /boot as ext2 not ext4!!
Does it really matter?