For an increasing number of Microsoft Windows users, dual-booting between Linux and Windows 11 is a favored setup. But in order to avoid unnecessary headaches and ensure a smooth experience, there a few things you need to do before embarking on that dual-boot adventure.
In this post, you will learn 3 very important things you need to do before setting up that dual-boot system between your favorite Linux and Windows 11, whether that distro is Linux Mint, Fedora, or Ubuntu. Two of the tasks will be completed from your computer’s UEFI (Unified Extensible Firmware Interface) firmware utility. The third task will be completed from inside Windows 11.
1. Disable Fast Startup
The first thing you want to do is to disable a feature of Windows 11 called Fast Startup. Also known as Hybrid Boot, Fast Startup was introduced in the first iterations of Windows 8, and it combines the features of a cold shutdown and hibernation. It saves the system state to a hibernation file, so the system can boot or reboot faster. However, because it locks the Windows partition, it can interfere with the boot process of other operating systems, particularly when accessing shared partitions or filesystems. So it is advisable to disable Fast Startup to avoid data corruption or boot issues when dual booting with a Linux distro, especially on a single drive.
You can disable Fast Startup from the Windows 11 Control Panel, but that involves several mouse clicks. The simplest method of disabling it is to use the terminal application as administrator. To do that, type “terminal”, minus the double quotes, into the search field of the Windows 11 taskbar. Then right-click on Terminal and select Run as administrator. Be default, that should open Windows PowerShell.
Now type the following command: powercfg /h off. That disables Fast Startup. You may then close the terminal application.
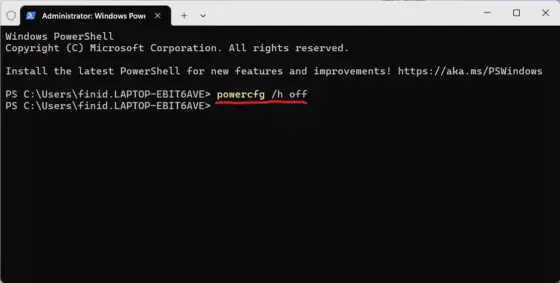
Figure 1: How to disable fast start up using PowerShell on Windows 11.
The next 2 things you need to disable are features of the UEFI/BIOS utility.
2. Disable Fast Boot
The second thing you need to do and the first feature of UEFI/BIOS you need to disable is called Fast Boot. If you bought a computer with Windows 11 pre-installed, it is most likely enabled by default. When enabled, Fast Boot causes the system to bypass some of the power-on self-test (POST) and hardware initialization procedures that are normally performed during the boot process. As a result, the system boots up faster.
The drawback of skipping certain initialization procedures is that some devices or peripherals will not be detected or even when detected, might not function properly. For example, USB devices, network adapters, or certain expansion cards may not be recognized if their initialization is bypassed.
To disable Fast Boot, reboot Windows and hold down or repeatedly press the F2 key as the system reboots until you see the UEFI/BIOS setup utility. If the F2 key does not bring up the UEFI/BIOS utility on your computer, consult your computer’s documentation to find out the right F-key. Then navigate to the Boot tab. Look for the Fast Boot entry and disable.
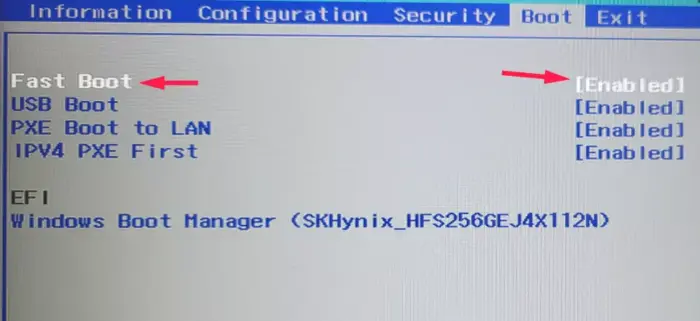
Figure. 2: Disable Fast Boot
With Fast Boot disabled, keep the UEFI/BIOS setup utility open because you’ll need to disable Secure Boot.
3. Disable Secure Boot
UEFI Secure Boot is a security mechanism implemented in UEFI firmware that serves to verify the digital signatures of the firmware and operating system components before they are loaded during the boot process. So it helps to prevent the loading of unauthorized or malicious software, protecting the system against bootkits and other types of firmware or boot-level attacks.
However, because much of the software you’ll be installing in Linux will not be signed, Secure Boot can quickly become a pain. That’s why the consensus recommendation is to disable. To do so, navigate to the Security tab of the UEFI/BIOS setup utility, then look for the Secure Boot entry and disable it.
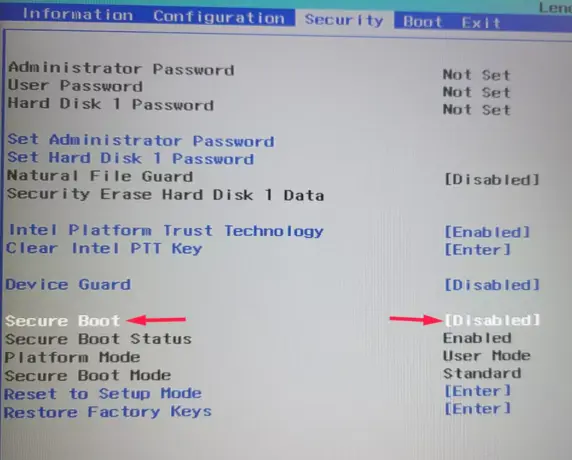
Figure. 3: Disable Secure Boot
With that done, save and close the UEFI/BIOS setup utility. Press the F10 function key usually take care of that. With that, you should be now ready to set up a dual-boot system between Windows 11 and your favorite Linux distro.


