This tutorial presents a step-by-step guide on how to install Linux Mint 16 and Ubuntu 13.10 on a Btrfs filesystem.
Btrfs is CoW (Copy on Write) filesystem with support for features like read-only and writable snapshots, subvolumes, incremental backups, deduplication, and multiple device support. You may view the complete list of features here.
The screen shots used in this tutorial were taken from a test installation using Ubuntu 13.10, but because it shares the same installation program with Linux Mint 16, you can follow along to install the same btrfs system on that edition of Linux Mint.
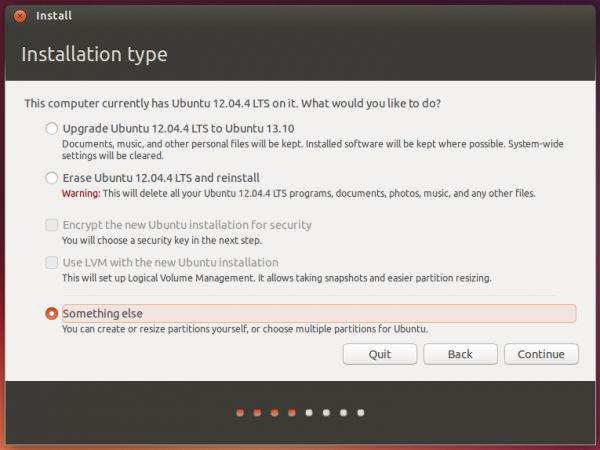
To start, boot the computer you want to use from the installation media of your favorite distribution. When you start the installer, click until you get to the Installation type step. Since btrfs is not the default filesystem used by any of the automated disk partitioning options, every step of this tutorial will have to be performed manually. That means selecting Something else is the only option at this step. Click Continue.

That should open the installer’s Advanced Partitioning Tool’s window. At this step, all disk and disk partitions detected by the installer should be listed. On the system used for this tutorial, I had existing partitions that I didn’t care to keep, so they had to be deleted. If this is the case with your system, select a partition, then click on the “-“ button to delete it. If you wished to install the btrfs system alongside the other distribution or operating system on the target hard disk drive, select a partition that has enough space and resize it. Then use the recovered disk space to create the partitions for the btrfs system.

This is what that window looks like after all the partitions have been deleted. Now we are ready to create the partitions needed to install the btrfs system. To begin, select the free space and click on the “+” button. This step will have to be repeated three times.

This is the partition setup window. You just need to specify the size of the partition, whether it’s a primary or logical partition, the filesystem, and the mount point. For an installation of Ubuntu 13.10 and Linux Mint 16 on a btrfs filesystem, you need to create at least three partitions – one each for /boot, Swap and a btrfs volume. For this tutorial, I chose to create just three partitions and in that order.

For the first partition, which will be mounted at /boot (that’s the value for “Mount point”), the size can be 500 MB or less. On a default installation of Ubuntu 13.10 and Linux Mint 16, the contents of the boot partition takes up about 62 MB of disk space. But be generous here, as resizing this partition after installation is not the type of stuff you want to spend time doing. For “Use as,” select ext2 or ext4. OK.

The second partition will be used for Swap space. A size of 2000 MB (2 GB) is enough for it. Be sure to select “swap area” from the “Use as” menu. OK.

The third and final partition will be used for the btrfs volume, so select “btrfs journaling file system” under the “Use as” combo menu. You may assign all the available disk space to this partition or whatever you feel is needed to install the system. Note that for a default installation of Linux Mint 16 and Ubuntu 13.10, the recommended disk space is around 6 GB. But I’m sure you have more disk space than that, so assign it the right value. Then select “/” for “Mount point.” OK.

Back to the main installer window, all the newly created partitions should be listed. Click Install Now to continue with the rest of the installation process.

After installation, it’s important to remember that btrfs is different from other Linux journaling filesystems, like ext3 and ext4, and LVM, the Linux Logical Volume Manager. If you recall, the btrfs partition was mounted at / during installation, but that is a consequence of how the installer works. In btrfs, we refer to subvolumes, so on a running btrfs system derived from this particular setup, there should be two subvolumes by default- / and /home. If you type <strong>sudo btrfs subvolumes list /</strong>, you should see a listing of the subvolumes. The next article on this subject will be on how to manage a btrfs file system.


In case anyone need more info on installing Ubuntu on BTRFS and creating a basic snapshot, check this out:
http://reversiblean-reversiblean.rhcloud.com/install-ubuntu-btrfs/