This article offers a step-by-step guide on how to dual-boot Windows 7 and Fedora 17 on a computer with two hard drives, with Fedora 17 installed on an LVM partitioning scheme. LVM, the Linux Logical Volume Manager, is the default disk partitioning scheme in Fedora 17, but disk space allocation to the logical volumes could be better.
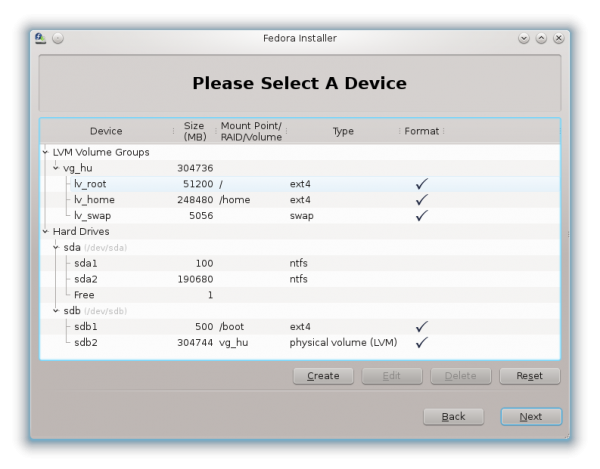
Take the image below, for example, which was taken from a test installation of Fedora 17 KDE. It shows the default disk space allocation to the logical volumes. You can see that there are two primary partitions, one of which is a boot partition (/dev/sdb1) and the other (/dev/sdb2), the LVM Physical Volume. In addition, there are three logical volumes (see the top of section of the image). They are: lv_root, lv_home and lv_swap. Notice that there are no free space available.
That is because Anaconda allocates all available disk space to the logical volumes, when it is supposed to allocate just enough to install the system, especially to the root logical volume. For a desktop system, allocating 51 GB to the root logical volume is a waste of disk space.

The point of this tutorial, then, is to show how to dual-boot Fedora 17 and Windows 7 on a computer with two hard drives, with proper disk allocation to the logical volumes. Because the installation process is the same across all the Fedora 17 editions, this tutorial can be used to set up a dual-boot system between Windows 7 and Fedora 17 (main edition), which uses the GNOME 3 desktop environment, or any of the Fedora 17 Spins.
If you are not familiar with LVM and with disk partitioning in Linux, it is highly recommended that you read guide to disks and disks partitions in Linux and introductory articles to LVM here.
As on a default installation, two primary partitions and three logical volumes will be created. The first primary partition, which is a Standard partition, will be mounted at /boot, that is, it is the boot partition, where all boot-related programs will be located. The second primary partition will be the LVM Physical Volume, under which the three logical volumes will be created.
After the installation has completed, the computer will always boot into Windows, since it is installed on the first hard drive. At that stage, you have two options, if you want to be able to boot into Fedora: Change the default boot disk to /dev/sdb in the BIOS, or add an entry for Fedora in Windows 7’s boot menu. Because Fedora’s installer automatically adds an entry for Windows 7 in GRUB’s boot menu, using the first method requires very little effort; no additional software installation is required. The second method involves installing a special program on Windows 7. From experience, the second method is not necessary, so the recommendation is to use the first method.
If you have not done so already, download an installation image of Fedora 17 from here. Transfer it to a suitable media and boot the computer from it. Start the installer and click through the first steps until you get to the one shown in the image below. Select Basic Storage Devices, the click Next.

Because the hard drive that will be used for Fedora will be partitioned manually, select Create Custom Layout. Next.

Selecting Create Custom Layout and clicking Next in the previous step should land you in the window shown in the image below, where the disks and partitions connected to the computer are listed. At the top of the list is sda, where Windows 7 is installed. You do not want to mess with that one. Any action you take here MUST be on sdb, the target disk for Fedora 17. If there are existing partitions on it, as in this example, delete them. You do that by selecting each partition and clicking Delete. Again, be sure that you are not messing with any partition under sda.

After deleting the partitions under sdb, select the free space and click Create to start creating partitions. You will be presented with the window shown here. The default option on this window is Standard, which is what we want. Click Create.

On the next window, shown here, there are three options that we have to modify. They are: Mount Point, File System Type, and Size (in megabytes). For the boot partition, the mount point will, of course, be /boot. While the default file system type on Fedora and virtually all Linux distributions is Ext4, there are other options. However, you do not have to bother about them. Aside from physical volume (lvm) and swap, which we will be using further later, you do not need to bother about the rest, at least for this tutorial.

When the right options for the boot partition have been selected, the window should look just like the one shown here. Notice that for the size, 500 MB was allocated. That is the default size allocation for a boot partition on most Linux distributions. If you do not have a lot of disk space to spare, you can go lower than that. As low as, say, 100 MB. OK.

With the boot partition out of the way, select the free space on the main window, and click Create. That should bring up the same window you saw earlier. Since the next partition is a primary partition for LVM, select LVM Physical Volume. Create.




Dual-boot / Windows 7 and Fedora 17 /18
=======================================
” By default, the installer will want to install it in the Master Boot Record (MBR). On a standalone system, that is, with Fedora as the only OS on the hard drive, that is where it should be.”
Could you be more precise on this point. This is the point where most people mess-up but the way you treat it is so trivial that does not make sense. So, exactly where to put the bootloader on a dual-boot windows 7 and Fedora 17/18.
Thank you
John
The master boot record MBR is not part of any partition described. Every hard drive has its MBR at the beginning.
The beauty of a 2 drive setup here is that the sda-windows drive (and its MBR) remain untouched so the BIOS could boot the Windows drive like it always did -OR- (the goal here) boot the Linux-sdb drive first, and BIOS uses the MBR of the linux drive where the Linux bootloader was just installed. This Linux bootloader also sees Windows giving you the option to boot either OS.
I noticed in the step for creating a Volume Group and the logical volumes, you say to select sda2. Shouldn’t that be sdb2 since sda2 is where Windows 7 resides in this tutorial?
Yes, you are right. That should be sdb2. Just a case of where the description and the screen shot are not in accord.
Thanks for sporting the error. It has been corrected.
Finid, would you please consider writing a tutorial on how to resize and otherwise manage LVM partitions AFTER installation?
I understand the benefits of being able to resize an installed operating system’s partitions under LVM, but don’t know how to do so.
Thanks!
That tutorial is actually 80% complete, just been too lazy to finish and publish it. Should be ready soon.
I’d never call you lazy. You have the best Linux tutorials I’ve found on the web — they’ve really helped me since I started getting into Linux last year. And your reviews are always interesting. I especially like the attention you give to issues others seldom address, such as physical and network security.