For those Windows users who have discovered what Linux has to offer, but for one reason or another are not ready to completely abandon Windows, dual-booting between the two operating systems is one method of keeping a foot in both worlds. And to help those users, this article presents a step-by-step guide on how to configure dual-booting between Windows 7 and Ubuntu 11.04 on a computer with one hard drive. The same steps may be used to dual-boot both between both systems on a computer with two hard drives.
In attempting to dual-boot between Windows 7 and Ubuntu 11.04, you will either install Windows anew, then install Ubuntu 11.04 alongside it, or install Ubuntu 11.04 alongside an existing installation of Windows. This tutorial uses as example, a case of installing Ubuntu 11.04 on an existing installation of Windows 7.
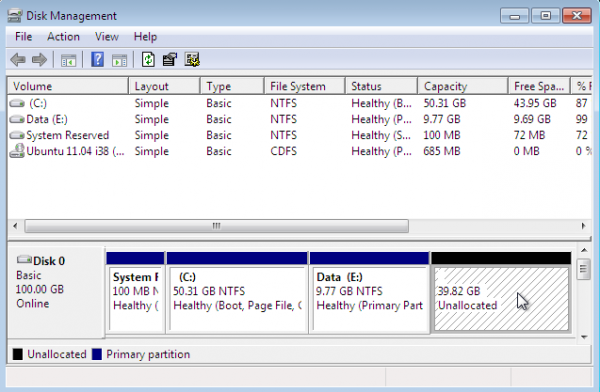
As shown in the image below, the existing installation of Windows 7 used for this tutorial has three primary partitions. And because of the limitations of the MBR partitioning scheme, only one primary partition is available for installing Ubuntu 11.04. By using an extended partition, we can configure as many partitions as we need for Ubuntu.
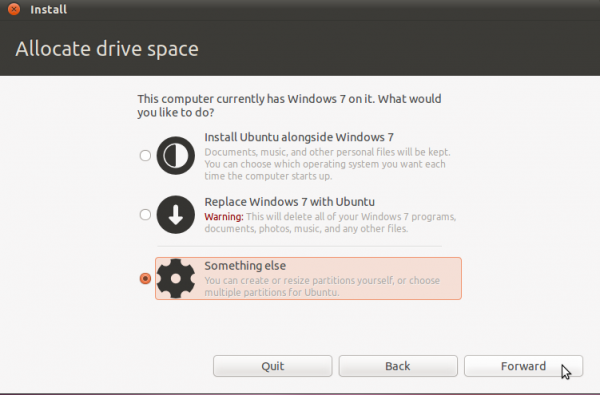
To begin, boot the computer using a Ubuntu 11.04 CD or DVD. At the disk partitioning step, the installer will present several options. Because the installer will not automatically partition and configure the free space, using the installer’s advanced partitioning tool is the only method of creating the necessary partitions. To launch the advanced tool, select the “Something else” option, the click Forward.
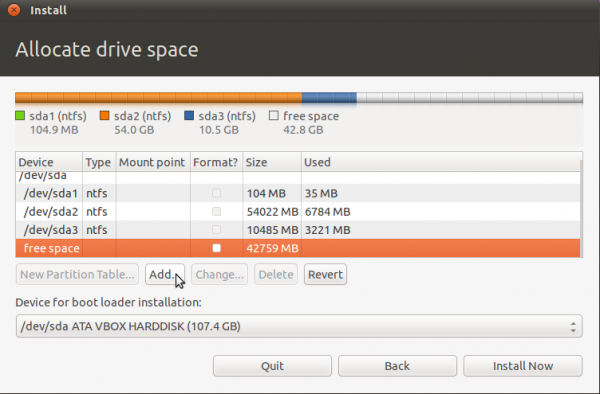
This is Ubuntu’s advanced partitioning tool and the detected partitions. The first three partitions are obviously the ntfs partitions that we saw in the first image. Because there are three existing primary partition, the last partition will have to be an extended partition, under which logical partitions for installation of Ubuntu will be configured.
By default, Ubuntu’s installer configures two partitions – the first for /, the root directory, and the second for Swap. When creating partitions for installing any desktop Linux distribution, my recommendation is to create the following four partitions:
- /boot, the boot partition. This is where programs critical for booting the system will reside.
- /, the root directory. The bulk of the programs used for running the system will be installed here.
- Swap, unformatted disk space for use as virtual memory.
- /home, the partition where your home directory will be located. In the course of using the system, files and folders you create will reside in various folders here.
So, to start setting up these partitions, select the free space and click on Add. Note that this step will have to be repeated for all the partitions.
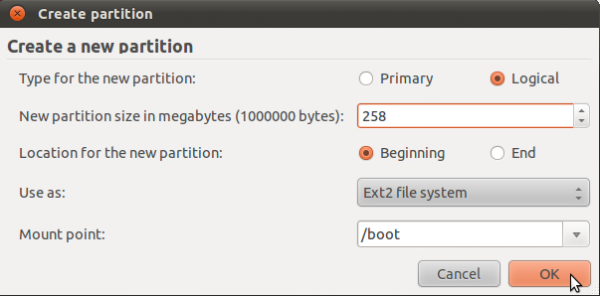
The first partition will be for /boot. When setting up an LVM-based system using an Alternate Installer ISO image, the default disk space allocated to /boot is 258 MB. However, only about 22 MB of that is used, so anything thing between that size range will do. For this tutorial, the default will be used. The mount point will, of course, be /boot. The default file system is ext2. OK.
The second partition will be for Swap. It is possible to install Ubuntu without Swap. However, if you attempt to do that, the installer will try to discourage you with the following warning:
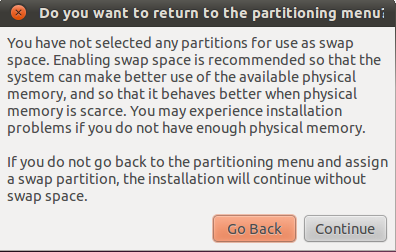
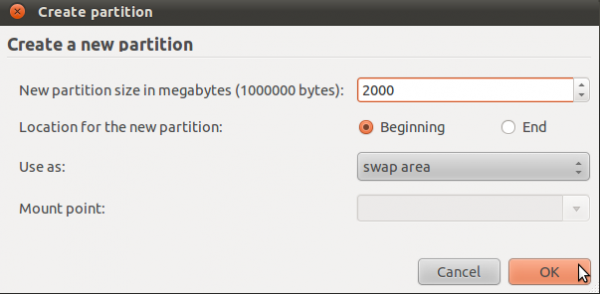
For the record, I have been able to install Ubuntu 11.04 successfully without Swap. The sky has not fallen yet, but I have not tried to put the system in Suspend or Hibernate mode. In any case, save yourself a load of trouble and configure Swap. The suggested size for Swap is 2000 MB. Select “swap area” from the “Use as” dropdown menu. OK.
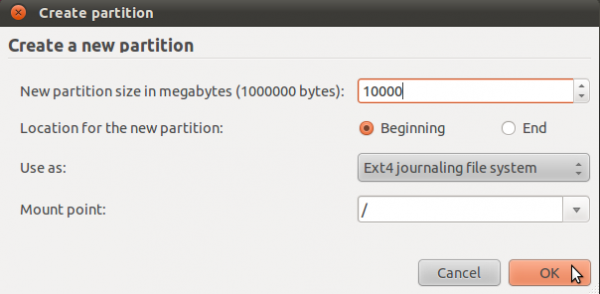
The third partition will be for /, the root directory. The default journaling file system on Ubuntu 11.04 is ext4. You may stick with it or choose another journaling file system available. Btrfs is supported, but this partitioning scheme is not for btrfs. If you are interested, how to install Ubuntu 11.04 on a btrfs file system is a good place to start.
The installer recommends a minimum of 4.4 GB for Ubuntu 11.04, but on a new installation, less than 3 GB of disk space allocated to / is used. Note that as you install additional applications after installation, disk space used will grow, so be generous here. I think 10 GB should be more than enough. OK.
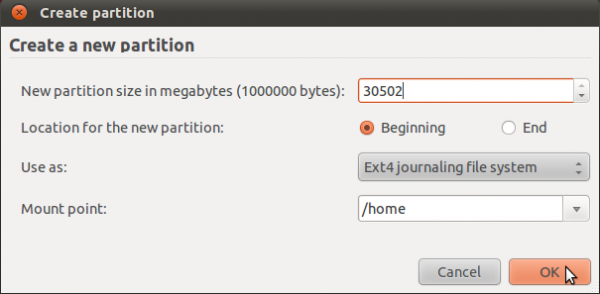
The last partition will be for /home. The file system is ext4, and you may allocate all available disk space to it. OK.






Thank you !, It works perfectly !.
Apparantly this doesn’t work with Ubuntu 12 but only with Ubuntu 11. I am assuming all those who got a failed to install GRUB in /boot were trying to install Ubuntu 12. I have tried 5 times with some little tweaks to install GRUB in /boot for Ubuntu 12 i.e. increasing /boot partition size, changing the format to ext4 etc but nothing works. I even set me partitions the same way so there is no misunderstanding. Now when I installed Ubuntu 11, it works fine for me. GRUB was easily installed in /boot and there were no problems at all. Please look into this. Try a fresh intall yourself and see what the problem is. Thanks.
Sure, I’ll give it a fresh look later this week.
Just tried this tutorial on a Vbox virtual machine, with Windows 7 and Ubuntu 12.04 and it works perfectly.
Next step: trying it on my laptop 🙂
Some people seem to be having problems with 12.04. Let us know if it works for you on your laptop.
I still haven’t installed ubuntu 12.04 in my laptop,maybe later in the week. But in my “experiences” I ended up repeating the same process to dual boot windows 7 and xubuntu 12.04 (again in a VBox machine). This time I ended up with the same fatal error when trying to install GRUB in /BOOT partition. The only difference betwen the two processes was deactivating the PAE for xubuntu. Tomorrow i’ll try again with Ubuntu 12.04, with PAE activated, as in the first try I made.
I’m relatively new to linux, and have a lot to learn, so I really don’t yet understand the reason why the fatal erros occured this time (Desktop environment, kernel, PAE, ???). Any ideas on this?
Well, I don’t know why, but after trying the exact same install as I did sucessfuly the first time, I got the fatal error message, and my installation did not finished… Have no idea why…
Has anyone had better luck with this issue?
Check back tomorrow. I’ll update this tutorial for 12.04. If you have not done so already, you may subscribe to this website by RSS or email, so it will be delivered to your inbox or Feed Reader automatically.
Just wrote an update to this article using Ubuntu 12.04. You may read it here.
Hi there! I ran into a little problem with my installation. Everything went just fine untill it was supposed to install the grub then i got a fatal error but I solved that with choosing /dev/sda5 again and then the installation completed. Then I followed your steps for for easyBCD and when i reboot I can choose Ubuntu 11.10 but then I get into a commandprompt lokking like this
/GRUB
and a text that tells me I an get commands by presing TAB and when I do that I get a bunch of commands. But I don´t know how get any further. So should I try to do the Bootrepair or is something elese wrong?
Is /dev/sda5 your boot partition?
It is very likely that you did not tell EasyBCD the correct location for GRUB.
Hi, i’m having the same issue.
When i select grub2 in the EasyBCD, i cant select where is the grub installed (it says automatically configured and dont let me select one…).
oh, i am installing ubuntu 12.04, i think is the same but… just in case
Yep, it is the same.
That is what happens when GRUB 2 is the boot loader. So you should be fine.
yes but ubuntu never starts… it only shows a command line like Slaughter83 describes.
What is the size of the disk you used? And how much is allocated to Windows before the boot partition of Ubuntu starts?
same fatal error message when I choose /boot partition as Device for Boot loader installation…
even I choose other partition( / , /home ), it’s showing the same error message.
so I just ignored the message, reboot, of course I could’nt get into ubuntu. booting with live USB, select try ubuntu, and
sudo add-apt-repository ppa:yannubuntu/boot-repair
sudo apt-get update
sudo apt-get install -y boot-repair
boot-repair
http://askubuntu.com/questions/125428/grub-complains-of-no-such-partition-after-installing-1204
using this app, I could fix grub and dual booting has no any problem, looks like…
I don’t know what was problem. I created /boot as primary partition and Ext2 file system. Other people said that changing ext2 to ext4 could fix grub installation problem? I tried, doesn’t work…
so my quetion is …
is that really necessary to install the grub to boot partition then dev/sda ?
http://members.iinet.net.au/~herman546/p22.html
wait for your answers
kind regards.
If you want GRUB to be responsible for presenting the OSs on bootup, then installing it in sda is your best option. The reason for installing it in /boot is given in the article.
Hi. In the step where you recommended installing GRUB in the /boot partition of Linux, I forgot to set it there and ended up installing it in the MBR. Is there any way to restore the windows bootloader and reinstall GRUB into the /boot partition? Thanks.
See this article.
how to get back ubuntu after installing win7 in case of dual boot
If that is a question, this might help.
So I followed your partitioning steps (I unallocated about 20 gb from windows 7). But after completing installation and attempting to boot back into windows it crashed due to hardware changes. I’m fairly certain I didn’t overwrite any existing windows drives. How can I fix this so that I can run windows again?
I had installed ubuntu 11.10 as main OS in partition, other than windows. But now i m not finding any option to boot windows. It just starts ubuntu, when i power on my laptop..
Please suggest any solution. Thankyou..
Provide more details about the partitioning scheme you used and we just might be able to help you.
How did you set up partitions for Ubuntu relative to Windows?
If Windows 7 has two primary partitions , could I create /boot as primary partition?Is there any difference if I follow the tutorial and use logical partition ?
Thank you very much.
You could create an extended partition for Ubuntu, and under it create logical partitions for /boot and any other partition you want to use for Ubuntu. That will leave you with 1 primary partition free.
Or you could create /boot as a primary partition, and create the last partition as an extended partition, with the other Ubuntu partitions under it as logical partitions. This option will exhaust the number of primary partitions – 4 – that the system can support.
either option will work.
I understand more clearly now. Thank you.
Hi
Thank you for this great article,
I have got a problem during the installation process. In the partitioning step my “free space” is inactive and it appears as “not usable space”
any ideas please?
Thank you
If it is not usable, it most likely means that you have 4 primary partitions configured already.
If that is the case, you need to delete one primary partition and create an extended partition. That will allow you to create logical partitions for the installation.
Note: Using an MBR partition table, the system cannot support more than 4 primary partitions.
I followed the exact steps in this article by staring with a new Windows 7 installation. Then I installed Ubuntu 11.10 (not 11.04) with the same 4 logical partitions. I chose the bootloader to /boot but i was given a fatal error giving me the option to choose another location. Has anybody found a solution to this?
What is the exact error message? What is the size of your HDD?
Same here. What is the fix?
Error: “It was not possible to install the bootloader at the specified location: /dev/sda5. This is a fatal error.” It then asks to choose a different location.
What is the size of the HDD, and how far from the start of the drive is the boot partition?
Hi,
Tried to do the same operation, and got the same error message !. Tried also to create the boot partition as a primary partition, but no success !!
I had the “fatal error” on sda5 as well (on two separate installs). There was another thread elsewhere about this for Ubuntu 11.10. Changing the filesystem to ext4 fixed the problem. I’m too much of a linux newb to state whether or not there will be side effects from choosing ext4 over ext4.
er…that should read “choosing ext4 over ext2”
Hi mate,
Does this setting lets you view your ntfs partition? lets say i have C(Windows Files System) and D(NTFS partition). Will I be able to see those 2 partition when im on ubuntu?
Will it still work on 11.10?
regards,
Jake
Yes. When you open the file manager, both partitions will be listed on the (left) pane or panel. click on them and browse away. You can also copy files to and fro.
Is there anyway to boot to Ubuntu without installing EasyBCD? I have a problem with windows so I can’t even get it to start up, much less install any programs on it.
Thanks
I don’t want to assume anything. If you provide a little bit more info about your setup, it would make it a bit easier to help.
I followed all the instructions you provided, so I assume Ubuntu is installed correctly. I just do not know how to boot to it, as you instruct to install EasyBCD through Windows to be able to boot to Ubuntu, but I cannot install much less use Windows.
In other words, is there any other way to boot to Ubuntu other than using EasyBCD?
How can I get the option to select Ubuntu or Windows when the computer is starting up? I only have the option to start Windows, nothing in the BIOS has Ubuntu visible to me.
Is there a tutorial or simple solution to this (perhaps modifying GRUB)?
If you do not have access to Windows before you completed the installation of Ubuntu, then there is no easy method to get to Ubuntu.
It is possible to boot the system with a Live CD and reinstall GRUB in a different location, but the easiest way to solve this problem, since you are not able to boot into Windows, is to reinstall Ubuntu and then install GRUB in the MBR of the hard drive. By letting the installer put GRUB in the MBR (Master Boot Record), you wipe Windows’ boot manager, but the installer will auto-add an entry for Windows 7 in GRUB’s menu, so that anytime you boot the computer, you will be presented a choice of which OS to boot – Ubuntu or Windows 7.
Aside from that, it will also give you the opportunity to access your files in Windows when you boot into Ubuntu.
I’m proposing this solution on the assumption that you are unable to boot int Windows.
If you installed Ubuntu on the same drive that Windows is on (as laid out in this tutorial), then you will only have the option to start Windows when the computer first boots. There is not setting in the BIOS that will enable you to boot Ubuntu. You will first have to modify Windows’ boot menu by adding an entry for Ubuntu on it.
And the easiest program to get that done is EasyBCD. However, if you cannot boot into Windows (as you wrote in a previous comment), then the easiest method around that is to reinstall Ubuntu and install GRUB in the MBR.
If you used the same partitioning scheme as this tutorial, then you will need to have access to Windows to complete the dual-boot setup successfully.
Without that, there is nothing you can do, short of reinstalling Ubuntu and installing GRUB in the MBR of the hard drive.
Thanks for the ideas. That’s what I was asking for, do you know any tutorials/sites that I can read/research that will show me how to install the GRUB to the MBR?
As you said, that seems to be the best way.
Any way you can help me on this?
Sorry. WP ate my last comment. Here it is:
There are 2 methods to try and solve this problem. The easiest might be to reinstall Ubuntu and install GRUB in the MBR (Master Boot Record) of the disk, rather than in the boot partition. You do that by skipping the step where the tutorial says to change the boot loader location from /dev/sda to /dev/sda5 or whatever the partition number of the boot partition is.
The other method, which I am yet to try, is to boot the computer with the Ubuntu installation CD. Once in the Live Desktop, start a shell terminal and run sudo grub-install /dev/hda or sudo grub-install /dev/hd0. This link has more info on this and other GRUB commands.
Keep us posted on the results – good or bad.
Thanks for this great work.
I have followed your steps, but at the end of ubuntu installation I got a message that says can’t install boot loader to the specified location. I then tried many other locations but every time I got the same message.
Can you help me in this?
Thanks
Are you attempting to dual-boot on a single hard drive, and are you using the same partitioning scheme as the article?
Yes, I have windows 7 already installed and I have a single hard drive.
I followed the same partitioning scheme you had explained.
Thanks
I had the same issue. Went with install boot loader on MBR. Tried to load ubuntu after configuring EasyBCD and it went to a screen with the following:
grub>
any ideas?
I got the same error. When Ubuntu asked me to choose a different place to install grub, I chose sda5 (my /boot) again and it worked.
However, I have the same problem as kp. After using BCD as per the tutorial, I was met with the grub> screen.
https://help.ubuntu.com/community/Boot-Repair
Boot repair was able to solve this problem for me!
Same issue as above. My scenario is Windows 7 on primary and I installed Ubuntu on the slave. Followed the steps as above and in the end got GRUB error. After this I chose the slave /sdb5 I think and the installation finished. Booted into Windows and installed EasyBCD. But as shown on the first screen of EasyBCD above, I don’t see the option of GRUB2 under ‘Type’. I can understand that GRUB ever got installed maybe or is not on the primary partition, but what should I do from here? I wonder if I should just have taken the ‘Install alongside windows option and let Ubuntu handle all this!. Any help is appreciated.
Damn, still using master/slave drives? Get dat dere SATA! joking aside:
My windows installation was first as well, however, I installed ubuntu on a separate partition on the same drive.
Are you using the most current version EasyBCD? My grub didn’t install properly either and still I had to GRUB2 option in EasyBCD.
Once again, try using boot repair. Boot repair allows you to install grub wherever you want.
Thank youuu! this tutorial is just what I was looking for.
Now I’m able to pick from Ubuntu or Windows at booting.
You’re awesome! =D
GREAT JOB!
You don’t know how this article was helpful to me! easy to read and understand for non English speaking readers.
Thank you very much.
You are very welcome. Don’t forget to share it with your friends.