“LVM Volume Group” is the only logical option to choose here. Create.
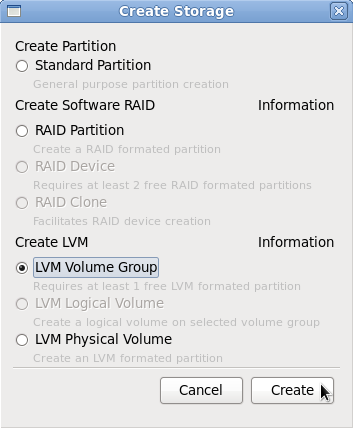
Select VG option
In the Volume Group Name field, specify a name for the volume group, or accept the default. To begin creating logical volumes, click on “Add.” Note that by default Fedora 13 creates the following logical volumes:
- lv_root for /
- lv_home for /home
- lv_swap
The only problem I have with it is that all the available disk space is used up. For this tutorial, the same three partitions are going to be created, but with just the right disk space needed to get the system up and running.
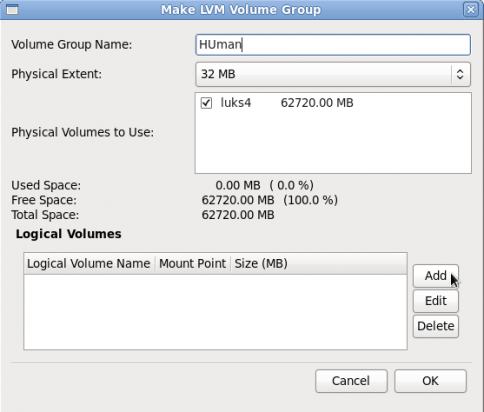
Assign a name to the VG
So we start by creating a logical volume for /. In this example, I’ve chosen to allocate 6 GB to this logical volume. You could go lower. For guidance, a default installation of Fedora 13 uses less than 3.2 GB of the allocated disk space. OK.. Repeat this step to create a logical volume for /home, and any other that you need. For a personal-use computer, the three logical volumes created in this example will suffice. Because the PV is already encrypted, it is not necessary to encrypt any of the logical volumes. So leave “Encrypt” unchecked. If, however, you are paranoid, go ahead and have fun.
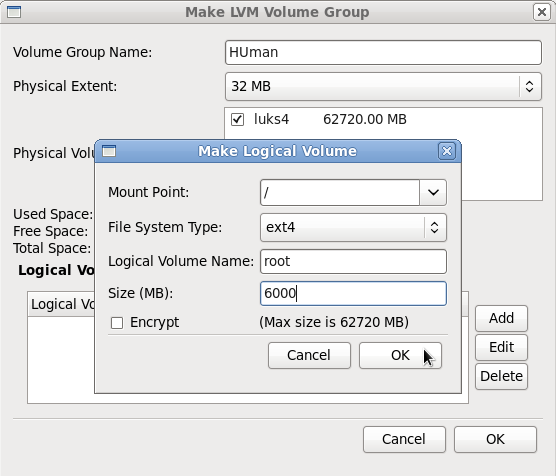
Create the first logical volume
This is just to show what options to choose for the logical volume for swap. Only 2.0 GB has been allocated to it in this example, but it is really recommended to allocate an amount that’s twice the RAM on the computer. Else you might have issues with suspending or hibernating the system. OK.
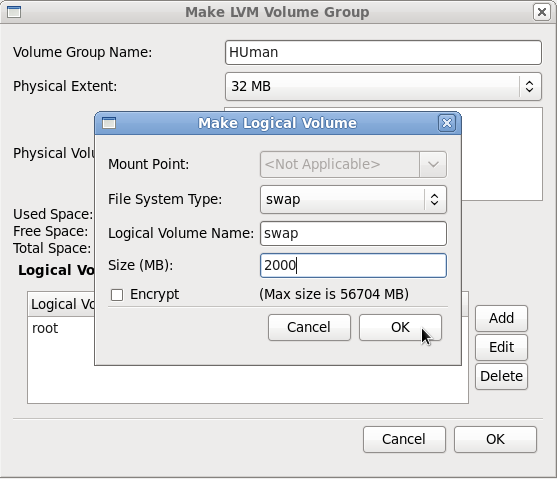
Create swap space
This is a view of the all logical volumes that has been created. Notice in the middle section that we have only used 28 GB, or about 45%, of the available disk space. With 55% still unused, you can use it to grow any logical volume, or create new ones, if necessary.
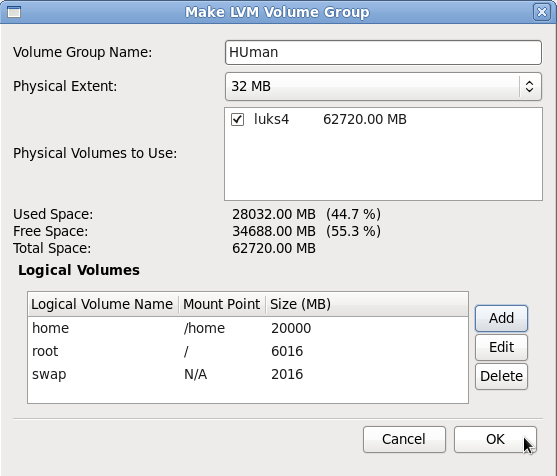
View of all logical volumes created
Back to the main disk partitioning window. Next.
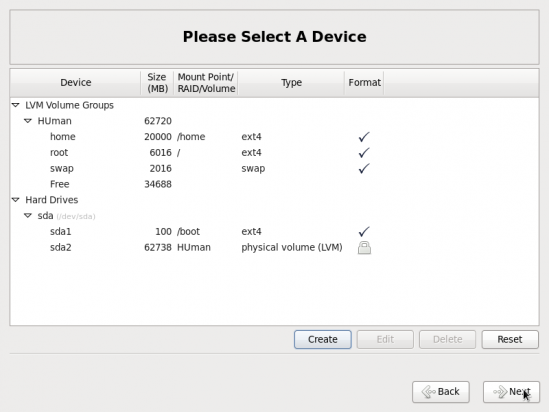
View of all partitions created
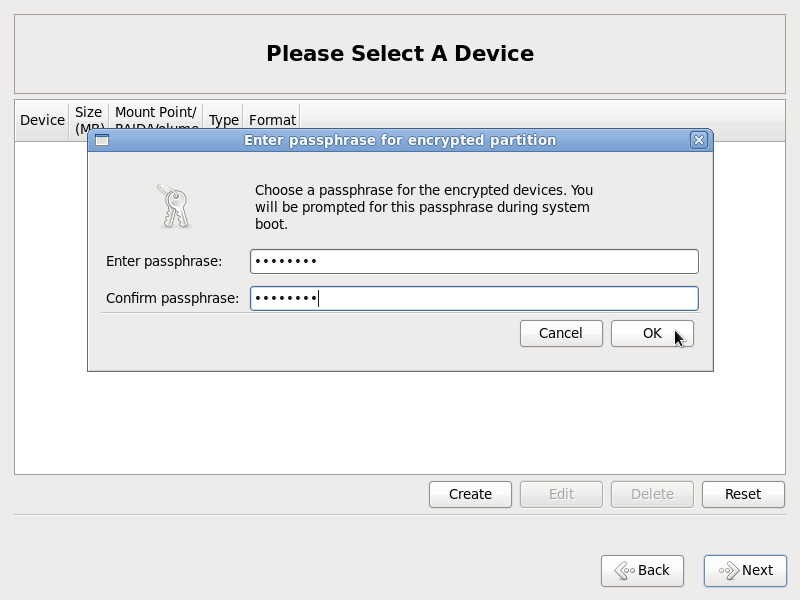
The installer is requesting the encryption passphrase. One caveat: The passphrase should not be the same as the root password or any other user account password. Click “OK” and continue with the rest of the installation.
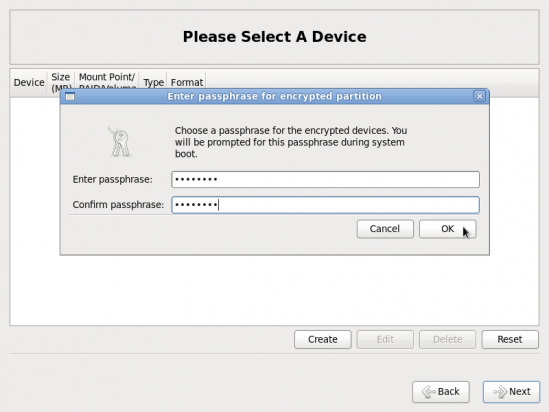
Specify passphrase to use to encrypt the disk
A follow-up tutorial will be titled “Managing LVM on Fedora 13.” To be notified when it is published, please subscribe via RSS.



Thanks, I am facing trouble with Fedora 14 installation on a new 1 TB hard disk. Got help from this site and now it is successfully created. Great tutorial. Thanks again.
Anil
my machine is dell inspiron1440 with intel i3 processor. I have installed windows 7. Now i want to do a dual installation. I am having 32 gb of free space in that. I am getting all the above screens but when i select OK in the Add Partition Screen it Gives me the following message.
Error Partioning (Dialog)
Could Not allocate requested Partitions:
not enough free space on the disks.
while there is free space available in the disk.
following are the partitions of my disk.
HDD 320 GB
window7
sda1 100 Mb ntfs
sda2 76700 Mb ntfs
sda3 113664 Mb ntfs
sda4 81920 Mb ntfs
Free 32860
On the “Installation type” window, the second image in this tutorial, what option did you choose? Given that you said that your disk has space already marked as “free,” you should select the “Use Free Space” option. Make sure to check “Review and modify partitioning layout” before clicking the Next button.
Once the installer creates the default layout using the free space, then you can modify it.
By the way, how many logical volumes are you trying to create and what are the size allocations?
It’s not a good idea to use a boot partition smaller than 500MB. Fedora upgrades require that installation images be copied to the boot partition and will take considerably more than 100MB. Fedora 13 uses a default boot partition size of 500MB (increased from 200MB) specifically for this reason.
Please don’t advise people to create such a tiny /boot partition.
First, sure only 28MB or so is used after the installation. That’s because the churn has finished, and there’s only one kernel installed. When kernel updates are available, Fedora installs up to three kernels at the same time, so that if you have trouble with later kernels you can still use earlier ones. /boot needs to be large enough to allow this.
Secondly, more wiggle room is needed in /boot in order to use preupgrade – the recommended method – to upgrade to a later Fedora release. Up until F13, Fedora releases defaulted to creating a 200MB /boot, and even this is usually not enough space to do a preupgrade to Fedora 12 or later. From F13 onwards, we’re defaulting to 500MB to make sure this works okay in future.
Bottom line, I’d highly recommend making /boot 500MB. If you’re REALLY trying to save on space, 300MB should probably be okay for doing preupgrades for the foreseeable future, and 200MB is okay if you only need enough space to cover the needs of the installed system, and you don’t intend to use preupgrade to upgrade in future.
The rationale for a 500 MB /boot was not stated. Then I came across this, and now we know. So yes, a 500 MB now makes sense.
Knowing how often the Linux kernel gets updated, it’d be a good idea to have a gui tool that’ll give the user a list of kernels that are more than one updates old, with an option to delete them. Or is there such a gui tool already? I know that the systems informs the user at the cli, but a newbie-friendly gui tool would make it a lot easier.