With the first partition created, select the free space, then click the “Add…” button to create the next partition. You will need to repeat this step to create the remaining partitions.
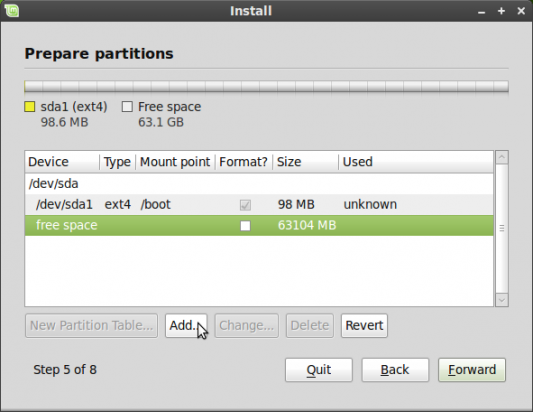
Boot partition is created
The next partition we need to create will be for swap. The recommended size for swap space is double the amount of memory that you have. For this example, I’m allocating 6000 MB, or 6 GB. For “Use as,” select “swap area.” OK.
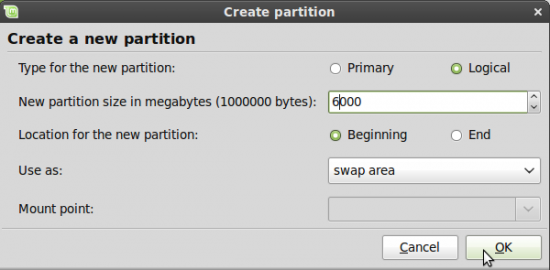
Creating the swap partition
A default installation of Linux Mint 9 or Ubuntu 10.04 takes up less than 4 GB of disk space. So anything more than 4 GB will do just fine for the main partition. Make the right selection for the file system and mount point (ext4 and /), then click “Forward.”
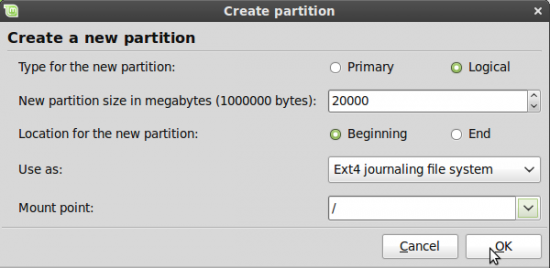
Creating the root partition
Since this is the last partition I want to create, I’m going to allocate the remaining disk space to it. Again, for “Use as,” select “Ext4 journaling file system.” For “Mount Point,” select /home from the drop down menu. Forward.
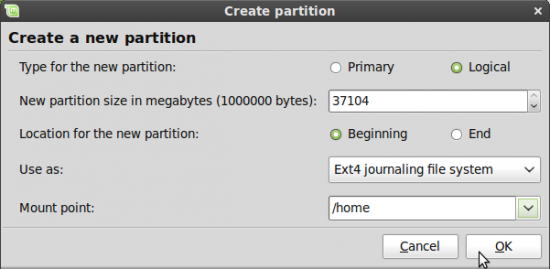
Creating the home partition
This is a view of all the partitions you just created. If you need to make any changes, select the desired partition, then click the “Change…” button. Otherwise, that’s the end of the manual partitioning guide. Click the “Forward” button to continue with the rest of the installation.
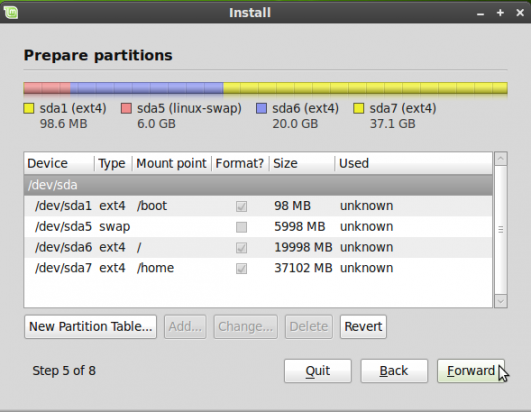
A view of all partitions created



Thank you so very much, my good man. I was severely frustrated with the internet before you showed me how it was done. Thank you.
thanks for the manual. I was searching for it a while now and quite pleased to get it all what I was searching for.
Thank you so much for this CLEAR, Essential and what is IMPORTANT, well VISUALIZED Installation-Guide! Best Wishes!
Thanks for a lucid and useful guide. I would appreciate any insights into how to partition the drive to enable a dual boot system with Windows Xp and Ubuntu 10.x that enables both the windows and Linux O’S to share a common data repository. This makes backing up data simpler and also enables data and files to be used by either OS. If possible I would prefer the common data partition to be as large as possible.
Take a look at how to dual-boot Ubuntu 10.10 and Windows 7. It will give you an idea of how to proceed.
If your computer has a single drive with Windows already installed, then you will have to reinstall and repartition the disk. Here’s a suggestion: Following the instructions in the above link, create the Windows partition. Windows will actually create two partitions, the system partition, and the main partition. Then create a third ntfs partition. Give it the size that you want it to be. This will be the common, or shared, data repository. Before you click to install, make sure that the second partition is selected, not the third one.
After Windows is installed, start the installation of Ubuntu. Ubuntu’s installer should see the three partitions created under Windows as /dev/sda1, /dev/sda2, and /dev/sda3. /dev/sda3 is your common data repository. Follow the instructions in the link above to create partitions for Ubuntu.
After Ubuntu has been installed, the next step is to install the ntfs package that will enable Ubuntu to be able to write to an ntfs file system. The file, /etc/fstab will need to be modified so that the common data repository will be mounted rw at boot. That should be enough to get you started. I will try and provide more details on the last steps in another article, hopefully to be published in a couple of days.
Let me know if you run into any issues.
No, it is not usually required that Windows be reinstalled–although it’s a good idea to back it up first as well as to have it freshly defragmented to reduce the likelihood of failure. Most distros can reliably repartition the drive without disturbing the installed Windows setup.
As for a shared data drive, certainly NTFS is the simplest route. There are also utilities around that can make XP able to read at least some Linux disk formats…I have used these in the past.
On my current system, I have Windows 7 Home Premium dual booting with Kutuntu–although I usually only start up the Windows instance to make sure all the software is updated, about once and sometimes twice per month. I still get questions about Windows issues from friends, relatives, and former clients so I want a Windows system to refer to at those times or otherwise I would not bother.
My Linux install isn’t very involved–a small about of space for root with a much larger one for /home, plus a sizable data partition (and a spare one for the root of a second version of Linux I can use to try different distros from time to time). It’s a 500 GB disk, and I have another one in an external case that can easily be swapped for this one in case of a drive failure, and to use as an external backup device. (I learned the utility of that approach with my prior laptop, an HP that was on its fourth hard disk in four years.)
True, “it is not usually required that Windows be reinstalled,” but his question was specific to Ubuntu 10.10. The installer of Ubuntu 10.10 is unable to resize the disk if Windows is installed on it. It does not even see Windows on the disk. That’s my experience with Ubuntu 10.10 and Mint 10 when trying to dual-boot with Windows.
I just looked at this again–the tutorial was generally good–although since Linux recognizes up to four primary partitions, there is no reason to make any of them logical in this case.
As for swap space–if you will be doing hibernation or “suspend to RAM” you’ll need enough free swap to hold the entire RAM image…so at least as much swap as RAM in that case.
I have Kubuntu 10.10 installed from a live CD–and it saw the Windows install with no problem whatsoever. I have no idea why yours did not see it,a and have never heard of that with a healthy disk.
Could not figure it out myself. Will give it another shot later today.
Thanks very much for the tutorial. Perfect!
2112 MB swap at the front or back of the drive
9999 MB / next to the swap
REST MB /home
Ok thanks- Got it going as suggested with
Swap 1G, /boot 70Mb, /root the remainder.
Very slow. Unusable. I am trying with Puppy again.. They should revise the minimum resourses
required for Mint 9.
I will use this excellent Mint OS on some other computers for sure. I suggest that for us WinDuhs
users you add simple tutorial here explaining root, boot, swap, home etc. and suggesting allocations to each as a percentage of total available volume.
Really appreciate all your help here.
Chris.
ps. Why are the posts here not showing in correct sequence ?
Chris,
One GB of swap on a 4.3 GB drive and on a system with only 256 MB of RAM is excessive. Since you’re going to reload anyway, try it with 0.5 GB of swap, 40 MB of /boot, the rest as /.
You have discovered why I suggested originally that the “minimum requirements” for a large distro would be unusable.
If you paid $22 for a 4.2 GB drive, you basically paid too much. It is already old enough that it is unlikely to be reliable, but it should be fine to start.
For Word attachments, try AbiWord–it takes far fewer resources than OpenOffice.org. Unless the lady is unusual, she won’t have much real call for PowerPoint attachments–so I’d skip them unless you develop a show-stopper.
Puppy 5, as I said previously, would be one good choice. Another might be Lubuntu, although I looked at it briefly and it didn’t want to install, and I ran out of time to mess with it. Perhaps the copy I downloaded had a glitch–I didn’t follow it up long enough to determine that as yet.
David
@David:
Running Firefox with 3 tabs open will almost certainly kill all the RAM on that PC. So the more swap space that’s available, the better. Compared to my suggestion, your’s will only net him another 530 MB in extra storage space, but leave him at a very thin margin on space available for use as “RAM.”
The bright spot is he got it to work. At least we now know that all the hardware on the PC works.
@finid–
With those limited resources, I’d be leery of running too many open windows anyway. Besides, the elderly lady this system is for is not so likely to be running many things simultaneously to begin with. I’d also look at Opera or Chromium with minimal (if any) plugins to maximize available RAM.
The problem with swap, with such a small and probably very slow hard disk, is that it is extremely slow.
At the same time, it is highly likely that some additional applications may be helpful–and obviously they must go somewhere.
What I still don’t understand is why the 4.3 GB drive to begin with. Newegg, for instance, is offering an 80 GB IDE drive for $22.99, and there are 160s for about $40 or so. A new drive would have been so much more capable–and probably with far more life left in it than this one.
Still, given the limitations and the user it is being done for, I still would opt for maximizing disk space and not worrying so much for multiple browser windows.
David
” Newegg, for instance, is offering an 80 GB IDE drive for $22.99, and there are 160s for about $40 or so ”
Is that 2.5-laptop ?
Never thought of looking at Newegg – I assumed laptop IDE’s had been discontinued because they were so expensive on ebay. 80G’s are $60 or so.
Puppy looks very attractive and friendly. She will like it. I can always give her a bigger drive if she gets ambitious. I’ll save Mint for myself and others.
Cheers
I’m happy you got it running. I did warn you that you are going to be running thin on space … and RAM.
Per the tutorial, I’ll get one done by the end of this week. Still working on a bunch of other tutorial s and reviews.
Replying to comments from the backend seems to mess the sequence up. Will look into it. Thanks.
@David
a quick ps: Cheapest ide/ pata laptop drive on newegg is $50 plus shipping- the prices you saw must have been be desktop 3.5.
Hence the 3.5G drive for $10 !
cheers
Follow up /edit:
I entered:
/boot 98 MB
Swap 499 MB – (guessing that Ram is 256)
/ (root) the balance – 3725 MB
/home – did not allocate anything.
Hangs at next screen ‘who are you’ ie freezes
Thanks !
Here’s where I think your problem lies: Setting up /home and not allocating anything to it. It could also be with swap size relative to RAM.
Per RAM, don’t guess how much you have. Find out exactly how much.
Btw, what are trying to install? Mint or Ubuntu? I don’t think it makes any difference, but it’d be nice to know. Where you able to run whatever you are trying to install in live CD mode?
Since you are going to be running very thin on disk space, here’s my suggestion. Free up more space from /boot by allocating 60-70 MB to it. That’ll leave you with about 4.2 GB. Then 1.0 GB to swap, and the rest, a little bit more than 3.2 GB, to /.. With a disk size like you have, don’t bother with a separate partition for /home.
Be warned! Even if it installs successfully, you are going to be running very thin on disk space. You’re going to be barely able to install extra stuff or save very much to your home directory.
Now the million-tux question. What are you doing with a computer with a 4.3 GB HD? You don’t have to answer that, but let me know the result of your next attempt.
Thanks- laptop is probably 1.5 cpu with 256 Mb ram. HD was 160 GB ,burnt out. Trying to get it going for the owners mother who wants email/yahoo/wordpad/printer.Shes 68 and never used a computer ! Ability to open email with .doc or .ppt etc attachments would be a luxury. Used IDE drives are expensive and I am doing this as a gift,hence the $22, 4.3G drive.
Smaller distro ? DSL is ugly & unfriendly. Puppy
is beyond my abilities to load on HD, don’t want a
live distro for her. I didn’t like Slax.
This is Mint 9 lxde. After posting last night I entered:
root 3.7, home 500 Mb, swap 125 Mb and it still won’t proceed.Had done a md5sumcheck on the CD,and prewiped the HD with D BAN. What could be wrong? Is it because the drive is so small that it won’t load ? Maybe the ‘minimum requirements’ should be changed ?
Thanks to all .
Your “root 3.7, home 500 Mb, swap 125 Mb” does not tally to 4.3 GB. Use the exact space allocation that I suggested and if it still does not load, then David’s comment is likely true.
Keep in mind that it is not absolutely necessary that you create a separate partition for /home.
@Chris–there are several possibilities. First, a system with a 4.3 GB hard disk is itself probably fairly ancient–it may not be properly supported by many current distros. Also, I’d use one of the very light-weight versions…you are bound for problems with a modern Gnome or KDE release, I believe. I’d probably go with Puppy Linux 5.0. For /boot, I’d give it no more than 40 MB; swap to be twice the size of your actual RAM (check the BIOS to determine that most easily), the rest to root.
Ubuntu or Mint should install successfully on a system with at least 192 MB of RAM and a 3 GB HD. Those are the minimum hardware specs.
@finid: They may be minimum specs, but it would definitely not be a very happy minimum. Plus, the rest of the system is likely quite old as well–so there will likely be limits in CPU and graphics performance–plus the disk is obviously old and of low spec. In systems that old, too, there are often very subtle problems–perhaps a very slightly flaky power supply, to give just one example. On my primary system, I am currently running Kubuntu with the Englightenment window manager. However, it’s a four year old laptop that is getting a little flaky, so I have it dual booting and will be putting Puppy on the second partition today in fact, simply to stress it less. (It will be replaced this Summer, actually). That said, this is a laptop with 1.5 GB RAM, presently a 160 GB hard disk, and a dual core processor. For his system, if it only has a 4.3 GB hard disk, it is likely also a very old processor and may have other limitations as well. Thus, I would not go with a large distro for that system.
Good points.
What partitions do I have to make with a
4.3 GB hard drive? I tried 3 times to use the automatic ‘erase and use the entire disk’ but it just hangs.Please tell me what to enter in the manual section. ON MY KNEES ! do not give me any ” you could do A , but on the other hand you could do B,and some people do C…”
Thanks lots!
4.3 GB HD? Wow! I though that was a typo until I read your follow-up comment.
As others have said, if you are to use hibernate the swap size must exceed the RAM amount. However, with multi-GB RAM setups, the old advice to use twice the amount of RAM for swap is itself outmoded. For a system with three or four GB of RAM, I see no reason to have more swap than the amount of RAM, as it is otherwise rarely used on systems with that much RAM.
Also, for multiple partitions, EXT4 may not be the best file system for all partitions other than swap, as various filesystems perform quite differently with different file sizes and read/write activity.
Somewhere, I read an article about using the most appropriate filesystem types for each partition for maximum performance. I’ll look and if I find it I’ll post it back here.
If you are going to use Hibernate you need swap to be bigger than your installed memory.
Hmm 100MB /boot never needed that…
When disk space was a premium, /boot never got more than what it needed, which is less than 30 to 40 MB, but at some point, all the major distros started allocating about 100 MB to it. A little extra doesn’t hurt, but the 500 MB in a default installation of Fedora 13 doesn’t make.
Sure 1gb in a 4gb Desktop should be lots, many distros will allow (but alert you)an install without a swap, others run great with 256mb swap or more. Drive space is cheap and I’ve seen the other side of insufficient swap space a system crash, hibernation usage is a different story. I assume today Linux on modern hardware will need little swap space. Linux Kernel now has swapiness for swap management. Many use between 512mb and 2gb for a swap size. I have my system at 4gb in a 6gb DDR3 memory, Arch Linux 64 bit system, yes too large. The only down size to swap is disk space.
A separate /boot partition is easier to recover in case of system failure, sometimes LVM have problems not having /boot alone. RAID Level 0 will not boot of a entire / system, some distros have problems booting of a RAID Level 1 with an entire / and or /boot, it also allows one to create a smaller boot partition for a floppy or USB stick there are other reasons to. Having a separate /home, /usr, /tmp and /var, is a good idea but sometimes it is not recommended for the new Linux user.
Good points. As a matter of fact, the standard practice when setting up an LVM-based scheme is to first create a small partition for /boot (usually about 100 MB), then initialize the remaining space for use by LVM.
Yeah 100mb should be enough. I think I saw a distro in auto partition LVM mode set /boot at 100mb, not sure which one. Thinking Debian Lenny. Is it a standard scheme /boot and the rest LVM as opposed to /boot, swap, /?gb LVM and the rest LVM /home. Your layout makes more sense to me. If one is concerned about /home date and no backup, you can always pull /home off and pop it elsewhere.
Prior to this release cycle, all distros I’ve reviewed have allocated about 100 MB to /boot. However, Fedora 13 gave it 500 MB, which is way too much. It’s a waste of disk space. Funny thing is only 28 MB of that is used.
@finid, 500mb /boot they must be thinking about landing space for a 767 jet. Fedora 13 I’ve read is is amazing. I may try it on another rig.
Also, btrfs, the default filesystem on MeeGo needs a dedicated /boot partition.
Why would you want to make a boot partition? I just use /(root) & /home & swap, in that order. If you are running 4gb of ram or more there is no need to make the swap bigger than 1gb.