
This tutorial gives you the instructions needed to dual boot Linux Mint 9 and Ubuntu 10.04 Desktop. Unless you intend to create custom partitions, very little effort is required on your part. The installer does virtually everything.
By default, Ubuntu (and Linux Mint’s) installer creates just two partitions: The first, /dev/sda1, is for the root file system directory, and the second, /dev/sda5, for swap. If this does not satisfy the conditions for the system you want to create, you could create custom partitions yourself. For this tutorial, the default disk partition are used.
Note that for this tutorial, Ubuntu is installed first, followed by Linux Mint. Keep in mind, however, that it does not matter which one you install first.
So you start by first installing Ubuntu, then insert the Mint DVD into your computer’s optical drive and restart it. Mint will boot into a live CD environment. Click on the “Install Linux Mint” icon on the desktop. Because the first three steps only requires that you click the “Forward” button, and to reduce the number if images used in the tutorial, we begin with step four of a seven step installation process.
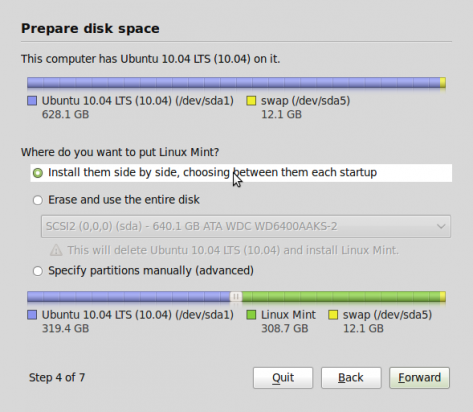
The image below (from the fourth step) shows that the installer has detect the presence of Ubuntu on the hard disk and is giving you the option to install Linux Mint side by side with it. Unless you want to create a custom set of partitions for Linux Mint, click on the “Forward” button. The installer will then begin the process of resizing the hard disk to create room for Linux Mint.
Now watch as the installer magically resizes the hard disk. Depending on the size of your disk, this could take up to two minutes.

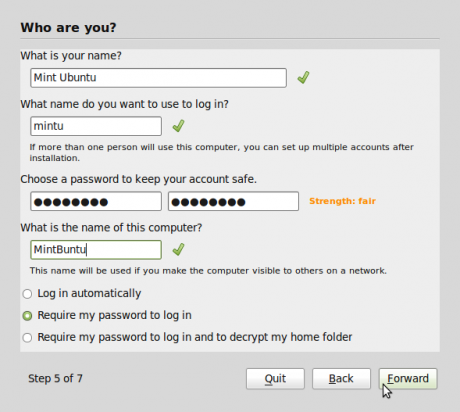
You get this window after the disk has been resized. Specify a username (login name) and password. You also have to select one of three options at the bottom of this window. The recommended choice is “Require my password to log in.” Proper security practice dictates that you never chose to “Log in automatically.” Choosing that option is bad for your computer’s physical security profile and impacts its physical security rating negatively.
The last option, “Require my password to log in and to decrypt my home folder,” is useful if you want to encrypt your home folder. While it looks like a good option, it actually does very little for the physical security posture of your computer. Click “Forward” when you are done.
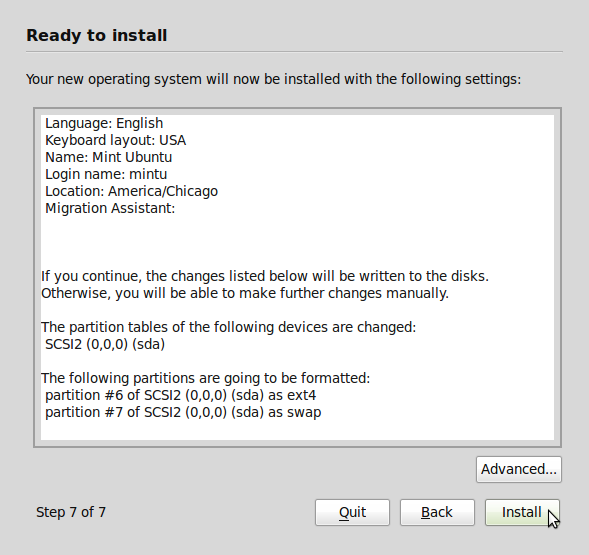
For the final task, click on the “Install” button and watch as Mint is installed side by side with Ubuntu on the same hard disk.

When next you reboot the computer, you will be presented with a choice of distributions (Linux Mint 9 or Ubuntu 10.04) to boot into. In this case, Linux Mint will be the first choice and the default distribution that the computer will boot into if you did not make a selection before the timeout expires. This is how to dual boot Linux distribution. When attempting to dual boot Linux and Microsoft Windows, the Linux distro should be the one installed last.





Tried the above, UBUNTU (10.04 first) on Asus Netbook 1005ha, Atom CPU, 320 hdd, with Win7.
Then tried to add a third: PCLINUX OS. Opera is my favorite browser on all my op sys (Symbian, M$, Linux. But cannot work Opera on current Ubuntu. Hence PCLOS, which I use on my other computers (netbooks, notebooks).
In another forum, Debian user claims that Ubuntu-stuff won’t work with all Debian programs, so Ubuntu (& derivations are suiciding. Is this true?
Greg Zeng. Australian Capital Territory.
I have heard those comments about incompatibilities between Ubuntu and Debian programs, but I am not in a position to verify any of those comments at this time. I do not use Ubuntu or Debian on any of my personal PCs.
If the folks at Ubuntu are deliberately churning out programs that are not compatible with Debian, then just avoid it like a plague.