Linux Mint 13 Cinnamon and Linux Mint 13 MATE are the latest editions of the popular Linux desktop distribution based on Ubuntu Desktop. This tutorial presents a step-by-step guide on how to dual-boot either one with Windows 7 on a computer with a single hard drive.
Because the Cinnamon and MATE editions of Linux Mint 13 share the same installation program, the steps involved are the same regardless of the edition you use. For this tutorial, a 32-bit installation image of the Cinnamon edition was used.
If your computer is running a self-installed copy of Windows 7, the default number of partitions will be just like the ones shown in the image below. Keep in mind that the partitions on an OEM (Original Equipment Manufacturer) installation could be different. For this tutorial, the operating assumption is that you computer is running a self-installed copy of Windows 7. Note: On your computer, make a mental note of the amount of free space on the C drive listed on this image. You will need the information during the installation of Linux Mint 13.

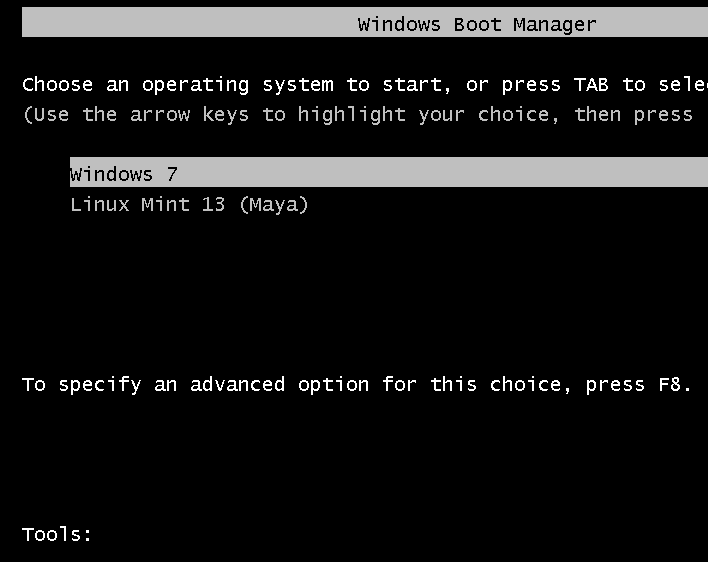
The objective here is to install Linux Mint 13 on the same hard drive, with GRUB, Linux Mint’s boot loader, installed in the boot partition (of Linux Mint), leaving Windows 7’s boot programs in the hard drive’s Master Boot Record (MBR) untouched. Then using another application to add an entry for Linux Mint 13 in Windows 7’s boot menu, so that at boot time, you will be able to choose which operating system to boot into. Selecting Windows 7 will cause the computer to boot into Windows 7 and selecting Linux Mint 13 will boot the system into your newly installed copy of Linux Mint 13, but not after a brief stop at Linux Mint’s boot menu.

After creating partitions for and installing Linux Mint 13, the new partitions as seen from inside Windows 7 will look a lot different. This image shows the partitions from the computer used for this tutorial after the dual-boot operating has completed.

For this tutorial, the partitions that will be created for Linux Mint 13 are: a partition mounted at /boot; root partition mounted at /; a partition mounted at /home; and a Swap partition. You do not need to create all four, but that is what will be done for this tutorial.
What do you need to complete this tutorial? Just five items:
- This tutorial
- You, and an Internet-connected computer, needed to read this tutorial.
- An installation image of Linux Mint 13 (MATE or Cinnamon edition). You may download it from here. Burn the downloaded image to a DVD, or transfer it to a USB flash drive.
- The target computer running Windows 7 (Note: you may opt to reinstall Windows 7 anew)
- EasyBCD – a free software from NeoSmart Technologies that will be used to add an entry for Linux Mint 13 in Windows 7’s boot menu
Note: If you are not familiar with disk partitioning in Linux and how to dual-boot operating systems, it is highly recommended that you read guide to disks and disk partitions in Linux and tips for dual-booting Windows and Linux before continuing with the rest of this tutorial.
Now that we have a pretty good idea of what we need to accomplish, time to get it done. To start, boot the computer from the Linux Mint 13 DVD installation image that you made. Linux Mint 13 DVD is a Live DVD and by default, will boot into a Live desktop environment. Click on the installer’s icon on the desktop to start the installation process. When the installer starts, click through the first steps until you get to the one shown below. You definitely do not want to select the second option. Like the second option, selecting the first option will lead to an automatic partitioning of the free space needed to install Linux Mint 13.

Selecting the first option will actually bring you to this step, where you can see how the installer will resize the main Windows 7 partition (the C drive). The problem with selecting the first option, is that GRUB will be installed in the MBR of the hard drive, where it will overwrite Windows 7’s boot files. Since this is not what we want to do, the only option left, is the last option (Something else). So, if you are at this step, click the Back button.

Selecting Something else and clicking Continue will bring you to the Advanced Partitioning Tool. “Advanced” does not mean that the tool is really advanced, it just means that it is for people who know how to partition disks in Linux. If you read and understood the material discussed in guide to disks and disk partitions in Linux, consider yourself an advanced user.
The main window of Advanced Partitioning Tool is shown below. By default, the partitions listed at this step – sda1 and sda2, are the two Windows 7 partition that we saw on the first image on this page. In Windows’ parlance, sda2 is the C drive, while sda1 is the System Reserved partition.

The task here is to resize sda2, freeing up enough space that will be used to create the partitions for installing Linux Mint 13. To begin, select sda2 and click Change.

This is the resize window, also known as the Edit Partition window. The sda2 on the computer used for this tutorial has about 320 GB of disk space. How much of that disk space we can free up depends, of course, on what is available. This is where you have to be very careful.

The system used for this tutorial was a recent installation, so Windows 7 has only used about 7 GB. With that, I decided to allocate 100 GB to Windows. That amount is what should be shown in the New partition size field. And that is all you need to do here. Click OK.


Thanks!!! Great Tutorial. Now i have windows 7 in dual mode with Linux Mint 14 (Nadia) cinnamon 64-bit installed on my laptop.
Great tutorial, thanks!
Thank you, my friend.
Working. Mint 10 & win7
I edited the sda2 partition, and instead of it being called free space its designated as “unusable”
What happened?
I’m not used to doing this kind of stuff D;
Thanks, I found this to be a very helpful tutorial. My Eeepc netbook is now dual-booted with Mint 14 Cinnamon. It did need some partition tweaking to start with as the netbook as is already had 4 primary partitions, but I used a partition manager to sort that out.
Also, I have 2 other primary partitions, but I don’t know what those are…
I’m completely lost..
List the partitions and their sizes as they appear in the Advanced Partitioning Tool window.
And be sure to read guide to disks and disk partitions in Linux.
/dev/sda1 – 208 MB, 69 MB used
/dev/sda2 – 420190 MB, 152541 used (This is the one I used)
unusable – 204337 MB
/dev/sda3 – 15288 MB, 13580 used
/dev/sda4 – 108 MB, 33 used (FAT32)
That space is unusable because the partitioning scheme in use does not allow more than 4 primary partitions. To make the space usable, you’ll have to delete 1 primary partition.
So decide which of the primary partitions you can do without and delete it. Because sda1 and sda2 are your system partition and C drive respectively, you wouldn’t want to delete those.
What do you have in sda3 and sda4?
I don’t actually, know, haha. I got this HP laptop of off Ebay. I went into Disk Management on Win7 and this is what it lists-
– (C:)
– HP_TOOLS (FAT32, 99MB, 91MB free)
– RECOVERY (D:) [14.24 GB, 1.59 GB free)
– SYSTEM (199 MB, 165 MB free)
I don’t know what I can afford to wipe out.
Since this is a unit you got from eBay, best thing to do is reinstall Windows, because you don’t know what the person you got it from has on it, unless you absolutely trust the other party. Hope you understand the point I’m trying to convey.
For this unit, you C drive is what Linux sees as /dev/sda2. The others are:
/dev/sda1 = SYSTEM
/dev/sda3 = RECOVERY (D:)
/dev/sda4 = HP_TOOLS
Don’t mess with sda1 and sda2.
You can afford to delete sda3 or sda4. If you delete either one, its space will be merged with the space you recovered from C, so you can use the whole space to install Mint.
Just wanted to say Thank you! Everything went smoothly without a hitch! Now running Linux Mint 14 MATE [Nadia] & Windows 7 Pro dual boot
Excellent tutorial and advice!
Regards Vinod
Good or bad??? Thanks for the tutorial. It helped a novice like me to install Linux Mint 14 on my own without any hitch. But I didn’t really needed the last step of adding Linux to the boot menu. Seems like this is a new change in Linux Mint 14! Anyways, I installed BCD and repeated the step which let no change in the boot menu. The boot menu now looks more like Linux Mint then Dos as it was earlier.
Thanks for the nice tutorial LinuxBSDos!
One last question, I want to retain the Windows Installation that I have.
Would it be better for Boot to primary partition?
Would this in any way affect my Windows system from booting up if I was to use Logical instead?
Then I should be able to use EasyBCD to set my Windows as the default OS while Mint is secondary.
Hello There,
I found your website very interesting.
I have a 50Gb partition along with 8 Gb Ram on my Windows 7 machine
I would like to partition it and install Mint 14 on it as a dual boot system.
Would like some advise on the space required for each of the partitions like boot and root
Appreciate your response on this matter.
Thanks
Vinod
What is the size of the disk space used for Windows 7?
If the 50 GB is just for Mint, then it is still too small to make a separate /home partition.
Just create /boot of about 100 MB, Swap of 2 GB, and the rest for the root partition.
My overall HDD drive is about 640Gb. I have a reserved partition of 100Mb. Windows is 315.90Gb partition size.
I have a different partition for Data 217.67Gb
Finally Unallocated is about 62.50Gb
Is Swap size 8192Mb too much considering my RAM? 2Gb = 2048Mb for Swap area is the very basic right?
Please advise. Thanks
For a 32-bit system, 2 GB for swap is about right, and 4 GB for a 64 system.
With three Windows partitions, you should have 1 primary partition left, which you can use for creating logical partitions for Mint, unless the partitioning scheme is GPT-based.
Alright, I shall go with a 4Gb Swap Space. I have thought of going with 500Mb for my Boot partition.
And the rest for root? Approximate 50Gb?
How about I allocate some space for home? 10Gb?
What do you think? Is this ok?
If you want to create a separate /home partition, it should get the bulk of available disk space. So in your case, / should get about 6-7 GB, while /home gets the rest.
The reason is that a fresh installation takes up about 3.5 GB of disk space, and will not grow substantially afterwards.
Hello,
I tried your tutorial word by word. However every time I select Linux Mint from the Windows boot menu it wont boot into linux mint. It just says something about Grub and ask to press TAB for command list. I have to reboot by typing in reboot. Please let me know if I am doing something wrong. I have selected the relevant partitions for boot.
Regards
What’s the size of the HDD, and how far is /boot from the first sector?
Gosh!
EXACT SAME PROBLEM
now in place of my new friend Rahul, I shall take the pain of explaining the issue further.
My hard Disk size is 500 gb
I have used LILI usb creator
link : http://www.linuxliveusb.com/
1. my first sda1 is the system reserved of few MB’s
2. secpnd is sda2 is the 100 GB Windows C drive (Windows 7 installed already)
3. I have made 3 different partitions
sda 3 primary partition as told by you
(1 Gb) ext 4 and mount point “/boot”
sda5 logical partition 50 GB ext4
mount point “/”
sda6 logical 4 gb as swap space
(Note : i have not used home)
Set the boot loader to the
sda3
i.e. the /boot
everithing successfully installs
while restarting i remove the usb
it boots into win 7
i install easy bsd
follow what you have said
Then,
i restart my PC
boot into the new option created by Easy BSD
[=================================
its LEAVES ME AT THE
“grub>” window
==================================]
i TRY EVERY POSSIBILITY IN THE
EASYBSD
its either says
ERROR :15
Cant find 6 files
/boot/……….
/something
/something……….
OR IT LEAVES ME TO GRUB>
I HAVE BECOME WAY TOO DESPERATE NOW
THAT FOR THE FIRST TIME IN MY LIFE I AM POSTING SOMETHING ON A DISCUSSION FORUM
NOT THAT I GOT ISSUES WITH ASKING FOR HELP
BUT JUST THAT I HAVE BEEN WAY TOO IGNORANT
PLEASE RESPECT THE NEWLY BORN FEELINGS IN MY HEART
I just must be very lucky or some force is at work, but on all the dual-boot setups I’ve done, I’ve never encountered these GRUB error messages.
In any case, try the solution suggested here. Scroll to the Encountering the dreaded GRUB 2 boot prompt section.
Let me know if ti worked for you. Note that you have have to type grub instead of grub2 in some of the steps.
Thank you very much. These instructions worked!!!!
windows 7/Linux Mint 14
Easybcd doen’t work with XP
Nice… Excellent tutorial. Thanks for shared it! very useful
successfully installed Linux Mint 13 MATE with this tutorial.
thanks a lot!!!
thank you very much mate
it worked great