One tool that has seen very little or no change over the past several releases in Ubuntu Desktop is the installation program. So it is somewhat surprising that some users are having a hard time dual-booting Windows 7 and Ubuntu 12.04 using a tutorial written for Ubuntu 11.04.
Stemming from comments in that article, and email from readers, I decided to revisit that tutorial using Ubuntu 12.04. So the purpose of this article is to show how to dual-boot Windows 7 and Ubuntu 12.04 on a computer with one hard drive. And it will be on a computer with an existing installation of Windows 7. If there is a need to, you may reinstall your copy of Windows 7.
If you want to attempt this on a computer with two hard drives, see how to Dual-boot Ubuntu 12.04 and Windows 7 on a computer with 2 hard drives.
To get started, download an installation image of Ubuntu 12.04 from here. Depending on your platform, you may download the 32- or 64-bit image. Screenshosts used in this tutorial were taken from test installations using a 32-bit installation image in both a virtual environment using VirtualBox, and on real hardware. In either case, I did not encounter any errors that others have reported, so I am certain that if you follow this guide, you should have a computer with both Windows 7 and Ubuntu 12.04 installed in a dual-boot configuration.
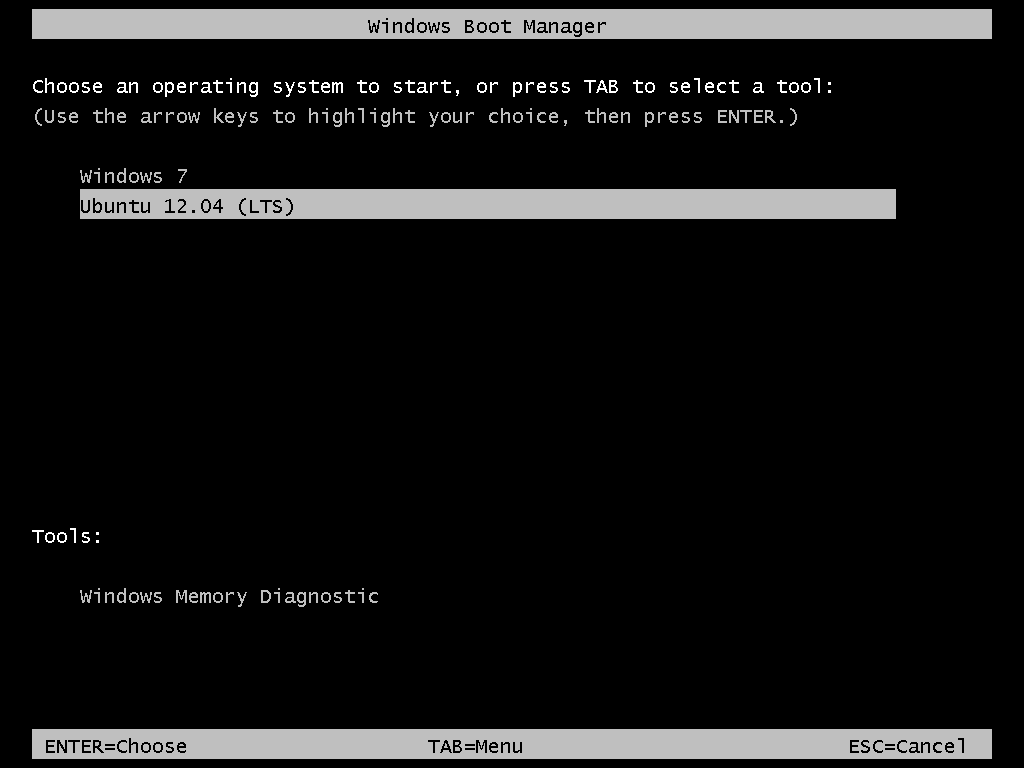
So that anytime you reboot the computer, you should see Windows 7’s boot menu with two entries listed – Windows 7 and Ubuntu 12.04 (LTS). Then you may choose to boot into Windows 7 or Ubuntu 12.04.

Now that you know what the overall goal is, how do you get from here to there? First, understand that if you have a computer running Windows 7, that Windows 7’s boot manager is responsible for making sure that the system boots. Installing Ubuntu on the same hard drive throws another boot manager into the mix. So the most important decision you are going to make about this, is which boot manager (Windows 7’s boot manager or Ubuntu’s) do you want to be responsible for primary boot operations?
When dual-booting Windows 7 and a Linux distribution on a computer with one hard drive, the best option is to have Windows 7’s boot manager be the primary boot manager. Why? Because whenever you reinstall or update Windows 7, its installer will overwrite anything it finds in the portion of the hard drive where critical boot-related programs are installed. That portion of the hard drive is known as the Master Boot Record (MBR). Also, certain anti-virus programs have been known to mess with the contents of the MBR, so installing GRUB in another location will ease the maintenance headache associated with your system. This point determines where GRUB will be installed.
If you are not familiar with disk partitioning (in Linux) and dual-booting, it is highly recommended that you read guide to disks and disk partitions in Linux and tips for dual-booting Windows and Linux.
By default, a new installation of Ubuntu 12.04 is installed on two partitions – a main partition, and Swap. The main partition is usually a primary partition and the Swap, a logical partition. And if Ubuntu is the only operating system on the hard drive, you will see both partitions labeled /dev/sda1 and /dev/sda5. Because you are going to install it on a computer with another operating system on it, the partitioning scheme will have to change.
The recommended partition scheme that will work better with the system you are about to install will have at least three partitions. They are the:
- Boot partition – This is where GRUB will be installed, instead of in the MBR. Installing GRUB in the boot partition is where users have encountered errors, so pay particular attention to what you do with this partition
- Root partition – This is where all the programs will be installed
- Home partition – This is optional, but it helps to have your files and folders on a separate partition
- Swap space
I think what you need to do should be pretty clear now. Time to begin the process! If you have not done so already, burn the installation image (of Ubuntu 12.04) you downloaded to a CD or transfer it to a USB stick, and boot the computer from it. When booted from the CD, you will be given the option to boot into a Live Desktop or start the installation without visiting the Live Desktop. It does not matter which option you choose, but booting into the Live Desktop and starting the installation from there seems to be a very good choice.
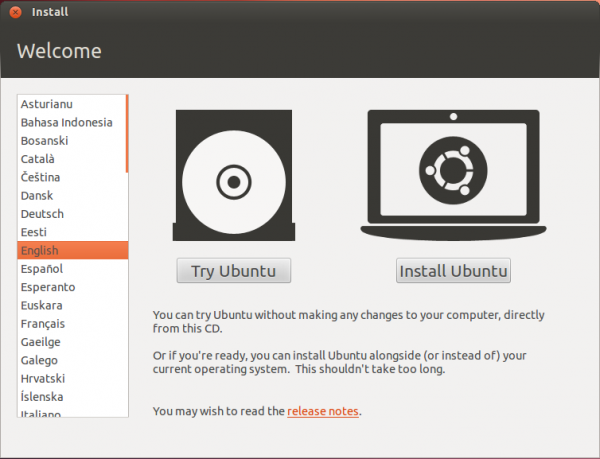
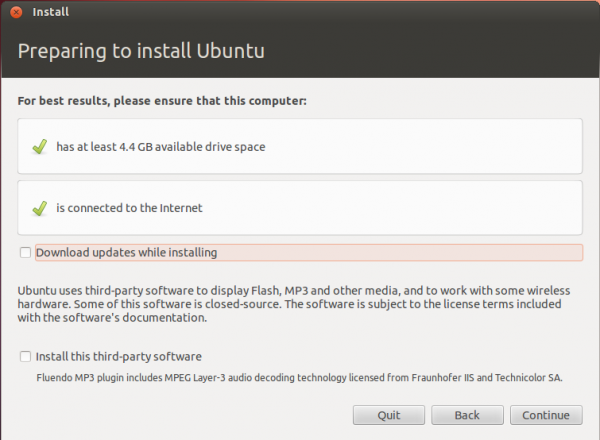
Whether the installation process is started from the Live Desktop or not, clicking through the installer gets you to the step shown in the image below. The most important information here is the minimum disk space (4.4 GB) recommended for a successful installation of Ubuntu 12.04. That piece of information will help you determine how much disk space to allocate to the root partition.
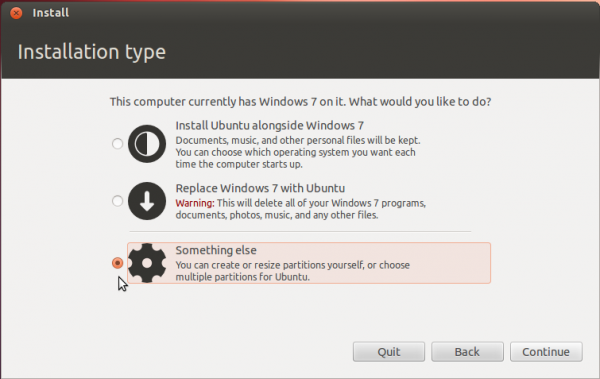
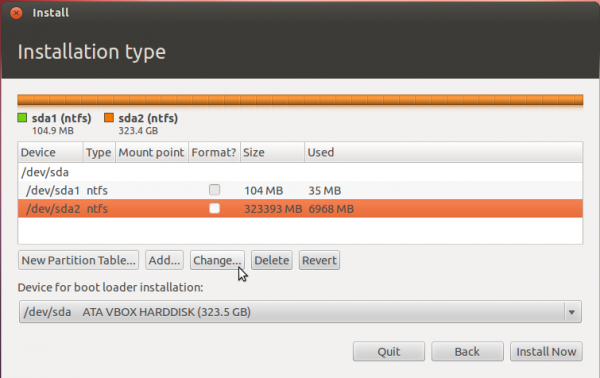
Clicking Continue from the previous step will land you here. If, as in this example, you have Windows 7 installed on the target hard drive, you should see the same three options shown here. Because you will be creating partitions manually, the option you want to select is Something else.
That should bring you to the Advanced disk partitioning tool. Again, if we are operating from the same point, that is, if you have a default installation of Windows 7 on the target hard drive, you should see two ntfs partitions (/dev/sda1 and /dev/sda2) listed. The main Windows 7 partitions, also popularly known as the C drive, is your sda2. To install Ubuntu, you will have to resize that partition. Note: If have free unallocated space on the hard drive, you do not have to go through this partition resizing process. To resize the partition, select it and click the Change button.
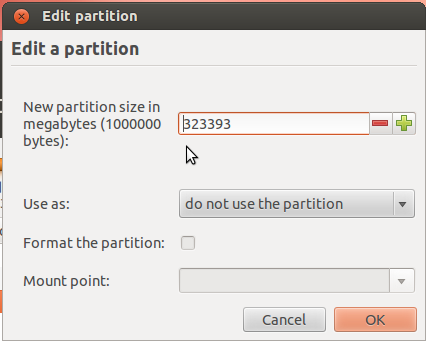
That should open this window. The only thing to do here is tell the installer how much disk space you want to keep for Windows 7. The rest will be used for Ubuntu. The system used for this tutorial has about 324 GB of disk space. I chose to keep 100 GB for Windows.
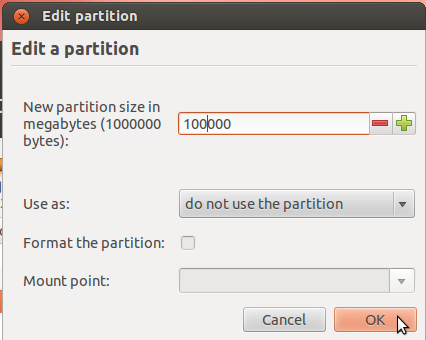
So the window now looks like this. Click OK.
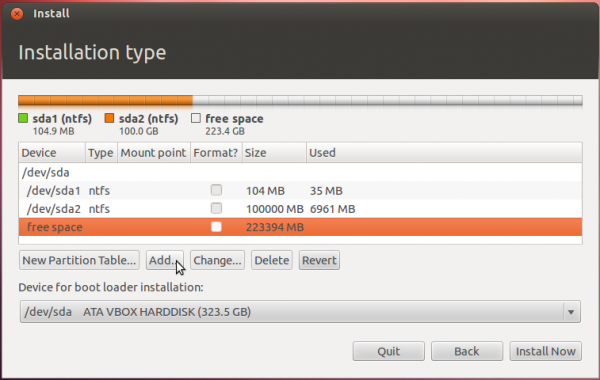
After the partition has been resized successfully, you should see the freed space marked as free space. Select it and click Add to start creating partitions for Ubuntu 12.04.


Hi, sorry for the newbie question, but when I’m creating the three partitions, could you tell me the ‘type’ of each (primary or logical)? The pictures say logical for all three; but you don’t mention it in your written post.
Thanks
The pictures are right, they are logical. Another way to tell is by looking at the partition numbers. The numbering of logical partitions starts at 5 (sda5, sda6, upwards). Primary partitions for systems using an MBR partitioning scheme goes from 1 to 4. See this article for details.
Thanks for clearing that up- the article you linked to was a great help! One more question, I run a system with a single 500 GB hard drive, partitioned (using the Windows installer) into three- C (97.5 GB, where Windows is installed), D (260 GB, which I want to keep for my media) and E (107 GB, where I would like to install Ubuntu). As you can see, that’s the last partition on the drive- could that lead to any problems for my installation? I read somewhere that the bootloader should be saved into a sector within 50% of the hard drive?
For a 500 GB HDD, that should not be an issue, but if it turns out to be, you can make the Windows data partition the last, so that the new configuration becomes: C (97.5 GB); Ubuntu (107 GB); D (260 GB). That should put Ubuntu’s boot partition at <100 GB from the first sector of the drive.
And, of course, your data partition can be shared between Windows and Ubuntu. See how to access MS Windows files and folders from Linux.
Tips for dual-booting Windows and Linux is also a good read.
Hello again! I ended up deleting the ‘D’ partition which was the second partition on the device; and installed my Ubuntu on it.
Just wanted to thank you for such a great tutorial- following it to a ‘t’, I managed to set Ubuntu up in a jiffy; and I’ve never even tried installing an OS before in my life!
Thanks!
Glad to be of help. Don’t forget to subscribe to this site by RSS or mail
I have everything working fine but i am new to ubuntu and I am not sure about the swap area because when I check it from the Gparted I see “!” at my 8Gb partition and it is black unkown. Is this ok? Thank you again..
could you ask your question at http://linuxbsdos.com/qa and post a screen shot of GParted showing what the issue is? Note: post anonymously because the registration is not working very well
I followed ur tutorial but instead of getting windows screen to select windows i got grub.
i have 3 partitions C,D and E and i m using D: to install ubuntu
I was making a mistake, thanks for the help. Your tutorial was really helpful.
Cool!
From comments by others, it looks like your are using a UEFI hardware. Is that right?
No, i m not actually i was using the wrong partition to install, on the 2nd try i made it correct
Hi, I am using UEFI, because that’s the way Lenovo has it. Would that be a problem during Ubuntu installation?
Not with Ubuntu, but the current version of EasyBCD is said to not work with UEFI.
So the solution is to install Ubuntu and wait for new version, which would support UEFI or should i search more about boot-repair as somebody wrote before?
Hi Finid. I’m having a problem installing the boot files for Ubuntu on the sda5 partition. I mean, when I choose the “sda5” as a device for boot louder installation from the dropdown menu the “Install Now” button wouldn’t work at all while the rest of the buttons like “back” and “quit” would. I tried to push on “Install Now” several times but it didn’t go in. Any ideas??? Also, I partitioned all the sda’s in the same sizes except for the sda7 since I have a different hdd capacity. Thanks in advance!
And i’m a proud begginer in using Ubuntu if it helps 🙂
I’ve seen that behavior with BackTrack, but never with Ubuntu. What are the sizes of all the partitions, including those for Windows?
Well, out of 320 GB of hdd space the windows, after i had the “sda3” shrank, had:
*sda1 ntfs 16106
*sda2 ntfs 104
*sda3 ntfs 100000
and for the new paritions it was:
*sda5 ext4 /boot 499
*sda6 ext4 / 19998
*sda7 ext4 /home 149998
*sda8 ext4 /swap 3999
*free space 29361
yes, the windows had 3 partitions and the “C” was in the “sda3” partition if it makes any difference. another suspicios thing was that, when i was creating “sda6” to “sda8”, the “Create partition” popup window didn’t come with the “Type for the new partition” line where i’d point to that little circle called “Logical”. Instead, I had the only choice of “beginning”. Though, the “sda5” had that line. Also, when all the mount points were selected the very last one, the “sda8” /swap partition didn’t come with the “/swap” choice in the dropdown menu, instead i typed it in myself.
Thanks for your further comments! 🙂
The tutorial is amazing, but the comment section is a bit of a mess!
I’d like to read all of these comments. Is there any way I can display them in chronological order?
Thanks.
@ Anna:
The comments are actually in chronological order, but they are also nested. A commenting system of this sort is really not suitable for the kind of discussion that follows these tutorials. Let’s see what happens with nesting disabled.
That was not a good experiment. Nesting has to be enabled. There is an ongoing effort to redirect comments to a modern forum/discussion application, so stay tuned.
Thanks a lot for the answer, Finid! Okay, I’ll wait to hear before I try reading all this! 😉
Me again! Correct me if I’m mistaken, but I think the comments are in reverse chronological order, aren’t they? I think the nested part is more than okay, actually. The comments just need to be in actual chronological order, with the first comments on top of the first page… and the latest comments hidden from view at the bottom of the 3rd or 4th page, which is less than ideal of course… Well, maybe you could get rid of the multi-page layout? (I know, it’s probably easier said than done…)
Easy installation, but have one problem. After installing and configuring EasyBCD, it still takes me first to the grub menu, then, after I choose Windows, it takes me to the Easy BCD where I again choose which way i want to go (Windows or Ubuntu) What did i do wrong?
Umm, still waiting on an answer of what I possibly did wrong. I had to go back, delete the partitions I had created, then went to the picture where it said “device for boot loader installation.” I then chose the right one, but still come up with Grub first, then the Windows Boot menu. Why is this? Anyone?
What should happen is after installing and setting up EasyBCD, on reboot, you should see the Windows boot menu, where you can then select Windows or Ubuntu. If Windows is your choice, the system boots into it.
However, if you select Ubuntu, you should see the GRUB menu, where you can then select Ubuntu or Windows. Not sure why yours is working backwards.
It is virtually impossible for it to be working as are you describing. It’s weird.
Awesome! I love it when things I do and the way things are ru are virtually impossible!! Any ideas, on the virtual impossibility?
Your case should only happen if the OSs are on separate hard drives, with the Ubuntu drive as the default boot disk. So, did you dual-boot on 2 hard drives?
No, only have one hard drive, a WD 750 gb in a Dell Mini 1012. Overkill for a netbook, I know, but was just using ubuntu as an experiment, you know, playing around.
That’s exactly what happens when you use EasyBCD on a UEFI system. Here’s the link to my thread in the Ubuntu Forums that documents my entire struggle: http://ubuntuforums.org/showthread.php?t=2048457
The correct place to install the boot loader, in the Xubuntu installation, is /dev/sda5 (if that’s where the /boot partition winds up, which it will be for a standard Ubuntu/Xubuntu installation).
Links to the Boot-Repair page are in my Ubuntu forum thread, and the program is also listed in Ubuntu’s Software Center.
Thanks, but I need a step by step on how to fix this. Can you email it to me? () is my email address, as I need a basic step by step.
This is what’s happening to me also:
The GRUB loader displays first on POWER ON, and then goes right into Ubuntu if I’m not quick enough to select Windows. When I manage to select Windows from the GRUB list, it brings me to the EasyBCD loader with Windows 7 first then Ubuntu.
I got a 2TB hard drive on my Desktop PC partitioned into 3 virtual drives: C, D, E.
I re-sized C to instal Ubuntu.
Is there a way to get the GRUB loader to change to Win 7 as the default OS?
P.S. Your guide was very easy to follow. Thanks.
P.P.S. It’s an ASUS motherboard with quad-core AMD processors.
In Ubuntu, install grub-customizer from the Software Center. It lets you specify the default entry, and handles all the details for you.
There was no “reply” button on your request for step by step instructions so I’m replying here.
Actually, no “fix” is needed if you just remember not to select Linux from that second menu. I suspect that there’s some way to fix it by adjusting the default and timeout via EasyBCD, but since that utility still is not working properly with UEFI systems I have not tried to do so and cannot recommend that you do either! There might be another Win7 way to adjust it, but I don’t know Win7 that well either…
Very good how-to but one major problem: as of August 29, 2012, the EasyBCD program is unable to deal with systems that use UEFI to boot rather than the conventional MBR boot technique! My new box, an HP desktop currently stocked by Office Depot, uses UEFI, and I spent a frantic couple of days trying to make things work before getting in touch with EasyBCD’s creator — who advised me that it’s not yet compatible although he’s working to get it there.
My solution was to use Boot-Repair from the Ubuntu repositories, via the Live CD “try” option, which corrected things and makes everything work again.
If I were doing this again, I would totally ignore the final step of using EasyBCD, and go straight to Boot-Repair via the Live CD. The result is a conventional GRUB menu rather than the Win7 menu, which looks even better to me…
Thanks for the tip.
hi where can i find the ubuntu repositeries or boot-repair?
Not sure what you mean or what you are trying to do. Can you rephrase your question in a way that we, at least I, can understand better?
I found boot-reapir at software centre. and repaired the boot. great tutorial.thanks
Hey, Jim.
Didn’t see a “Reply” button by your Reply to “Is there a way to get the GRUB loader to change to Win 7 as the default OS?”.
“GRUB Customizer” is different from “Boot Repair”, suggested by “oldfred’ in your thread in Ubuntu Forums?
Also, when I get GRUB to boot Windows first, will GRUB still be susceptible to being overwritten during Windows update or reinstall? Thanks.
Grub Customizer and Boot-Repair are completely different programs, for different purposes. G-C lets you set up your Grub menu the way you want it to look. B-R can correct configuration problems that made part or all of the boot process fail to work.
If the Ubuntu bootloader is put into /dev/sda1 then yes, it would be overwritten if you reinstalled any version of Windows, without regard to your default entry in the Grub menu. However if you put it into /dev/sda5 as described in this how-to, it should not be changed.
However most versions of Windows seem to blindly assume that they own the entire drive, not just a couple of partitions, so you might lose the entire Ubuntu installation!
Incidentally, both G-C and B-R are available through the software center, but you may have to search the Ubuntu forums for G-C to find a link to modify your repository list to get to it…
Hey, Jim.
I finally got the bootloaders sorted out; I think I might have installed the the bootloader on sda instead of sda5 the first time.
But now my MS Wireless Mouse 5000 is freezing (the wireless keyboard is fine):
1) Near the end of OS installation, had to complete from keyboard.
2) After reboot, just after loading desktop
3) After having opened about 8-10 tabs in Firefox, probably 10 minutes after boot up.
4) Same as 3), but maybe after 20 minutes.
The mouse works great with Win 7 for past 5-6 months. The first thing I checked was the batteries, and changed to fresh ones.
Also shut down notebook thinking it may be giving some sort of interference – it uses a different wireless mouse.
Googled and found this on Ubuntu Forums but no solution – http://ubuntuforums.org/showthread.php?t=2007933.
Got this advice from similar post a little more than a year ago, probably about ver. 11.04 – http://ubuntuforums.org/showthread.php?t=1739036 – “I’m no expert but you might try System/Administration/Hardware Drivers and let it look for a better driver. Then select and activate the one labeled “recommended” if it is not already active. If that doesn’t work, try System/Administration/Software Sources and check some of the unchecked sources, especially “proprietary drivers”. Then System/Administration/update manager and press the check button. Install any updates, then go back and try step one, System/Administration/Hardware Drivers and let it look for a better driver. Then select and activate the one labeled “recommended” if it is not already active. It’s worth a try.”
I’ll try the latter, but can you suggest a possible solution?
Thanks for you having patience with us newbies.
Hey, Jim.
I messed up, I should have tried the “latter” solution before whining to you.
Here’s what I did:
As soon as it booted to desktop, I clicked on “System Settings” –> “Additional Drivers” (under Hardware in second row), which brought up a list of 4 NVIDIA Accelerated drivers that could be updated; I selected the one that said “Recommended” and hit “Activate”; it updated and I had to Restart a couple times, but I’ve been up nearly 2 hours straight now.
I’m sorry for bothering about this. Thanks.
OK. I spoke too soon; 15 minutes after the post above, while penning my “solution” to the guys in the first link, the mouse froze again; rebooted twice but no response from mouse; don’t know keyboard strokes to get into “System Setting”, will see what I find and try rebooting later today. Writing this from Win 7, mouse is fine here.
The best tutorial ever! I have encountered no problems. One just need to read too and not only look at the pics especially when choosing a devie for boot. Thank you!
Hey please help me my ubuntu installation was freezing alot.. please tell me your skype or facebook to get better answer please answer
What are the hardware specs? How much RAM and Swap space does the PC have?
motherboard: gigabyte h77m-d3h
processor: intel i5 2500k
vga: msi hd radeon r7850
ram: 4gb
i set the swap same as you, 4000mb
i try to install with USB(kingston DT101 G2 16gb) and dvd(GT-Pro DVD-R), both are same, freezing on installation
**yesterday i finally succes installing ubuntu, but after 5minutes or later its freezing/hang then i restart my pc, i go to windows 7, make a free space an ntsf disk then i restart my pc again and its say unknown file system glub bla bla bla after bios screen, and i was unable to boot both windows 7 and ubuntu
so i delete/uninstall the ubuntu and reinstall the windows 7
sorry, my english is bad
Hi, I am using Windows XP instead of Windows 7. I got all the sections done successfully, except modifying BCD. I can’t use EasyBCD as I am not using Windows 7. Can you suggest some other way to modify BCD?
Thanks
But the EasyBCD site says that “legacy systems” Windows systems are supported. What happens when you try to use it with XP?
It can’t find BCD sector and also pops up the message that EasyBCD works with Windows7/Vista platform. I think this is because Windows XP uses bootcfg whereas Windows 7 uses BDCEdit.
BCDEdit*
Hey i think you have a little mistake about the boot partition, also you say in this guide, it is required to select the SDA5 partition to handle the boot loader, but if that is true, why we need to install the EasyBCD program? i have installed Ubuntu once, i didn’t select such option, i just use the deafult, and then when i start up, the Grup menu used to appear to select the starting O.S, without installing easyBCD. But is ok the rest. Thank you
So, using the default is pretty simple and easy, but what happens the next time you reinstall or update Windows? Right, GRUB will be overwritten.
Hi, I´m back Xd
I reinstall Ubuntu because of I screwed it up, so I reinstalled it but, now i got 2 grub menu´s one at first, then appear the black screen due to the easyBCD software, and at that point if I selected Ubuntu, then the grub menu option appear again, in that is so annoying, so what should I do?, by searching on google i think I edit the MBR? Am I rigth? what you suggest me?
The first boot menu is that of Windows, not GRUB, GRUB’s is the seond one you se after selecting Ubuntu from the first one.
To not see GRUB’s menu, you need to edit the /etc/default/grub file from the command line. In that file, look for the line that says, GRUB_TIMEOUT=10. Change it to GRUB_TIMEOUT=0. The number is time in seconds. If you are not familiar withe the command-line, see this article.
Hey Thanks for your reply, i finally found your answer. But indeed i have 3 boot menu’s like this: The first one is purple screen aka grub, if i choose ubuntu a second menu appear that is the black screen due to the EasyBCD software as I said, and finally if I choose Ubuntu from that menu option, another third grub menu appear, and if I choose Ubuntu it is possible to start Ubuntu, but only after passing for 3 different boot menu’s.
In short: first menu is grub, a second one is due to easybcd, and a third one is again a grub menu.
As i said, it happened when i reinstalled Ubuntu, because i believe the MBR was modified, and i know by seting the time_out=0 will work, but i just think it is the right way to do it, because still the MBR has 3 boot menu option, and that is not efficient, becuase i think you can have 1 million of boot menu option with time_out=0 but this would spend more memory, or not??.
Again thanks for your reply and I hope you can help me
I know this is not the right place to post this, but is just i’m getting desperate.
The thing is after testing Ubuntu 12.04 I realized it completely gets stuck after a couple hours of work. Then i upgrade it to 12.04.1 and the same story. Now I decided to use the 11.10 version, due to an advice from some guy in ask-ubuntu.com. Still this version doesn’t got stuck but now there is a flashing horizontal line in the top of my screen, by searching out on google I found it might be a graphic issue, went to additional drivers to enable whereas driver I need to enable, but there is no even a driver list. Now I think i’m getting really frustrated with all of this with Linux, could someone please help me how to fix the freezing issue in 12.04, or with the stupid flashing line in Ubuntu 11.10? becuase if this keeps happening to me, I think I’m gonna give up and use windows for all eternity.
btw my hardware specs are:
Dell inspiron 15R 5520
proccesor: intel core i5 3 generation, 3210, ivy bridge
memory: 4GB DDR3 single channel
graphic: radeon
Could you double-check that graphics because the Dell inspiron 15R 5520 I’m seeing all have Intel integrated HD Graphics 4000, not radeon.
Hi, i reply here because there was no reply button below your answer.
Indeed my graphic card is a Intel integrated HD Graphics 4000, sorry I made mistake but the rest of specs are ok, for sure
There have been reported issues with Linux distributions and Intel’s Ivy Bridge processors, so I don’t think this is the fault of Linux, more like Intel’s fault. I just built a new system with a Core i3 3220, so I’m going to try it out myself.
Have you tried any other distribution, like Fedora?
Thanks for your answer, btw the reason I insist installing Ubuntu is because I´m developer and I´m planning to start developing android apps, and by checking the developer android site, I have noticed they only gives support for Ubuntu and windows, so another Linux distribution is not an option to me.
My final test is to try out the last release of Ubuntu 12.10 Quantal Quetzal alpha 2, becuase apparently they fixed some issues regarding new graphic cards. If you really achieve to build your new system in core i3 would be great if you let me now how it goes on your machine. Thank you again for your assistance.
Sure, I will attempt an installation of the latest pre-release version of Quantal Quetzal in a couple of days.
Hi, I´m back Xd
I reinstall Ubuntu because of I screwed it up, so I reinstalled it but, now i got 2 grub menu´s one at first, then appear the black screen due to the easyBCD software, and at that point if I selected Ubuntu, then the grub menu option appear again, in that is so annoying, so what should I do?, by searching on google i think I edit the MBR? Am I rigth? what you suggest me???
Hey i Just post a reply here, but i don’t know where it goes
thanks for replying me
i dont know about grub at all i just followed ur tutorial n install ubuntu as u mentioned.what i did during installation i can tell u. i made 500 mb space for boot n then 20gb for / amd 10gb for home and something 4gb for swap area just as u mention.and then let the system to be installed.afterthat i add the entry by using easybcd. i dont see any grub type thing or option during installion that it promt me to install in MBR or in boot sector.i really dint see it.can reinstalling help me out this problem? or during installation where does the gruby type step comes? plz tell me what i do or recommend me any way to solve this problem
Take a look at the fifth and sixth images on page 2 of this tutorial. You will see where to change the location of the boot loader installation.
i have installed boot loader in /dev/sda3 ext4 boot.afterthat i have selected from the drop down menu /dev/sda3 and then clikc on the option install now
but this wont solve my problem again.
i have again reinstall ubuntu by following ur tutorial thoroughly that i migh have made a mistake during intallation but again it wont do any gud.whenever i boot into ubuntu i m taken to grub4dos console and a command like grub>
could u please point where i m making a blunder during installation that i have to see this console.
a friend of mine suggests me to install through wubi intaller but mine wish to intall ubuntu the way u mention in the tutorial
now u have to suggest me something in order to overcome this problem
even i have tried grub legacy instead of grub in easybcd but no output
plz help me out in this technical problem
coz i m not gettin where i missing something ur tutorial is so much simple to the point that no one has to face this problem.and thanks for ur generous replying
hi finid
i hope u will b fine.i want to ask and tell u something.i have installed by choosing an option ‘ubuntu alongside with win7’ This option has worked for me n i let the windos intaller to ubuntu the way it likes.after the installation has completed it reboots and this time instead of showing the window boot menu there’s the menu of ubuntu bootloader.now everything is working finely.But mine question is still there What is that i m missing that i wont b able to install ubuntu as u have mentioned in ur tutorial
could u please tell me or point out mine fault or something which enables me to install the window the way u tell me?
When attempting to boot ubuntu 12.04 I am taken to GRUB4DOS console.
grub>
Ubuntu does not boot.
Setup Notes:
-My win7 works normally and I have a win7 recovery disk partition that works as well (and contains the boot part). Is there a way to point grub2 at the boot partition we created? Or is that already happening and I have some other issue occuring?
-I Installed ubuntu 12.04 from bootable USB created with startup disk creator in ubuntu. USB installed normally to another pc without dual boot.
-Ubuntu will install and boot fine with wubi and wubi was previously installed on this setup (I am trying this guide to not use wubi).
Any suggestions? Other then wipe the whole hdd and start by reinstalling windows?
*win7 recovery partition contains the win7 boot part.
ORDER of install was:
1. Extracted win7 dvd files to partition at back of drive to act as install/recovery partition.
2. Created Installed win7 to front of the same drive as the recovery partition.
—-at this point boot menu shows win7 and win7 setup.
3. Installed wubi/ubuntu 12.04.
4. Deleted wubi ubuntu partition.
5. Booted from Ubuntu 12.04 thumb and followed this guide (skipping separate partition to mount /home too).
6. Restart as requested, (boot menu shows win7 and win7 setup still) boot into windows and use easybcd to set Grub2 and name it Ubuntu 12.04 (LTS).
7. Reboot and select Ubuntu 12.04 (LTS) and I get grub console as previously described.
ON EasyBCD, instead of selecting GRUB 2, try GRUB Legacy. In many cases, it solves the problem you experienced.
1. Tried grub legacy pointing at the boot partition we created for ubuntu with no luck (just goes to a black console with a blinky _ ).
2. Tried grub legacy pointing at each of the partitions with no luck.
3. Tried reinstalling Ubuntu 12.04 following this guide again (just incase I oopsed the first go round) with no luck. Tried steps 1 and 2 again with new install, no luck.
I’m going to format the disk and put just ubuntu, if no issues then I will start over again and try windows without the install disc partition, then with it and see if I can’t hunt down the issue.
…I think I found my issue.
So wiping the hdd and installing ubuntu only the system boots normally. I let the installer set up partitions and got:
(from front of drive to back)
/dev/sda1 – 100mb FAT32 – mounted at /boot/efi
/dev/sda2 – 247 GB EXT4 – mounted at /
/dev/sda3 – 8.5GB SWAP
UEFI.
After installing ubuntu I have been having a hell of a time getting the windows installer to detect the HDD (tried numerous steps to no avail thus far). The one ‘new’ thing is my bios boot menu now shows an option for ubuntu. I never had such an options for windows (when the pc was shipped or when I swapped the hdd for a ssd and threw win7 on it).
I really don’t know much about UEFI but I think ubuntu created a UEFI entry? Possibly overwrote a windows UEFI entry?
Arrrrrrg! I understand the posts I read a while back about UEFI being unfriendly now. (assuming it is indeed my issue)
I was installing on a Gigabyte Z68 motherboard with UEFI, and had nothing but problems (see my posts above). I reverted to the non-UEFI BIOS, and I had no issues with getting things to work (ie. getting past Grub flashing cursor). Not sure what UEFI is doing, but it isn’t playing friendly with the dual-boot setup and getting bootable partitions across the two OSes.
Hopefully, I’m not butchering the topic but my understanding of UEFI is that it basically secures an install by requiring a unique key to boot.
Sadly this creates many complications with dual boot. And worse still with laptop motherboards that aren’t feature rich to allow it to be disabled. And worse STILL because windows (I believe starting with windows 8) will REQUIRE UEFI. And OS’s have to pay money to play with UEFI devices…
In theory cool, in practice so far… not so much.
Yeah, UEFI is causing lots of headache, and I think it’s going to get worse once Window 8 is released. I need to get me UEFI hardware.
If you original windows 64 bit, create a bootable USB with ISO for UEFI and try to install both in EFI mode. only 64 bit can be installed in efi mode.
creating bootable UEFI USB is very simple
– copy efi\microsoft\boot folder to one level up (it should be efi\boot)
– copy bootx64.efi from your installed 64 bit version (c:\windows\system32\boot\) or from iso image (use 7-zip, navigate to iso\sources\install.wim\ \windows\system\boot\) to USB (efi\boot\)
-boot USB.. verify installation mode when you get starting windows screen (shift+F10->cmd, enter ‘notepad \windows\panther\setupact.log’ without quotes.. search for ‘callback_bootenvironment’ code.. it should either shouw EFI or BIOS based on your boot)
At this point I am unable to load windows.
I’m not sure if it is a driver issue or what but the only way I can get windows install to let me select a drive to install too is if I put a copy of an install disk directly onto the drive.
But then it won’t let me install unless in UEFI mode, and then after the reboot the laptop will not load windows.
It seem’s I’m now ‘stuck’ with ubuntu.
-frustrating-
(I even pulled it apart and tried resetting the cmos but that was more or less a failed endeavor because the bios still has an ‘ubuntu’ boot menu entry)
Woohoo!
FWIW…
PC is Samsung series 7 laptop NP700Z5A
The problem (getting windows to install) was the boot order… With the ‘c:’ drive 1st and the windows setup usb 2nd I would either (A) not be able to install, or (B) end up with system and boot files being written to an unbootable 8gb ssd.
I have never had that issue before. Is it UEFI related?
(where an item in front of the boot media cannot be set as bootable from within windows setup?)
I think these issue are UEFI-related because they seldom show up on non-UEFI hardware.
First time trying to dual boot Win 7 / Precise 12.04 on a laptop, HP Pavilion dm1 3130 that has 4 partitions by default installed by Windows and HP. A trick permits to create an extended partition after reducing the C partition and erasing one of the 4 other primary partitions, the HP_TOOLS partition. This partition is before copied in a temporary folder and then relocated in a small logical partition inside this new extended partition, see http://www.blogeee.net/forum/viewtopic.php?f=398&t=21004&sid=eaff9c0bf114aef90b780e13c4251792 (in french). This way the Win 7 / HP system is left untouched. The new partioning is made using Windows system tools, you obtain in the end an approx. 200 GB extended partition.
So my situation is related to the following note “If have free unallocated space on the hard drive, you do not have to go through this partition resizing process. ”
The next step should be then the Ubuntu installation, I would like to apply your tutorial and method but I am hesitating: when starting the Ubuntu install process, I see 3 Win 7 partions (System, C and recovery) and one extended partition (sda5 / ntfs) that is not recognized as free space and I also have a small logical partition containing HP_TOOLS (sda6 / fat 32). What should I do? Trying to rename my extended partition and create the necessary logical partitions into it to run Ubuntu? Resizing and reduce this extended partition to create free space? I am kind of lost at this point (absolute Linux newbie), any suggestion ?
When you are looking at the partitions from Windows, what is on sda5? Does it contain data? If not, you can delete it from Windows, so it is free, unallocated space.
It worked perfectly. What is strange for a beginner is that the extended partition has the same name than the first logical partition (sda5), it’s kind of scary when deleting. I did it from Windows disk gestion tools then restart the intall process from Ubuntu following your tutorial, no problem. The only thing is that HP_TOOLS is becoming sda5 so the first Ubuntu partition /boot is becoming sda6 and so on. Thanks for the advice.
it’s not complete tutorial.
What’s missing?