One tool that has seen very little or no change over the past several releases in Ubuntu Desktop is the installation program. So it is somewhat surprising that some users are having a hard time dual-booting Windows 7 and Ubuntu 12.04 using a tutorial written for Ubuntu 11.04.
Stemming from comments in that article, and email from readers, I decided to revisit that tutorial using Ubuntu 12.04. So the purpose of this article is to show how to dual-boot Windows 7 and Ubuntu 12.04 on a computer with one hard drive. And it will be on a computer with an existing installation of Windows 7. If there is a need to, you may reinstall your copy of Windows 7.
If you want to attempt this on a computer with two hard drives, see how to Dual-boot Ubuntu 12.04 and Windows 7 on a computer with 2 hard drives.
To get started, download an installation image of Ubuntu 12.04 from here. Depending on your platform, you may download the 32- or 64-bit image. Screenshosts used in this tutorial were taken from test installations using a 32-bit installation image in both a virtual environment using VirtualBox, and on real hardware. In either case, I did not encounter any errors that others have reported, so I am certain that if you follow this guide, you should have a computer with both Windows 7 and Ubuntu 12.04 installed in a dual-boot configuration.
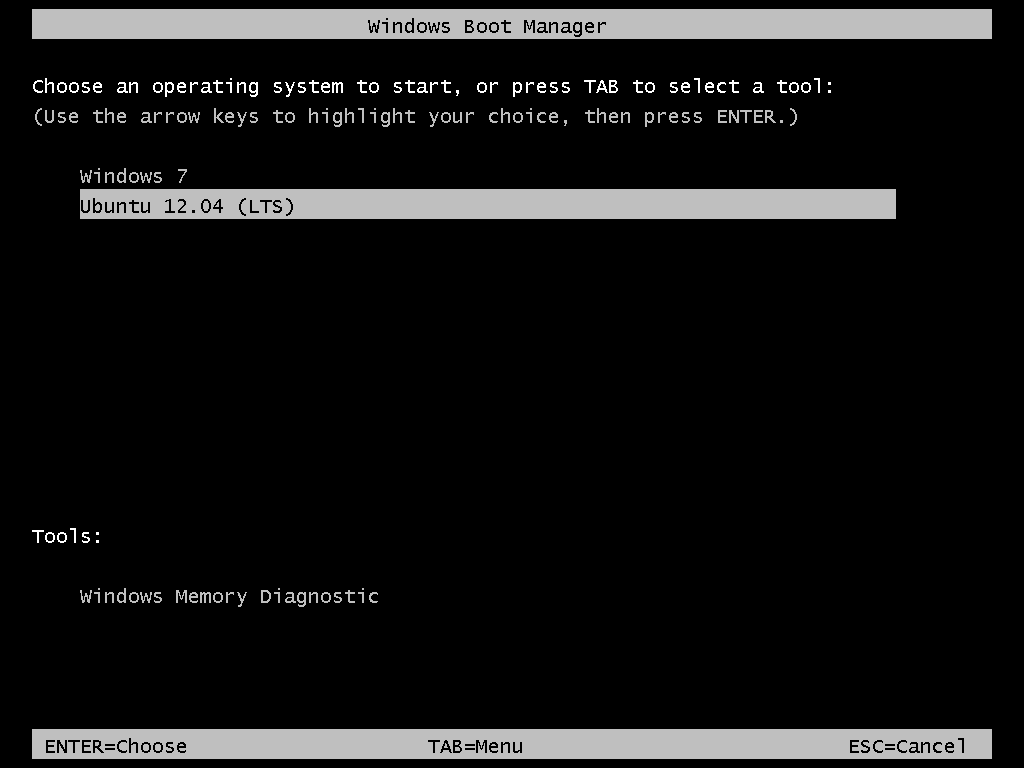
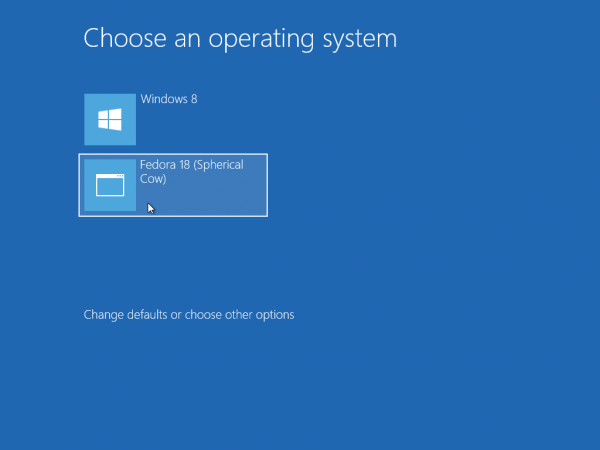
So that anytime you reboot the computer, you should see Windows 7’s boot menu with two entries listed – Windows 7 and Ubuntu 12.04 (LTS). Then you may choose to boot into Windows 7 or Ubuntu 12.04.

Now that you know what the overall goal is, how do you get from here to there? First, understand that if you have a computer running Windows 7, that Windows 7’s boot manager is responsible for making sure that the system boots. Installing Ubuntu on the same hard drive throws another boot manager into the mix. So the most important decision you are going to make about this, is which boot manager (Windows 7’s boot manager or Ubuntu’s) do you want to be responsible for primary boot operations?
When dual-booting Windows 7 and a Linux distribution on a computer with one hard drive, the best option is to have Windows 7’s boot manager be the primary boot manager. Why? Because whenever you reinstall or update Windows 7, its installer will overwrite anything it finds in the portion of the hard drive where critical boot-related programs are installed. That portion of the hard drive is known as the Master Boot Record (MBR). Also, certain anti-virus programs have been known to mess with the contents of the MBR, so installing GRUB in another location will ease the maintenance headache associated with your system. This point determines where GRUB will be installed.
If you are not familiar with disk partitioning (in Linux) and dual-booting, it is highly recommended that you read guide to disks and disk partitions in Linux and tips for dual-booting Windows and Linux.
By default, a new installation of Ubuntu 12.04 is installed on two partitions – a main partition, and Swap. The main partition is usually a primary partition and the Swap, a logical partition. And if Ubuntu is the only operating system on the hard drive, you will see both partitions labeled /dev/sda1 and /dev/sda5. Because you are going to install it on a computer with another operating system on it, the partitioning scheme will have to change.
The recommended partition scheme that will work better with the system you are about to install will have at least three partitions. They are the:
- Boot partition – This is where GRUB will be installed, instead of in the MBR. Installing GRUB in the boot partition is where users have encountered errors, so pay particular attention to what you do with this partition
- Root partition – This is where all the programs will be installed
- Home partition – This is optional, but it helps to have your files and folders on a separate partition
- Swap space
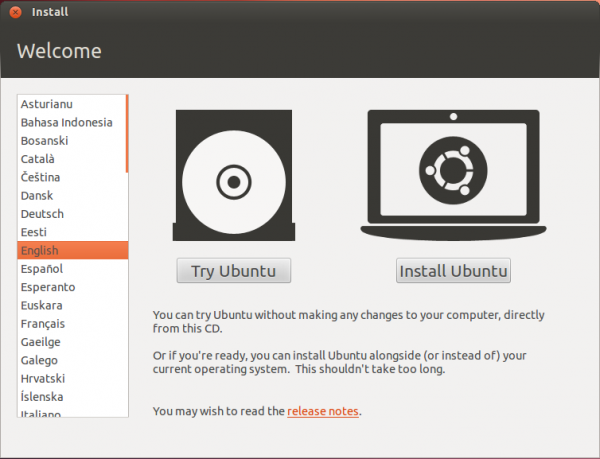
I think what you need to do should be pretty clear now. Time to begin the process! If you have not done so already, burn the installation image (of Ubuntu 12.04) you downloaded to a CD or transfer it to a USB stick, and boot the computer from it. When booted from the CD, you will be given the option to boot into a Live Desktop or start the installation without visiting the Live Desktop. It does not matter which option you choose, but booting into the Live Desktop and starting the installation from there seems to be a very good choice.
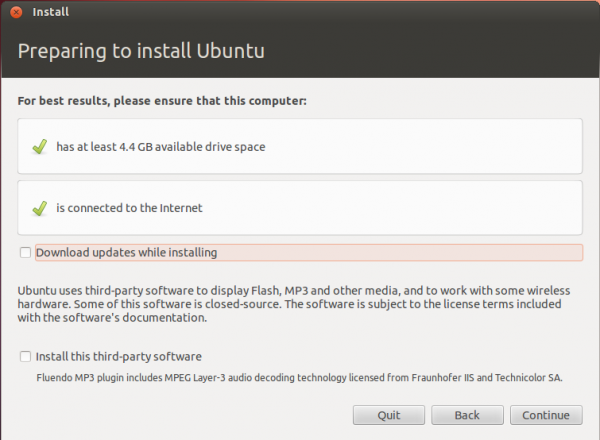
Whether the installation process is started from the Live Desktop or not, clicking through the installer gets you to the step shown in the image below. The most important information here is the minimum disk space (4.4 GB) recommended for a successful installation of Ubuntu 12.04. That piece of information will help you determine how much disk space to allocate to the root partition.
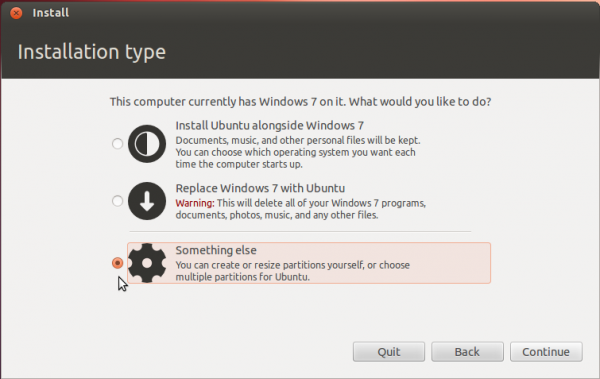
Clicking Continue from the previous step will land you here. If, as in this example, you have Windows 7 installed on the target hard drive, you should see the same three options shown here. Because you will be creating partitions manually, the option you want to select is Something else.
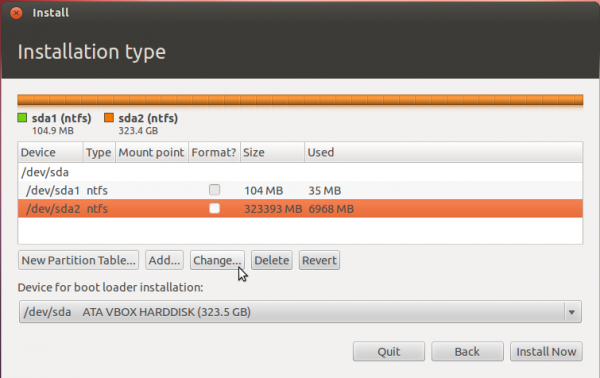
That should bring you to the Advanced disk partitioning tool. Again, if we are operating from the same point, that is, if you have a default installation of Windows 7 on the target hard drive, you should see two ntfs partitions (/dev/sda1 and /dev/sda2) listed. The main Windows 7 partitions, also popularly known as the C drive, is your sda2. To install Ubuntu, you will have to resize that partition. Note: If have free unallocated space on the hard drive, you do not have to go through this partition resizing process. To resize the partition, select it and click the Change button.
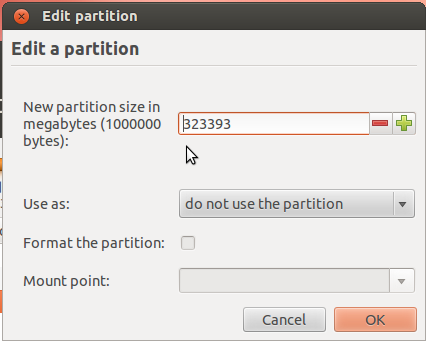
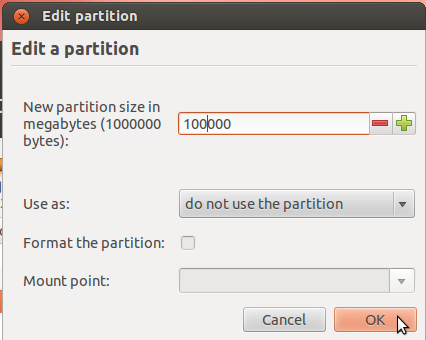
That should open this window. The only thing to do here is tell the installer how much disk space you want to keep for Windows 7. The rest will be used for Ubuntu. The system used for this tutorial has about 324 GB of disk space. I chose to keep 100 GB for Windows.
So the window now looks like this. Click OK.
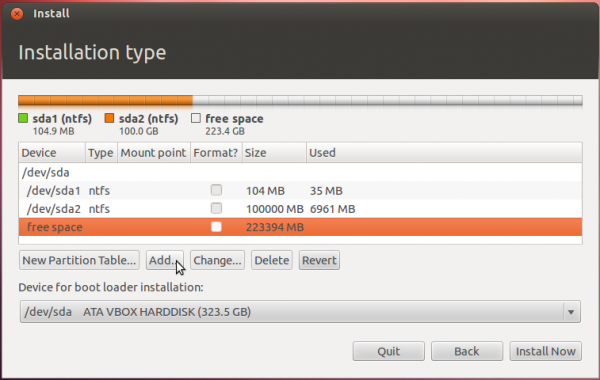
After the partition has been resized successfully, you should see the freed space marked as free space. Select it and click Add to start creating partitions for Ubuntu 12.04.


Hi,
Am having the same problem discussed earlier.. Stuck with a command prompt like screen with GRUB> prompt.
I installed Ubuntu 12.04 after installing Win 7. My boot mode is BIOS (MBR partition table). I used EasyBCD and followed all the steps mentioned.
The partitions are like
100 MB for some system partition (windows boot) sda1
100 GB for windows -Primary sda2
555 MB for LINUX_BOOT -Logical (/boot)sda 9
15 GB for LINUX_ROOT -Logical (/) sda 3
21 GB for LINUX_HOME -Logical (/home) sda4
4 GB for LINUX_SWAP -Logical (linux_swap) sda5
70 GB for WINDOWS files storage – Logical sda6
120 GB for WINDOWS files storage – Logical sda7
132 GB for WINDOWS files storage – Logical sda8
Total – 500 GB
The numbers seems confusing..as i messed up creating and deleting partitions in Gparted..
First I used GRUB2 in EasyBCD and ended up with the GRUB> prompt while selecting Ubuntu in Windows boot loader
Next I used GRUB (Legacy) in EasyBCD and ended up with the system being restarted while selecting Ubuntu in Windows boot loader
Please let me know what terrible mistake i’m making… this is totally frustrating as i’m unable to dual boot my system.
I saw in earlier discussion that something needs to be done with ‘NOMODESET’.. please guide me if thats the case as i’m unable to find a proper explanation elsewhere. Or shud i format all the Linux drives and start from first?
Thanks for your patience and help!
Forgot to mention that i booted Ubuntu live (and installed) in UEFI mode as my BIOS failed to boot the Ubuntu USB with UEFI disabled.. Now am trying to dual boot in BIOS mode.
direct specific instructions.
http://askubuntu.com/questions/38780/how-to-set-nomodeset-for-installation
Your partition numbering is upside down. Not sure if that is the cause of the problem, but try to clear that up and see if it works,
You might want to read this article and this one for more general info on this subjects.
I don’t have an exact solution instead i have an advise. This tutorial is very informative & great work by Finid. Apart from this, why didn’t you select the option “Install ubuntu alongside with windows 7”. I did that and fortunately everything working Fine yet. you can still make partitions to install ubuntu after selecting that option.
Do try to make (/boot) or (/) as primary.
Do read the Informative page which Finid gave you in his last Reply.
Thanks all for the replies ppl. Sry for the late reply.. i wasn’t able to see my comment for long time. I tried all possible methods like:
1. change the partition numbers (keeping /boot on sda5, / on sda6, /home sda7 and swap sda8)
2. Moving the boot loader (GRUB) by mounting sda5 using live cd
3. editing GRUB to set nomodeset using live cd…
NONE WORKED..
finally i found the culprit.. yes its my motherboard which either supports BIOS only or UEFI only mode.
If I set to BIOS only mode and follow your instructions, I get stuck at GRUB4DOS screen while selecting Ubuntu (Ubuntu 12.04 64 bit -both live & installation boots only in this mode) no matter however hard I tweak. As windows installed in BIOS and Ubuntu installed on UEFI
If i set UEFI only mode, format harddrive to GPT, install win 7 in uefi mode and Ubuntu in uefi mode, then everything works fine and the only things is that am not able to activate my cr*** windows in UEFI mode and should be using it in trial.
Finally I have decided to get another hardrive
Thanks again for your support
What mobo do you have? Brand and model.
Post got submitted before i verified some details.. details post below..
And i have Intel DP55WG board.
Thanks all for the replies ppl. Sry for the late reply.. i wasn’t able to see my comment for long time. I tried all possible methods like:
1. change the partition numbers (keeping /boot on sda5, / on sda6, /home sda7 and swap sda8)
2. Moving the boot loader (GRUB) from sda5 to sda (replacing MBR) by mounting sda5 using live cd
3. editing GRUB to set nomodeset using live cd…
NONE WORKED..
finally i found the culprit.. yes its my motherboard which either supports BIOS only or UEFI only mode.
If I set to BIOS only mode and follow your instructions, I get stuck at GRUB4DOS screen while selecting Ubuntu which is installed in UEFI mode(Ubuntu 12.04 64 bit -both live & installation boots only in UEFI mode) no matter however hard I tweak.
If i set UEFI only mode, format harddrive to GPT, install win 7 in uefi mode and Ubuntu in uefi mode, then everything works fine and the only things is that am not able to activate my cr*** windows in UEFI mode and should be using it in trial.
There is no combined mode in my mobo (intel DP55WG). I can only install Ubuntu in UEFI mode and cannot make it boot if BIOS mode is set and cannot boot Windows boot manager (which shows Ubuntu selection) if UEFI is set. The case is same for other way around .. It’s a kind of dead lock.
Finally I have decided to get another hardrive or look for some linux distro which support BIOS booting.
Thanks again for your support
Nice and easy to follow tutorial, thanks!
I think I have followed everything as I should, but I get a strange thing: after selecting Ubuntu in Windows boot menu GRUB shows up. Then I can select Ubuntu or Windows (didn’t try the second option yet). I suppose GRUB is not needed or expected here.
I tried to set GRUB Legacy in EasyBCD (I set device as sda5), but that didn’t change anything.
Both OSes work properly, I just got double boot menu.
If you do not want to see the GRUB menu after selecting Ubuntu from the Windows 7’s boot menu, follow this link to see how to disable it.
Thanks, that solved it.
May I know what is the difference between this method and simply selecting the “Install Ubuntu alongside Windows 7” option?
Install Ubuntu alongside Windows 7 will not give you the option of where to install GRUB, so it will overwrite Windows 7’s boot loader in the MBR.
The problem with that is the next time you reinstall or upgrade Windows, it, too, will overwrite GRUB in the MBR, which means you lose the ability to boot into Ubuntu.
Thanks!
So basically the “bootloader” is what helps an OS to boot. Reinstalling Windows overwrites the bootloader files for Ubuntu in the MBR, making you unable to boot into Ubuntu. However, if you install Ubuntu via this method, the bootloader files remain on the /boot partition, and all I have to do is install and configure EasyBCD again.
Am I right?
How about instead of using a Bootmenu, you manually select the boot device every time? Will separate primary partitions appear as separate devices on the boot device selection menu?
Yes, you are right.
I do not know how you can manually select a device to boot from without the help of a boot loader. Without a boot loader, it’s almost impossible.
Thanks, but i have one problems, still.
When i fallot your steps and reboot it takes me to grub bash’thingy and doesn’t boot up ubuntu.
Any ideas what i have done wrong ?
In EasyBCD, try selecting GRUB Legacy instead of GRUB 2 and see if that helps. Usually, it does.
Thanks a million!
Worked like a charm. Life saver – Cheers mate,
That is such a neat solution !
Thanks a billion for the tutorial!
It took me a while to get it right because my HP laptop is delivered with 4 partitions already on the drive.
However, once I realized all I had to do was delete a partition- I chose the ‘HP Tools’ partition – it was smooth sailing through the tutorial…
I haven’t tried this yet, but just for clarification, each of the partitions are logical, yes? In the pictures they are, but I just want to make sure.
Any partition number higher than 4 is a logical partition. So sda5 or sdb5 and higher are logical partitions. guide to disks and disk partitions is a suggested read.
Okay, that cleared it up for me, thank you.
Sir,
I had followed this tutorial to install Ubuntu 12.04 alongside Windows 7 and Windows 8, so I had a case of Triple boot.
However, I don’t know how, Ubuntu was my primary boot manager and then Windows 8.
But recently I deleted the Windows 8 and upgraded my Windows 7 to Windows 8. Now Windows 8 is my primary boot loader but I can’t access the Ubuntu OS nor can I access the Ubuntu drives since they are of ext 4 format.
What should I do?
Try using EasyBCD to add an entry for Ubuntu to Windows 8’s boot menu. Let us know if it worked.
Hello Sir …
Sorry I posted my question before on your post
http://www.linuxbsdos.com/2012/07/23/dual-boot-ubuntu-12-04-and-windows-7-on-a-computer-with-2-hard-drives/
Back then I didn’t knew that I have only one HDD…
I am currently running windows 7 32 bit with 1 GB RAM & want UBUNTU 12.04 alongside it…
So..what should be the size of the 4 partitions provided that I have 30 GB of UNALLOCATED SPACE…
Can you tell me now which one would be best for me..
32 bit or the 64 bit…??
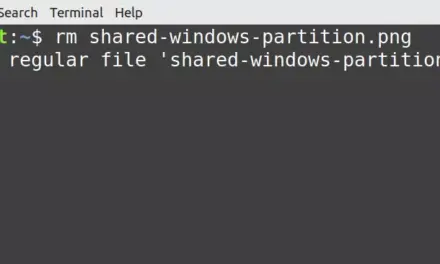
Thanks for the tutorial, but I have a quick (and hopefully not stupid) question: Can the two main partitions used for data storage (one for Windows and one for Ubuntu) be merged into one partition and shared among Windows OS and Ubuntu?
The answer is no, but you can create an ntfs partition from Windows that you can use to share data between both OSs. Note that you can also access files in the C drive from Ubuntu.
You might want to read this and this.
Thanks for the guide, But i got an issue here. After I choose to boot the ubuntu (I already followed through all from the guide) it didn’t take me to the Ubuntu. Instead, I got into somekind of command prompt.
Can you help me?
Can you share some info about your hardware?
What’s the size of the hard drive and how much of that is allocated to Windows?
I’m having this problem, using a 256gb SSD, ~220 to windows, the rest to Ubuntu.
Same problem here for me. Followed instructions exactly, except I skipped the /home partition, as I’m the only intended user of this installation. Started with 120GB SSD, setting aside 55 GB for Ubuntu (500MB boot / 50GB root / 4.4GB swap). After selecting Ubuntu at boot time, I get a GRUB2DOS screen, with a grub> prompt.
The issue is the same as I was having Google how to set “NOMODESET” in your setup then once you install you need to download the proper drivers for your video card. Not too tough of a fix however!
I am attempting to do this tutorial, but I have a problem. Once I specify the partitions, I want to select sda5 (the boot partition) as the “Device for boot loader installation”, but in the drop-down menu, sda5 is not an option! I can choose any of the windows partitions (sda1-3), or sda6 (which is the root partition). What should I do?
Interesting.
If you are sure that /boot was created, what is the amount of disk space allocated to Windows?
@finid
I got it working, although it was a strange work-around. I think I essentially “tricked” the ubuntu installer into putting the boot partition on the list by first creating the boot partition (sda5), then creating the root partition (sda6), then deleting the boot partition and re-specifying it. That last step of deleting the boot partition and then re-specifying it ended up switching the names, so now my boot partition is sda6 and the root partition is sda5, even though the sda6 block is loacated BEFORE the sda5 block on the disk (verified by looking at the start/end values of my partition table). This little switcheroo tricked the drop-down menu into letting me select the boot partition (sda6) as the device for the boot loader installation. It works, and I am happily posting from my computer that will dual-boot windows7 or ubuntu12.04. Thanks!
This was immensely helpful. Thank you very much!
You are very welcome. If you have to do the same on a computer with 2 HDDs, take a look at this article.
Great tutorial. I usually let the installer do it’s own thing but this seems a much cleaner option. One question though. After selecting Ubuntu at the windows boot screen it then takes me to the Grub screen and I have to choose which one I want to boot into again. Is this correct?
Yes, but if you don’t like that, you can configure GRUB, so that you do not have to see the GRUB menu.
Thank you for the tutorial finid but I’m kind of stuck when trying to boot to Ubuntu. I can boot to Win7 with no problem but when I choose to boot to Ubuntu 12.04 I end up on the GRUB> prompt (not the menu). Where do I go from the GRUB prompt?
Follow the steps in this article. If that does not work, reinstall, but it should, if you do it right.
Thanks for the info greatly appreciated – was looking at complex UEFI BIOS issues and this simple solution was a great relief!
I tried following the steps in that link, but it doesn’t seem to apply. I end up with a grub> prompt, not a grub2>. An ls produces nothing that is shown in that article. Seems like I am getting grub installed, versus grub2. I specifically selected grub2 using EasyBCD.
On the Add New Entry tab of EasyBCD, select GRUB Legacy instead of GRUB 2. That should fix it. Don’t have an explanation, but that is what seems to work.
And should I specify a path, or allow it to find it automatically? I have gone thru re-installs many times now, so quite frustrated, lol! When I enter ls at the grub> prompt, I end up with what looks like stuff on my C: drive (users, Windows, Program Files, etc.). It doesn’t show any of the linux file systems (sda). I only have one drive in the system, and it is configured just like in your tutorial (ie. sda5/6/7).
Different, but still no succss! With Grub legacy, I have gone thru just about every combination of install point and whether to use EasyBCD’s version of Grub. Either get a very DOS looking screen indicating failure to load, or just a flashing cursor. One screen shot that would be useful is the View Settings, after you have added the new entry. Mine specifies C: as the Drive and bootloader path of \NST\AutoNeoGrub0.mbr. I noticed that a NST folder was created on my C drive at some point, but nothing in it is visible to windows.
Just an update on my lack of success. 😉 It looks like the machine is loading Grub, instead of Grub2. So if I try and debug grub issues using the steps outlined in the external link above, all the commands are not supported (ie. the command linux is not available in Grub, only in Grub2. I used the command kernel instead). Nevertheless, I was able to replicate their instructions, but it will still error out.
I am wondering if the problem is that I have UEFI BIOS on my GA-Z68X-UD3 motherboard? I read that Grub2 supports UEFI. I just can’t figure out why Grub2 isn’t being called, as it should be installed by Ubuntu.