Linux Mint 13 Cinnamon and Linux Mint 13 MATE are the latest editions of the popular Linux desktop distribution based on Ubuntu Desktop. This tutorial presents a step-by-step guide on how to dual-boot either one with Windows 7 on a computer with a single hard drive.
Because the Cinnamon and MATE editions of Linux Mint 13 share the same installation program, the steps involved are the same regardless of the edition you use. For this tutorial, a 32-bit installation image of the Cinnamon edition was used.
If your computer is running a self-installed copy of Windows 7, the default number of partitions will be just like the ones shown in the image below. Keep in mind that the partitions on an OEM (Original Equipment Manufacturer) installation could be different. For this tutorial, the operating assumption is that you computer is running a self-installed copy of Windows 7. Note: On your computer, make a mental note of the amount of free space on the C drive listed on this image. You will need the information during the installation of Linux Mint 13.

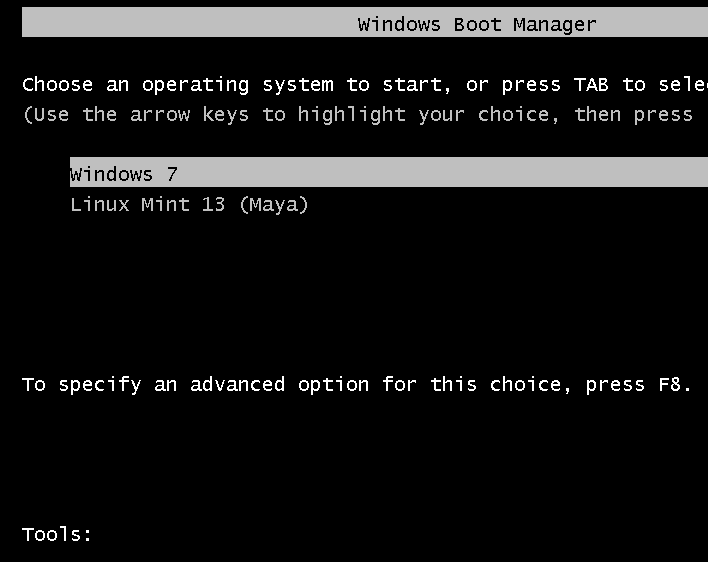
The objective here is to install Linux Mint 13 on the same hard drive, with GRUB, Linux Mint’s boot loader, installed in the boot partition (of Linux Mint), leaving Windows 7’s boot programs in the hard drive’s Master Boot Record (MBR) untouched. Then using another application to add an entry for Linux Mint 13 in Windows 7’s boot menu, so that at boot time, you will be able to choose which operating system to boot into. Selecting Windows 7 will cause the computer to boot into Windows 7 and selecting Linux Mint 13 will boot the system into your newly installed copy of Linux Mint 13, but not after a brief stop at Linux Mint’s boot menu.

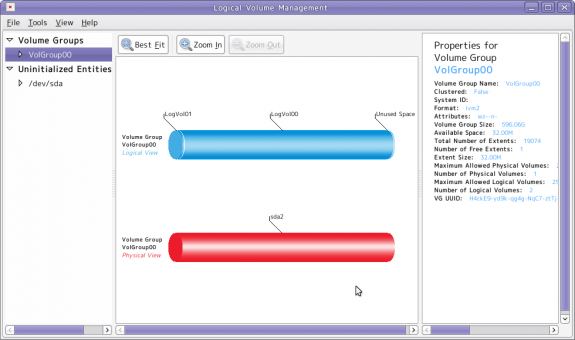
After creating partitions for and installing Linux Mint 13, the new partitions as seen from inside Windows 7 will look a lot different. This image shows the partitions from the computer used for this tutorial after the dual-boot operating has completed.

For this tutorial, the partitions that will be created for Linux Mint 13 are: a partition mounted at /boot; root partition mounted at /; a partition mounted at /home; and a Swap partition. You do not need to create all four, but that is what will be done for this tutorial.
What do you need to complete this tutorial? Just five items:
- This tutorial
- You, and an Internet-connected computer, needed to read this tutorial.
- An installation image of Linux Mint 13 (MATE or Cinnamon edition). You may download it from here. Burn the downloaded image to a DVD, or transfer it to a USB flash drive.
- The target computer running Windows 7 (Note: you may opt to reinstall Windows 7 anew)
- EasyBCD – a free software from NeoSmart Technologies that will be used to add an entry for Linux Mint 13 in Windows 7’s boot menu
Note: If you are not familiar with disk partitioning in Linux and how to dual-boot operating systems, it is highly recommended that you read guide to disks and disk partitions in Linux and tips for dual-booting Windows and Linux before continuing with the rest of this tutorial.
Now that we have a pretty good idea of what we need to accomplish, time to get it done. To start, boot the computer from the Linux Mint 13 DVD installation image that you made. Linux Mint 13 DVD is a Live DVD and by default, will boot into a Live desktop environment. Click on the installer’s icon on the desktop to start the installation process. When the installer starts, click through the first steps until you get to the one shown below. You definitely do not want to select the second option. Like the second option, selecting the first option will lead to an automatic partitioning of the free space needed to install Linux Mint 13.

Selecting the first option will actually bring you to this step, where you can see how the installer will resize the main Windows 7 partition (the C drive). The problem with selecting the first option, is that GRUB will be installed in the MBR of the hard drive, where it will overwrite Windows 7’s boot files. Since this is not what we want to do, the only option left, is the last option (Something else). So, if you are at this step, click the Back button.

Selecting Something else and clicking Continue will bring you to the Advanced Partitioning Tool. “Advanced” does not mean that the tool is really advanced, it just means that it is for people who know how to partition disks in Linux. If you read and understood the material discussed in guide to disks and disk partitions in Linux, consider yourself an advanced user.
The main window of Advanced Partitioning Tool is shown below. By default, the partitions listed at this step – sda1 and sda2, are the two Windows 7 partition that we saw on the first image on this page. In Windows’ parlance, sda2 is the C drive, while sda1 is the System Reserved partition.

The task here is to resize sda2, freeing up enough space that will be used to create the partitions for installing Linux Mint 13. To begin, select sda2 and click Change.

This is the resize window, also known as the Edit Partition window. The sda2 on the computer used for this tutorial has about 320 GB of disk space. How much of that disk space we can free up depends, of course, on what is available. This is where you have to be very careful.

The system used for this tutorial was a recent installation, so Windows 7 has only used about 7 GB. With that, I decided to allocate 100 GB to Windows. That amount is what should be shown in the New partition size field. And that is all you need to do here. Click OK.


Very great, worked perfectly fine. Thanks a bunch!
I may need to ask how to get back the windows boot option. I have done this before, and now with mint 13 in easy bcd if seems that I have done a mistake and the only boot options are linux mint kde(previouse installation after this tutorial) and cinnamon 13.
Can you point me to a tutorial where i can get back the windows 7 boot option?
If you can still boot into Windows, see this article.
The thing is that I can boot only in linux. Windows is still there, I can see the 2 partitions from it.
Do you have a Windows recovery CD?
Yes, in the end I have used the windows cd.
Thanks for reply, and for the tutorials.
I followed every letter to the word and it said that everything for mint was installed. But when i tried to start the computer by choosing mint, it went to C prompt ie C:\ and the mint wont load. please help.
If you seeing C:\, then the computer did not boot into Mint. You are in Windows, but a broken one, it seems.
If you choose Windows, are you able to into it?
I read through and followed the instructions, and after fumbling around with creating the partitions, installation went without a hitch. I am now the proud owner of a Windows 7/Linux Mint 13 dual-booting machine. It even picked up my Belkin F6D4050v1 USB network adapter right out of the chute and connected to my home network with absolutely no problems. So far package installation has been a snap. Thanks, guys.
Wow! All I have to say is this article is awesome!! I am now finally able to enjoy a dual boot laptop thanks to the author who laid out such a detailed explanation on how to configure your system. I had absolutely zero experience with partitions, but followed all the steps and everything worked out at the end! (The other guides that he recommended to read were excellent too). The only obstacle that I encountered was that I had to delete two unnecessary partitions that my HP laptop came with, (after burning the recovery disks), and then I merged the two unallocated spaces. Other than that, all went smoothly. Thank you sooo much, your help was greatly appreciated!! 🙂
Thank you.
Brilliant! I have never used Linux before. Was having endless problems trying to install Maya – this cleared up the whole process and dual booting works perfectly.
Thank you very much!
I have 3 partitions in my Win7 setup: System 100MB/Main HD C 454GB/Recovery 10GB
So I do the steps, free up 150GB for the linux install, create the first partition (/boot) with 500MB, and after that I see “Unusable”. I cannot create the next 3 partitions. Returning to Win& I see the free space and using win7 built in tool I restore to original state, NP.
What have I done wrong here? Thanks…
I think the problem is you had 3 existing primary partitions to start, and when you freed up 150GB for Mint, you created /boot as a primary partition, which gave you a total of 4 primary partition, the maximum allowed.
That is why the installer reported the rest of the space as unusable. The correct approach is to create /boot as a logical partition. Then, all the rest of the partitions you need to create will also be logical partitions, That should take care of the problem.
When completed, the partitions should be:
sda1 System partition
sda2 NTFS
sda3 Recovery partition
sda5 /boot
sda6 /
sda7 /home
sda8 Swap
This is assuming that you create 4 (logical) partitions for Mint. If you have not done so already, read guide to disks and disks partitions in Linux.
OK thanks, will do it that way. Must have missed the part about the 4 primary partition limit, and was going to do it the way suggested. Will now drop back to all logical drives. Thanks again!!
Posting this Thank You from my dual boot machine (booted to Mint just now…). Greatly appreciate you writing this and the support you gave me…
I had the same problem and went and read about partitions at that point – just made /boot a logical partition and it worked fine. Really great tutorial!
everything went well, except for a little hiccup at the partition part, since my computer came with 4 primary partitions by default, so it took me a while to figure that out and delete the unnecessary one…
good tutorial!
Amazing tutorial, finally learned how to dual-boot Linux.
Thanks!
You are very welcome.
This is a really good tutorial, thanks so much for taking the time to write it!
Thanks a lot for this tutorial. I followed it to the letter and had an easy and flawless install. 🙂
When I try to boot Mint I get
Try (hd0,0)NTFS5: No ang0
Try (hd0,1) EXT2:
And it stalls there.
What partitions do you have under Windows 7? And what file system did you use for the boot partition?
WIndows disk manager doesn’t detail the types of EXT partitions but there are 5:
477MB(boot)
46.57GB(root)
186.26GB(home)
9.31GB(swap)
262.45GB(unsure)
8GB(unsure)
It is a 2TB drive and I set them all up as EXT4 during the install, then I have my primary C: NTFS windows partition and my other E: HDD. What was the D: partition was the one I broke up for Mint.
I have 2 drives, primary is a 2TB drive, the other is an old drive I packrat on and it’s partitioning scheme is crazy because I use it for testing things. The primary has a 1.2TB NTFS partition I use for windows 7. The rest I formatted as EXT4 and partitioned as suggested in this article, difference being I allowed more space for home and root.
followed the instructions but linux mint 13 never loaded. I to the windows boot screen and then it went to the grub loader. Everything looked good it just didn’t load mint. Not sure what happened. Also after booting back in to windows 7 and then restarting. Windows 7 will not restart the pc anymore. You have to hit the power button and then restart the laptop. Any suggestions.
Not sure what the problem might be, but what’s your hardware specs – mobo, disk size, etc?
Have you checked the Linux Site and read the release notes? If you have a Broadcom mini wifi wireless card and are running wireless there is a cinflict with the Broadcom GL driver. I have a HP G61d28dx laptop and I have the same roblem. I still am working on a solution. That’s what I get for buying a cheap Laptop. I’m running Linux Mint 13 Cinnamon on my Dell desktop flawlessly.
Kevin N said:
“then it went to the grub loader. Everything looked good it just didn’t load mint. Not sure what happened.”
Not enough detail right here, in your explanation, for us to know what happened, either! For example,
Did you get the full grub2 menu, or just a black screen with some text from grub2, at the top? If the first, then something wrong with the grub2 installation. If the second, EasyBCD failed to generate a working Windows Boot Menu entry.
If ‘didn’t load Mint’ means you got as far as the seeing the Mint Desktop, but it froze there, then you may have a problem with graphic card incompatibility. This is likely the case if ‘didn’t load Mint’ applies in the same way, to what happened when running the ‘Live’ DVD installation.
If you never saw a fully-formed Grub2 menu after selecting the Mint entry, EasyBCD didn’t generate a correct Windows boot entry. Try selecting ‘Grub Legacy’ and do a manual selection of the partition containing the Mint boot.
If your installation is freezing — and it did the same with the ‘Live’ version — then Google for nomodeset, or (in my case it was) radeon.modeset=0, and do what you will see there.
I believe i’ve got the same issue as Kevin N, when i try to boot from the dvd disk, i get to a mint 13 countdown screen, saying that automatic startup will happen after 10 seconds, something like that. But after those 10 seconds the screen freezes and nothing more happens. I am booting from the disk to install mint 13 mate 64-bit
I had a very similar problem. I couldn’t boot the DVD so I did some investigating. My graphics card was causing the problem. When you boot from DVD when it get to the first screen hit any key. This will bring up a window, choose your language, then press f6, and use down arrow, and go down and put a check by “nomodeset”. exit that screen and go to Try without installing, click and see if it boots. If the DVD boot then you can get drivers etc. needed for your hardware. If you don’t install, you will have to do the “nomodeset”, each time you boot. Once you install you will only have to do it once. There is a grat deal of help at the Linux Mint Forums.
Hi, I have the same problem as Kevin N.
RonC, I will try to be a bit more specific. So basically after using EasyBCD to add a Linux Mint menu item to the Windows 7 boot menu (selecting GRUB 2), and then selecting that menu item in the boot menu after restarting the computer, we do not see the correct GRUB boot menu. Instead, this is what we see (or at least what I see):
____________________
GRUB4DOS 0.4.5b 2011-11-27, Mem: 630K/3177M/766M, End: 35560D
[ Minimal BASH-like line editing is supported. For the first word, TAB lists possible command completions. Anywhere else TAB lists the possible completions of a device/filename. ]
grub>
___________________
And that’s where I’m stuck. Why am I not seeing the correct GRUB 2 boot menu? Why am I seeing a grub command line interface instead? I tried using the “boot” and “kernel” commands, but obviously I don’t know enough to use this command line properly.
Please let us know what we can do next! I have an Asus Aspire 4750G. Could the wireless Broadcom issue Rick M mentioned really be causing this???
Thanks,
Jason
Same problem here. I have set up two other computers without problem but is having the same grub menu problem on a HP Pavilion p7-1109. Anyone else encountering this problem? Any way to solve this? Must be hardware coz I have no problem with the same setup with other computers.
Thanks in advance! Really appreciate any reply!
Hi Tyatt,
I just solved this problem – use the NeoGrub boot loader in EasyBCD instead of the Grub2 option. See my thread I used to solve this below:
http://forums.linuxmint.com/viewtopic.php?uid=90991&f=46&t=107533&start=0
I hope this works for you too!
Hey Jason,
i spent hours of experimenting till i found your comment.
Thanks for your hint at the NeoGrub boot loader.
This finally made Mint bootable within the Windows Boot Manager.
Hi B,
Glad that worked! It appears there are more than just a few of us with this issue. I would be curious, as I’m sure you guys would, to know why Grub2 won’t work for us. I’m guessing that after finid wrote his tutorial the Mint crew changed something which has since made his solution only workable for some folks.
Maybe finid could voice his ideas if he’s still around?
Cheers,
J
Yes, I’m still around ann the curious thing is, the latest tutorials that I wrote on the same subject worked, using GRUB 2. And that is the latest 3 tutorials that you can access from the main page.
I’ll try and repeat this tutorial under the same conditions to see what’s going on.
While I’ve installed linux on an old computer of mine many times (it wasn’t good enough for VirtualBOX) I never knew about EasyBCD. But I’m curious about something…
I’m eventually going to install Mint 13 Cinnamon on a second hard drive on this computer, what would I need to do in order for it to properly work? The second hard drive in question was just ordered and will arrive around Tuesday.
Would I need to put the grub boot loader into the new HDD and use EasyBCD to point to the drive? I’m not dual booting through partition so I don’t know if it’s the same or not.
If Windows is on the first HDD (sda) and the new HDD (sdb) is for Mint, then you do not need EasyBCD.
Just install GRUB in the MBR of sdb. After installation, change the BIOS boot order, so that sdb boots first.
Because an entry for Windows is created automatically in the GRUB menu, you can then choose what OS to boot into from there.
Thanks for the info!
This is a great tutorial similiar to the tutorial for Linux Mint 11, which I used for my install, I will now use this one for LM13 when Broadcom gets the firmware and driver update for the BM 43 wireless adapters. Installing these new firmware/Driver software would make a good tutorial, something for LinuxBSDos.cm to think about.
Keep up the good work, these are very helpful and make for a flawless install.
Wow! This is one of the best tutorials I have used.
It actually works. What I really liked is that this author is a natural born teacher. The other thing is he does not assume that one already knows basic information and not once talks down to the reader as so often happens. With information like this Linux would be a lot further down the road.
it