Managing users on Linux is one of the very first tasks that new users want to know how to accomplish. In Kubuntu 11.04, the graphical user management tool has all the features expected on such an application. For those new to Kubuntu, and who might need some hand-holding in creating and managing users, this article presents a step-by-guide.
The User Management tool is accessible from the System Settings, under the “System Administration” section. On a new installation, the only non-system account visible is the one created during installation. If you want to create a new account, say, for a guest or another member of your household, just click on the New button.

Unless you know what you are doing, the only information you need to specify here are the login and real names. The system defaults will suffice for the rest. By default, the account is enabled. Click on the Privileges and Groups tab.

Here is where you specify what privileges to associate with the new account. If the account is for a guest, someone you do not want to have administrative rights on the system, you definitely want to stick with the default privileges. To further restrict a guest account’s privileges, you might want to remove it from the lpadmin (printer management) and sambashare groups. Next task is to specify a password for this account.

Once a password is specified, you can configure it to expire at a future date. You would normally do that for a guest or temporary account. For a more permanent account, you might configure the password to age, requiring a new one to be configured before a certain date. Password-aging is one method of boosting the physical security profile of a computer.

Back to the User Management tool’s main window, the new account is listed. You may now test it just to ensure that it does not have access to system resources beyond what you configured for it.

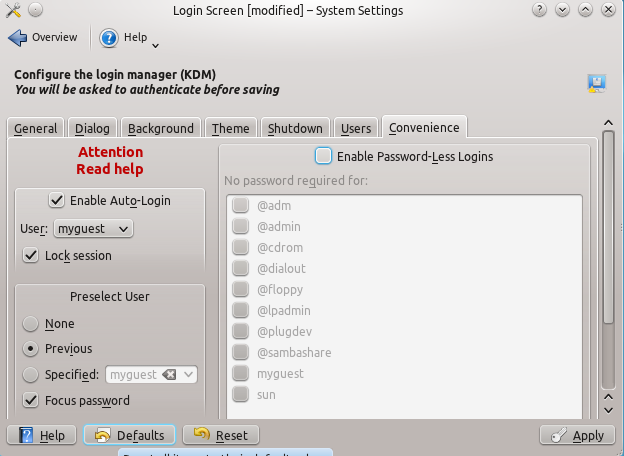
A convenience feature you might want to enable is automatic or auto-login. I do not encourage its usage, but there are situations where it makes sense to enable it. For example, at a non-profit group where I volunteer, I installed Linux Mint 10 on a computer for general use. The usage policy calls for access for all, and no personal data is to be stored. Rather than create an account for the dozens of potential users, I configured one account and enabled auto-login. Firefox, the browser installed, is configured to erase cookies and other session data on close.

You can have quality articles like this delivered automatically to your Feed Reader or Inbox by subscribing via RSS or email. This website now has a Question and Answer section. Use the commenting system for simple comments, but for more involved assistance, please use the Q & A section.